SCIM Client
Contents
- How does it work?
- Prerequisites
- Setup Trustelem Connect on a Windows machine
- Setup Trustelem Connect on a Linux machine
- Declare the SCIM server as a connector target
- Setup an application to provision through SCIM
- Force a synchronization
- Debug
How does it work?
The goal is to use the Trustelem to provision users and groups into an application that exposes a SCIM 2.0 API. The connector is what lets Trustelem reach a SCIM server that is only accessible from the customer's private network, but it can just as well forward to a SCIM server reachable from outside the network.
To do so, a connector, Trustelem Connect, is installed on a local customer server. Unlike the LDAP / Radius use case where Trustelem Connect receives requests, here Trustelem is the SCIM client: it builds the provisioning requests and Trustelem Connect forwards them to the SCIM server (typically one that lives on the private network, but any reachable SCIM server works).
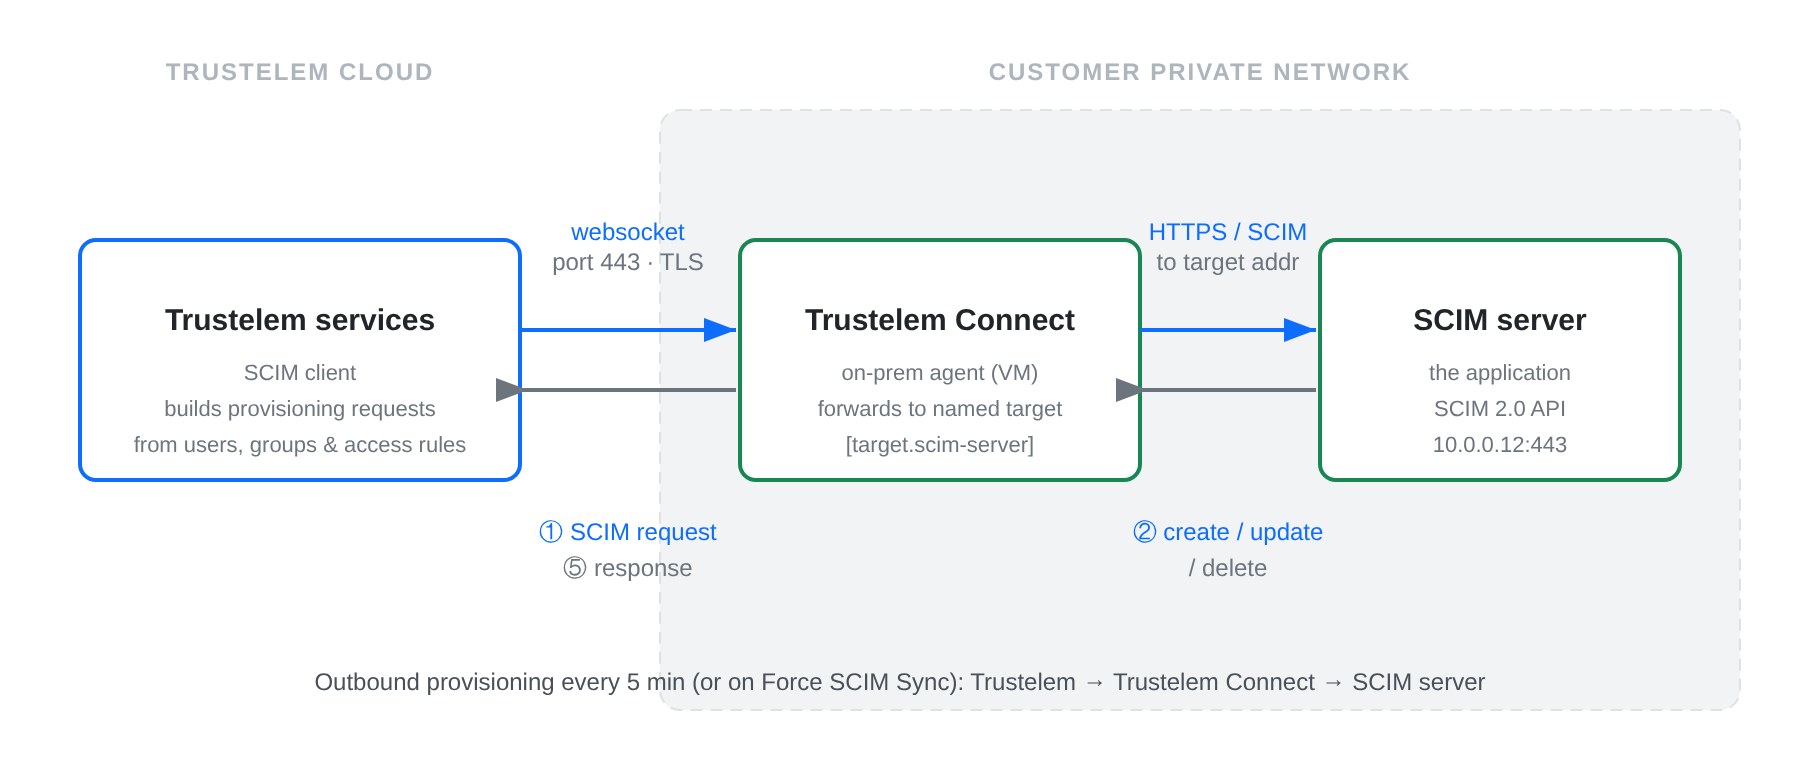
1/ During the setup, Trustelem Connect opens a websocket to Trustelem services using port 443.
Note: with the websocket, information is encrypted by TLS protocol and with an additional symmetric encryption.
On the local machine, Trustelem Connect is also configured with one or more targets. A target is a named destination (a host:port) that the agent is allowed to dial — here, your SCIM server.
For instance, I made the setup of Trustelem Connect and declared a target named scim-server pointing at 10.0.0.12:443
2/ On a regular schedule (every 5 minutes), or when an administrator clicks Force SCIM Sync, Trustelem computes the users and groups that should exist on the application, based on its access rules, and prepares the corresponding SCIM requests (create / update / delete).
3/ Trustelem sends each SCIM request to Trustelem Connect through the websocket, naming the target to use.
4/ Trustelem Connect opens the connection to the SCIM server (in TLS if the base URL is https://) and forwards the request to the address configured for that target.
Note: the generic agent only dials targets it has been explicitly configured with, so a request to an undeclared target is refused — it will never dial an arbitrary address.
5/ Trustelem Connect forwards the SCIM server's answer back to Trustelem through the websocket, and Trustelem records the result of the synchronization.
With the previous example:
- If a user gains a SCIM access-rule for the application, Trustelem creates (or updates) the user on the SCIM server.
- If a user loses the access-rule, Trustelem deletes (or deactivates) the user on the SCIM server.
Prerequisites
- Prepare a VM, Windows Server or Linux, with minimal resources for the OS
- If you already have a VM for Trustelem ADConnect or for a LDAP / Radius connector, you can use the same
- If you have only one VM which is down, the provisioning is down too..
- The recommendation is 2 VM at least, to have a failover system
- Download Trustelem Connect on the VM (.exe or .tgz depending of the OS)
- https://dl.trustelem.com/connect/
- the download buttons (Windows / Linux) are also available directly on the service page in your administration interface
- The flow from the VM to the SCIM server should be opened for the IP / port the SCIM API listens on
- usually tcp port 443 (https) or 8080
- The flow from the VM to the Trustelem production servers and relay (https://admin.trustelem.com) should be opened, on tcp port 443, towards the following IPs:
- Current production servers: 185.4.44.22, 185.4.46.20, 185.4.46.21, 185.4.46.22
- New production servers (replacement): 185.4.44.114, 185.4.44.117
- Relay endpoints: 98.66.169.89 (relay-fr-01.wallix.com), 20.39.241.157 (relay-fr-02.wallix.com)
- The SCIM credentials of the application (a bearer token, or a username / password for Basic authentication) and the base URL of its SCIM API
Setup TrustelemConnect on a Windows machine
In your Trustelem administration page:
-
Go to the Services tab.
-
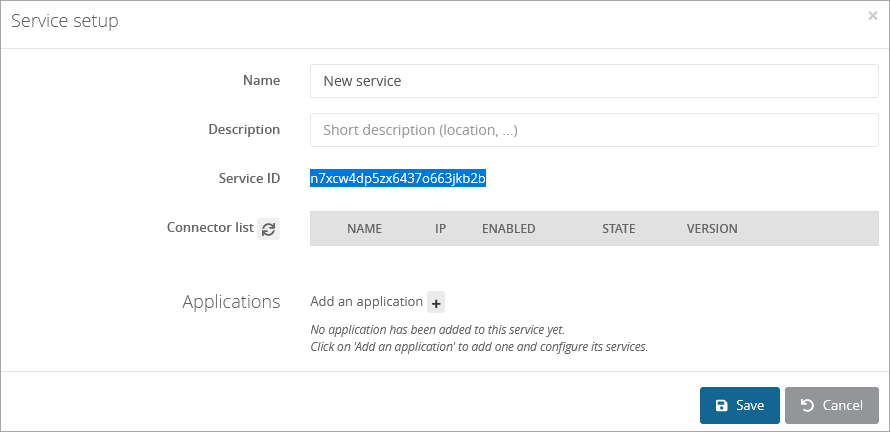
Click on the button + Create a service and copy the service ID.
On your server:
- Start the setup (Trustelem Connect.exe), and paste your service ID.
- If you have a proxy, complete the field HTTP Proxy with the value:
https://username:password@proxy_IP:proxy_port - Click on Validate the Configuration
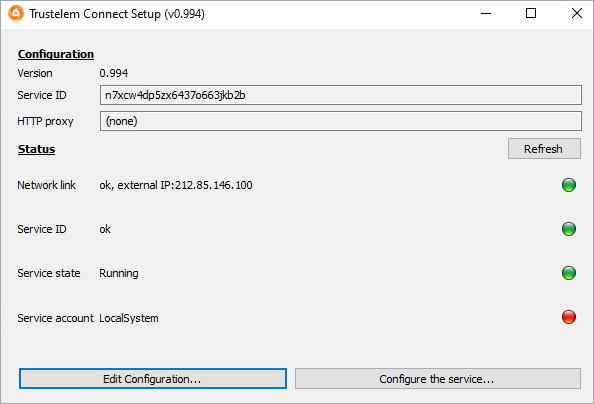
- Start the service.
In your Trustelem administration page
-
Refresh your Services page.
-
Turn on the service by clicking on No.
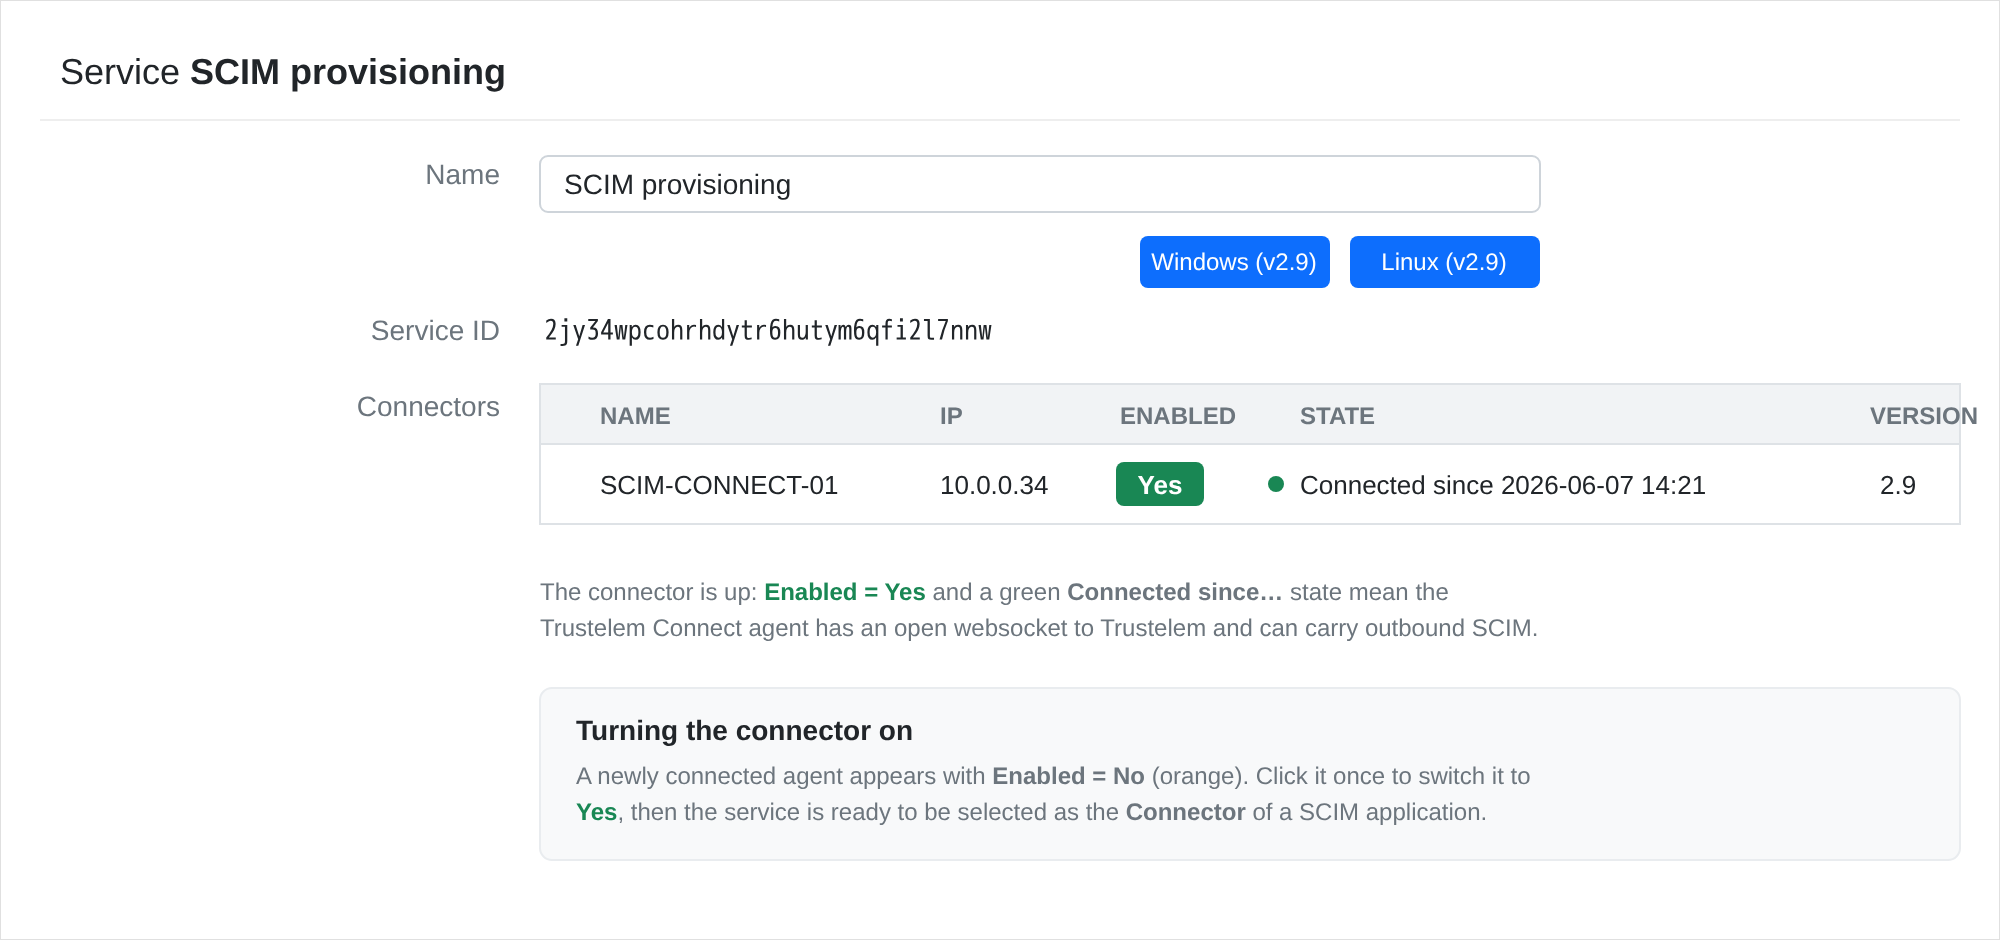
You now have a functional connector.
Setup Trustelem Connect on a Linux machine
In your Trustelem administration page:
-
Go to the Services tab.
-
Click on the button + Create a service and copy the service ID.
On your server:
- Install the connector as a service with the setup.sh script launch with root privilege.
- To complete the configuration, edit /opt/wallix/trustelem-connect/config.ini file containing the synchronization id.
- A sample minimal config.ini would be:
service_id = 2jy34wpcohrhdytr6hutym6qfi2l7nnw
state_dir = run/
# if there is a proxy
proxy = https://username:password@proxy_IP:proxy_port
- The run folder must have read write rights for the trustelem user.
- After that, you can start the service with: systemctl start trustelem-connect.service
- The service will run with the user trustelem
In your Trustelem administration page
-
Refresh your Services page.
-
Turn on the service by clicking on No.

You now have a functional connector.
Declare the SCIM server as a connector target
Outbound SCIM never dials the remote directly: Trustelem Connect forwards the request to a named target. You declare that target on the machine running the connector with the set-target command, then you reference it by name in the application setup.
On your server, from the Trustelem Connect folder:
connect set-target <name> <host:port>
With the previous example:
connect set-target scim-server 10.0.0.12:443
- <name> is a free label — you will type the exact same value in the application setup (field Connector target name).
- <host:port> is the address of the SCIM server as seen from the connector machine.
- The command writes a
[target.<name>]section in config.ini and enables outgoing connections; on Linux you can also edit config.ini directly:
outgoing_allowed = "true"
[target.scim-server]
addr = 10.0.0.12:443
- Useful options:
-
-always-tls/-no-tlsto force or disable TLS regardless of the base URL scheme -
-insecure-allow-skip-tls-checkto accept a self-signed certificate (must be combined with Skip TLS certificate check in the application setup) -
-overrideto clear an existing target before re-applying it
-
- Restart the service so the new target is advertised to Trustelem.
Setup an application to provision through SCIM
On your Trustelem administration page:
-
Go to the Apps tab.
-
Either open an existing application to add SCIM provisioning to it, or click on + Add an application to create a new one.
-
If you create a new application, choose either a pre-integrated application or a generic model depending on your need.
-
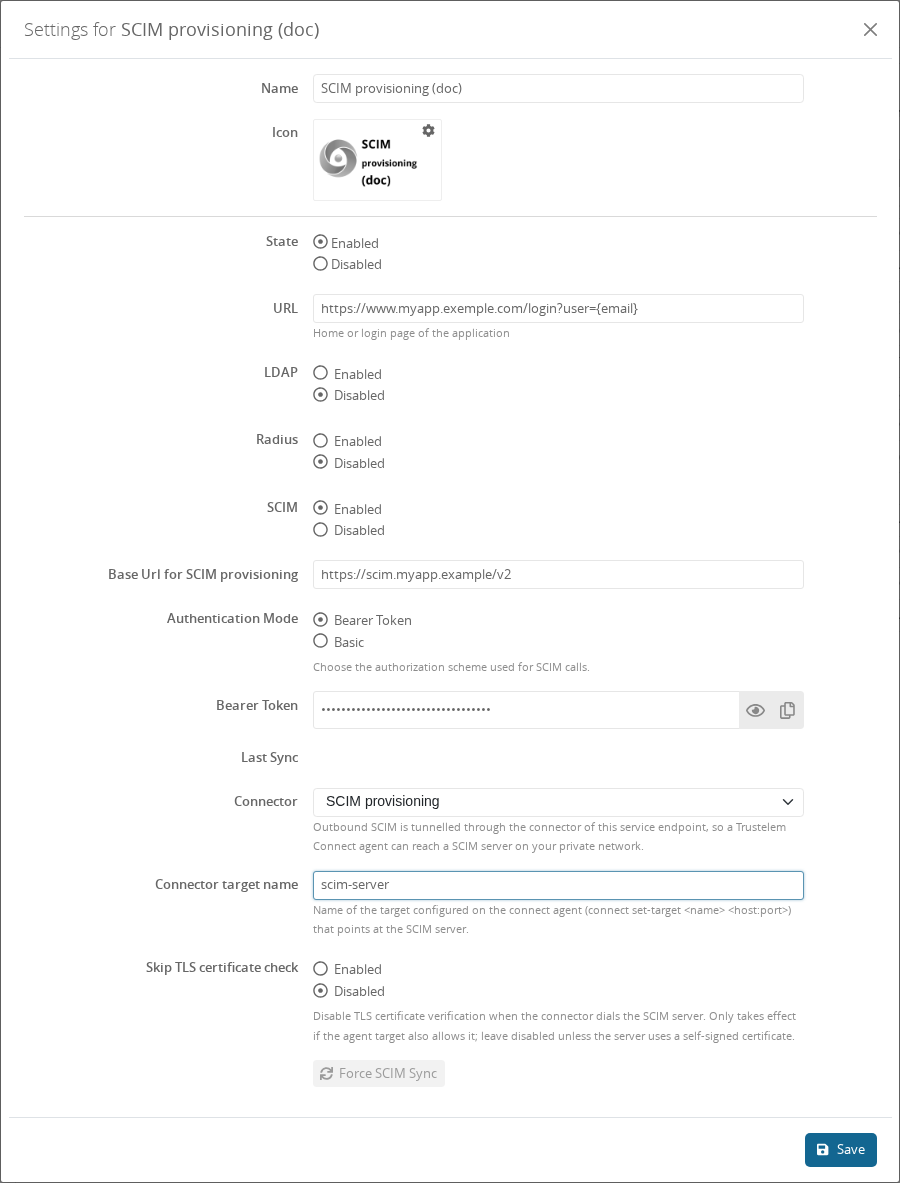
Turn on SCIM, then fill the SCIM section:
- Base Url for SCIM provisioning: the base URL of the application's SCIM 2.0 API (e.g.
https://scim.myapp.local/v2
). Its scheme decides whether the connector opens the connection in TLS. - Authentication Mode: Bearer Token or Basic
- For Bearer Token: paste the token in the Bearer Token field (the
Bearerprefix is added automatically if you omit it). - For Basic: fill Username and Password.
- Connector: select the service you created and turned on above. The outbound SCIM traffic is tunnelled through this connector.
- Connector target name: type the exact <name> you used with
connect set-target(e.g. scim-server). - Skip TLS certificate check: leave disabled unless the SCIM server uses a self-signed certificate. It only takes effect if the connector target was also declared with
-insecure-allow-skip-tls-check.
- Click on Save.
Of course, you need to create the access rules to define which users will be provisioned to the application
https://trustelem-doc.wallix.com/books/trustelem-administration/page/access-rules
Trustelem is now ready to provision users and groups to the application through Trustelem Connect.
Force a synchronization
By default, Trustelem pushes the SCIM updates every 5 minutes. To apply your configuration immediately:
- Open the application, in the SCIM section click on Force SCIM Sync.
- A full synchronization runs: Trustelem lists the resources already present on the SCIM server, reconciles them with the users and groups granted by the access rules, and applies the create / update / delete operations.
- The result is reported in the Last Sync field and, in case of error, as a message describing the most actionable cause (authentication failure, endpoint not found, no connector available, network error…).
Debug
The connector doesn't appear in the setup page on the admin page
- ping admin.trustelem.com on the machine running the connector to verify the outgoing flows
- verify the synchronization ID (service ID)
- verify the proxy setup
- if the VM is a Windows machine, verify that you clicked on Validate on Trustelem Connect program
The SCIM synchronization is not working
- Read the Last Sync message and your Trustelem Logs page:
-
no connector available → the service is not turned on, no agent is connected, or the connector does not advertise the configured target. Verify the service is On, that an agent is Connected, and that the Connector target name matches a
connect set-targetdeclared on the agent. - authentication failed (401) / forbidden (403) → check the Authentication Mode and the bearer token or username / password.
-
endpoint not found (404) → check the Base Url for SCIM provisioning (path and version, e.g.
/v2). -
network error → the connector cannot reach the SCIM server: check the target
host:port, the flow from the connector VM to the SCIM server, and the TLS settings.
-
no connector available → the service is not turned on, no agent is connected, or the connector does not advertise the configured target. Verify the service is On, that an agent is Connected, and that the Connector target name matches a
- If the SCIM server uses a self-signed certificate, declare the target with
-insecure-allow-skip-tls-checkand enable Skip TLS certificate check in the application; otherwise the TLS handshake fails. - Verify if the flow from the connector VM to the SCIM server is opened. If you have a doubt, use Wireshark on Windows or tcpdump on Linux on the connector machine.
/!\ tcpdump displays the flow received, before applying local firewall rules. So if you are on Linux and see the requests, you should verify if there is a local firewall.