# Trustelem applications
# Aha!
#### Configuration Aha!
- Log into your Aha! admin session, on Settings choose Account and go to the Security and single sign-on tab
- Choose SAML 2.0 as your identity provider and fill the following fields:
- Name
```exp
Trustelem
```
- Metadata URL
```exp
https://mydomain.trustelem.com/app/33XXXX/metadata
```
- Logout redirect URL
```exp
https://mydomain.trustelem.com/app/33XXXX/on_logout
```
#### Trustelem Configuration
- On Trustelem, write your Aha! custom domain in the corresponding field
*You can verify this value in the URLs displayed on Aha! SAML page : `https://accountname.aha.io`... )*
# Airbrake
#### Airbrake Configuration
- Log into your Airbrake admin session, go to Account & Billing and go to the Security tab
- Click on Enable SAML and fill the following field:
SAML/IdP Metadata URL
```exp
https://mydomain.trustelem.com/app/33XXXX/metadata
```
#### Trustelem Configuration
- On Trustelem, write your Airbrake subdomain name in the corresponding field
# Apimo
#### Activate SSO for APIMO
- Send an email to [support@apiwork.com](mailto:support@apiwork.com?subject=Trustelem%20SSO%20setup%20for%20my%20Apimo%20subscription) with the following contents (adapt it to your actual requirements):
```exp
Please enable Trustelem for my Apimo subscription (https://mydomain.apimo.pro/homepage).
My base Trustelem URL for Apimo is https://mydomain.trustelem.com/app/93XXX
Modification should be applied on [put your desired date here] at [hour].
```
- Await support confirmation.
#### Setup Trustelem groups
Apimo requires the users' agency and profile.
Use the following procedure so as to make Trustelem transmit these attributes:
- Create a group for each one of your agencies in your directory
- Synchronize these groups with Trustelem and rename them "Organization/Agency\_name" using the "groups" tab in your admin dashboard
- Create a group for each one of your profiles in your directory
- Synchronize these groups with Trustelem and rename them "Profile/Profile\_name" using the "groups" tab in your admin dashboard
**Notes:**
- A user can only be in a single **Organization** group and a single **Profile** group.
- The "Agency\_name" and "Profile\_name" have to match those in Apimo.
- If you can't use directory groups, you can create them in Trustelem instead.
# AppDynamics
#### AppDynamics Configuration
- Log into your AppDynamics admin session, go to Administration and then to the Authentication Providers tab
- Select the SAML option and fill the following fields:
- Login URL
```exp
https://mydomain.trustelem.com/app/33XXXX/sso
```
- Logout URL
```exp
https://mydomain.trustelem.com/app/33XXXX/on_logout
```
- Identity Provider Certificate
```exp
https://mydomain.trustelem.com/app/33XXXX/metadata
```
- Username Attribute
```exp
username
```
- Display Name Attribute
```exp
displayname
```
- Email Attribute
```exp
email
```
- By default the username will be the user email but you can change that in Custom scripting ; if you want username to be firstname.lastname for example add these two lines:
```ts
function CustomSAMLResponse(msg: SAMLResponse, user: User, groups: Groups, deny: Deny): void {
msg.setAttr("username", user.firstname+"."+user.lastname);
}
```
- You can also define AppDynamics roles according to attributes sent by Trustelem in SAML Group Mappings
- In SAML Group Attribute Name write 'groups'
- In Group Attribute Value, check the Multiple Nested Group Values option
- In Mapping of Group to Roles add Trustelem groups to which you want to match AppDynamics roles
#### Trustelem Configuration
- On Trustelem, write your AppDynamics name account in the corresponding field. You can find your name account on your AppDynamics url which looks like `https://[name-account].saas.appdynamics.com/`
- To send your users' Trustelem groups, add these lines in Custom scripting:
```ts
function CustomSAMLResponse(msg: SAMLResponse, user: User, groups: Groups, deny: Deny): void {
for (let g in groups) {
msg.addAttr("groups", groups[g].name);
};
}
```
# Arcgis
#### ArcGIS Configuration
- Log into your admin session on ArcGIS, then go on Organization, Settings and then Security
- In Login, set up a SAML login with the One Identity Provider option and fill the following fields:
- Name:
```exp
Trustelem
```
- Your users will be able to join:
```exp
Automatically
```
*A Trustelem authenticated user but unknown by ArcGIS will be created thanks to its SAML attributs*
- Download the metadata file and in File put the file you have downloaded
- In the advanced settings:
- Disable Encrypt assertion, Enable signed request, Propagate logout to Identity Provider
- Enable Update profiles on sign in if you want your ArcGIS users updated with the received SAML attributes
- Put the following Logout URL:
```exp
https://mydomain.trustelem.com/app/225XXX/on_logout
```
- Leave the default Entity ID value
#### Trustelem Configuration
- Replace domain-name by your **ArcGIS domain name** in the **EntityID** and **Assertion Consumer Service** Trustelem fields
# AssetSonar
#### AssetSonar Configuration
- Log into your AssetSonar admin session, go to Add Ons and then to the SAML Integration tab
- Click on Enable and fill the following fields:
- Identity Provider URL
```exp
https://mydomain.trustelem.com/app/33XXXX
```
- Identity Provider Certificate
```exp
$cert = "MIIDXXX...XXXNTYw=="
```
- Identity Provider Certificate
```exp
https://mydomain.trustelem.com/app/33XXXX/metadata
```
- Login Button Text
```exp
Trustelem
```
- Clock Drift (seconds)
```exp
0
```
- First Name
```exp
firstname
```
- Last Name
```exp
lastname
```
- Email
```exp
email
```
- By checking Only authenticate members that are already added to your AssetSonar account you don't allow the creation of AssetSonar accounts when new users login for the first time
#### Trustelem Configuration
- On Trustelem, write your **AssetSonar company name** in the corresponding field. Its value can be found in your AssetSonar url : `https://[company-name].assetsonar.com//`
# Automox
#### Automox Configuration
- Log into your Automox admin session, go to Settings and then go to the Security tab
- On the SAML option, click on Enable and fill the following fields:
- Entity ID
```exp
https://mydomain.trustelem.com/app/33XXXX
```
- x509
```exp
$cert = "MIIDXXX...XXXNTYw=="
```
- Login URL
```exp
https://mydomain.trustelem.com/app/33XXXX/sso
```
- Logout URL
```exp
https://mydomain.trustelem.com/app/33XXXX/on_logout
```
- By checking (Optional) Provision New users you allow the creation of a new Automox account when a user login through SSO for the first time
#### Trustelem Configuration
- On Automox, copy the link given in Automox ACS URL and paste it in the corresponding field on Trustelem
# AWS
#### AWS Configuration
- Open an root session on [https://signin.aws.amazon.com](https://signin.aws.amazon.com)
- Click on Services and under the Security, Identity & Compliance tab, click on IAM
- Click on Identity Providers and then click on Create a provider
- In Provider type choose SAML
- Enter the provider name and upload the metadata
- Finalize the creation by clicking on Next step and End
- Go on the Roles tab and click on Create role
- Select SAML 2.0 federation
- Choose the SAML provider, check Allow programmatic and AWS Management Console access
- On the forth step, choose the role name and click on create
#### Trustelem Configuration
- Go back on Settings for AWS on Trustelem and copy the AWS account ID in Subscription ID
- On the same page write the identity provider name
#### Role Configuration
- The code below allow to assign roles to users. As so, to assign roles you need to edit the script in the app settings and return the wished roles
```ts
function getRoles(user: User, groups: Groups): string[] {
return ["Role1", "Role2"];
}
```
#### Information
- AWS returns two attributes:
```exp
https://aws.amazon.com/SAML/Attributes/Role with value ARN role, ARN Provider
```
```exp
https://aws.amazon.com/SAML/Attributes/RoleSessionName with value user.email
```
# BambooHR
#### BambooHR Configuration
- Log into your BambooHR admin session and in the setting go to the Apps tab
- Download the SAML Single Sign-On application, click on Settings and fill the following parameters:
- SSO Login URL
```exp
https://mydomain.trustelem.com/app/33XXXX/sso
```
- x.509 Certificate
```exp
$cert = "MIIDXXX...XXXNTYw=="
```
#### Trustelem Configuration
- On Trustelem, fill Organization Name with your BambooHR organization name
# Blissbook
#### Blissbook Configuration
- Log into your Blissbook admin session and go to Organization and then to Account Settings
- In Authentication, edit Via Single Sign-On and chose the SAML 2.0 option
- Fill the following fields:
- Button Text
```exp
Trustelem
```
- SSO Endpoint
```exp
https://mydomain.trustelem.com/app/33XXXX/sso
```
- Unique Employee Identifier
```exp
Email Address
```
- X.509 Certificates
```exp
$cert = "MIIDXXX...XXXNTYw=="
```
#### Trustelem Configuration
- On Trustelem, fill Organization name with your Blissbook company name
# BlogIn
#### BlogIn Configuration
- Log into your BlogIn admin session, go to Settings and to the User Authentication tab
- Go to the Single Sign-On section and click on Configure SSO & User Provisioning
- Enable Single Sign-On and fill the following fields:
- Name (Optional)
```exp
Trustelem
```
- Metadata URL
```exp
https://mydomain.trustelem.com/app/33XXXX/metadata
```
#### Trustelem Configuration
- On Trustelem, write your **BlogIn domain name** in the corresponding field.
It can be found in your BlogIn URL `https://[domain-name].blogin.co/`
# Bonusly
#### Bonusly Configuration
- Log into you Bonusly admin session and go to Integrations
- Choose SAML, click on edit, check Simply provide your IdP Metadata URL & Issuer, we'll do the rest and fill the following fields:
- IdP Metadata URL
```exp
https://mydomain.trustelem.com/app/33XXXX/metadata
```
- IdP Issuer (Entity ID)
```exp
https://mydomain.trustelem.com/app/33XXXX
```
#### Trustelem Configuration
- On Bonusly, copy the value given in App ID and paste it in the corresponding field on Trustelem
# Boond Manager
BoondManager automatically connects users if login on Trustelem and BoondManager are equal.
You can force authentication through Trustelem - preventing users from signing in with their BoondManager password:
- Display the Resources List
- Select the target user
- Click on Configuration button, on the upper-right corner
- Select Security tab
- Check option Enable exclusive authentication from a trusted third party
- Save
# Box
- Download your metadata file and send it to [support@box.com](mailto:support@box.com?subject=Trustelem%20SSO%20setup%20for%20my%20Box%20subscription%22).
*The metadata file can be found in the Trustelem setup page of your application.*
- Await confirmation from support.
# Breezy
#### Breezy Configuration
- Log into your Breezy admin session, go to Recruiting Preferences and then to Integrations
- Choose the SAML module in the Single Sign-On Section
- Download Trustelem metadata and upload them in the SAML Metadata File section
#### Trustelem Configuration
- On Trustelem, write your Breezy company name on the corresponding field. If in doubt, this value can be found in the given URL on the SAML SSO Settings page : `https://app.breezy.hr/api/auth/saml/company/[your-company-name]`
# Bugsnag
#### Bugsnag Configuraiton
- Log into your Bugsnag admin session and go to Organization settings
- Click on Single Sign-On and fill the following field:
- SAML/IdP Metadata URL
```exp
https://mydomain.trustelem.com/app/33XXXX/metadata
```
- You can check Auto-provision collaborators if you wish collaborators to automatically join your organization when they log in through SSO
- You can also check Force your team to log in via your SSO provider to prevent authentication with login and password, but this option is available only once an administrator logged in through SSO
#### Trustelem Configuration
- On Trustelem, write the name of your Bugsnag organization in the corresponding field
# CakeHR
#### CakeHR Configuration
- Log into your CakeHR admin session and go to Settings, Integrations and then SAML SSO
- Fill the following fields:
- Entity ID:
```exp
cake.hr
```
- Authentication URL
```exp
https://mydomain.trustelem.com/app/33XXXX/sso
```
- Key fingerprint (hash)
- Download the application certificate and get its fingerprint by opening a terminal and entering the following command with replacing the file name with the certificate's one:
```exp
openssl x509 -noout -fingerprint -sha256 -inform pem -in file-name.pem
```
- Copy the fingerprint and paste it in CakeHR but erase all the ':' present in the fingerprint
#### Trustelem Configuration
- On Trustelem, fill **Company name** with your CakeHR company name
# Ci-book
- Send an email to [support@dserv.de](mailto:support@dserv.de?subject=Trustelem%20SSO%20setup%20for%20my%20Ci-book%20subscription) with the following contents (adapt it to your actual requirements):
```exp
Please enable Trustelem for my ci-book subscription (https://sub-domain.ci-book.com).
My Trustelem OAuth URLs for ci-book are:
- https://mydomain.trustelem.com/app/166XXX/auth
- https://mydomain.trustelem.com/app/166XXX/token
- https://mydomain.trustelem.com/app/166XXX/resource
Users should be forced to sign-in through Trustelem from [put the appropriate date here].
In the meantime, please keep the standard login form together with Trustelem sign-in process.
```
- Await support confirmation.
# CoderPad
#### Configuration CoderPad
- Log into your CoderPad admin session and in your organization, go to Team Settings
- In the Single Sign-On (SSO), click on configure SSO settings
- Download the metadata and import them in Automatic import
- You can also customize your CoderPad subdomain and then use this link to log in using SSO
# ConnectWise Control
#### ConnectWise Configuration
- Log into your admin session on ControlWise Control
- Go on the Administration panel, then go in Security and Enable SAML
- Click on Configure and fill the following fields:
- IdentityProviderMetadataUrl
```exp
https://mydomain.trustelem.com/app/33XXXX/metadata
```
- UserNameAttributeKey
```exp
NameID
```
- UserDisplayNameAttributeKey
```exp
displayname
```
- EmailAttributeKey
```exp
email
```
- RoleNamesAttributeKey
```exp
role
```
- DisplayName
- The value written here will complete the Connect with displayed on the ConnectWise authentication page
#### Trustelem Configuration
- Click on Save Configuration and then on Generate Metadata
- In the metadata, on the first line, copy the link located in entityID=" "
- On Trustelem, cut the link in the EntityID field
- Fill the Roles fields with one or several roles separated by commas; these roles with be applied by default to all users
- You can overload the roles with the Advanced setting's script, for example:
```ts
function CustomSAMLResponse(msg: SAMLResponse, user: User, groups: Groups, deny: Deny): void {
for (const cust_group in groups) {
if (cust_group === "admin") {
msg.addAttr("role", "Control Administrator");
}
}
}
```
# Coralogix
#### Coralogix Configuration
- Log into your Coralogix admin session and go to Settings and to the Configure SAML tab
- Activate the SAML, download Trustelem metadata and upload them on Coralogix
#### Trustelem Configuration
- On Trustelem, write your Coralogix team name on the corresponding field
# Corporama
- Send an email to [support@corporama.com](mailto:support@corporama.com?subject=Trustelem%20SSO%20setup%20for%20my%20Corporama%20subscription) with the following information:
```exp
ClientID: trustelem.oauth2.gmyXXX
ClientSecret: zokzH[...]DRY
https://mydomain.dev.tlm.io/app/12XXX/auth
https://mydomain.dev.tlm.io/app/12XXX/token
https://mydomain.trustelem.com/app/12XXX/resource
```
- Await confirmation from support.
- Enter your Corporama account name. It is used to generate the URLs:
- Redirect\_URI → `https://corporama.com/oauth2/nom_de_compte`
- Login → `https://corporama.com/login/sso/nom_de_compte`
*If you have a doubt, you can ask your account name to Corporama in the previous email.*
# Datadog
#### Datadog Configuration
- Log into your Datadog admin session and in the bottom left corner, go to Configure SAML
- Download Trustelem metadata and import them in Datadog
- To allow the automatic creation of new accounts when users log in for the first time you need to verify a domain name associated to users emails in Just-In-Time Provisioning
#### Notes
- In the Additional features, check Identity Provider Initiated Login
- By checking SAML Strict Mode, users will have to log in through SSO
#### Trustelem Configuration
- Copy the Single Sign-on URL given in Datadog and paste into the corresponding field on Trustelem
# Demo OIDC
#### Demo App configuration
- Click on the button below to automatically setup an instance on the Demo App
- It uses the following data:
- ClientID: trustelem.oidc.gvrwgzdc
- ClientSecret: f7O6M0P26EMg5oQVR9h4GZxWW2S01XYD
- OIDCProviderMetadataURL: `https://mydomain.trustelem.com/app/33XXXX/.well-known/openid-configuration`
#### Trustelem configuration
- Setup the Scopes:
- Scopes are the user attributes that will be sent to the application
- If the field is left blank, all default Scopes will be allowed
- If you want to customize Scopes, enter at least the Scope email
- The Demo app displays both current and previous login information to see the impact of different Scopes
#### You're done!
- You can now login to the application, using the user's dashboard or through the following URL: `https://demo.trustelem.com/gvrXXXXXXXXXXXwgzdc/auth`
# Digital Recruiters
#### Configuration
- Send an email to [support@digitalrecruiters.com](mailto:support@digitalrecruiters.com?subject=Trustelem%20SSO%20setup%20for%20my%20Digital%20Recruiters%20subscription) with the file Trustelem metadata.
- Await confirmation from support.
- In Trustelem application, replace **{domain}** by your Digital Recruiters domain.
- In Trustelem application, replace **{slug}** by your Digital Recruiters company ID.
- *If you have a doubt, you can ask a confirmation of their values in the previous email.*
#### Note
- If you want to add/change users' attribute(s), you have to use **Custom scripting**.
# Dropbox
- Open an administrator session on [https://www.dropbox.com/team/admin/settings/sso](https://www.dropbox.com/team/admin/settings/sso)
- In section **Single sign-on**, select **Optional** or **Required**
- Enter the 2 following parameters:
- Sign-in URL:
```exp
https://mydomain.trustelem.com/app/19XXX/sso
```
- Sign-out URL:
```exp
https://mydomain.trustelem.com/app/19XXX/on_logout
```
- Import **Trustelem certificate** (*available on the setup page of your Trustelem application*)
- Click on **Apply changes**
# Envoy
#### Envoy Configuration
- Log into your admin session and go to Integrations
- Install the SAML application and click on Configure
- Then fill the following fields:
- Fingerprint
```exp
54:F2:E3:07:43:28:B4:DA:C9:C5:0C:4F:1E:11:01:66:80:BB:XXXX
this fingerprint can be found on the application documentation on Trustelem admin.
```
- Identity Provider HTTP SAML URL
```exp
https://mydomain.trustelem.com/app/3XXXXX/sso
```
# F5 Big-Ip
#### Supported Features
The integration currently supports the following features:
- SAML
- Radius
#### Configuration du VPN Big-Ip (SAML)
Before we start, we consider that the Standard Network Configuration of Big-Ip has already been done, please be sure to have a functional VPN
**Note:** For a Web Portal authentication the VPN config must include the **Full Webtop** Mode
First of all, in the Trustelem app settings, enable the authentication method you want to use
#### Configuration de Big-Ip
- In the main tab, click on Access > Federation > SAML Service Provider > Local SP Services
- Click on Create
- Give a name to your Service Provider, in the Entity ID field put your Virtual Server's external IP
- Click on Ok
- In the main tab, click on Access > Federation > SAML Service Provider > External IdP Connectors
- Download the metadata
- Click on the arrow on the right of Create and select From Metadata
- Click on Browse, select the previously downloaded metadata file and give a name to your IdP
- Click on Ok
- In the main tab, click on Access > Federation > SAML Service Provider > Local SP Services
- Select the existing SP and click on Bind/Unbind IdP Connectors
- Click on Add New Row, in the SAML IdP Connectors drop-down, click on the previously created entry
- Click on Update, then click on Ok
- In the main tab, click on Access > Profiles/Policies > Access Profiles (Per-Session Policies)
- click on Edit, on your VPN access policy row
- A diagram appears, delete the Logon Page and Advanced Resource Assign steps with x then Delete button
- Click on the + between Start and Allow and in the Authentication tab, select SAML Auth and click on Add Item
- In the AAA Server Drop-down list, select the SAML SP you created previously and click on save
- Between SAML Auth and Allow, click on + and in the Assignment tab, add the Advanced Resource Assign item
- Click on Add Entry then Add/Delete. In Network Access and Webtop tabs, respectively select your VPN Network Access and Webtop then click on Update
- On the Big-Ip page header, click on Apply Access Policy
#### Trustelem Configuration
- In the Entity ID field, put your Virtual Server public IP address
#### Big-Ip VPN Configuration (RADIUS)
Before we start, we consider that the Standard Network Configuration of Big-Ip has already been done, please be sure to have a functional VPN
Note: For a Web Portal authentication the VPN config must include the Full Webtop Mode
First of all, in the Trustelem app settings, enable the authentication method you want to use
#### Trustelem Configuration
- Go on the Service tab and be sure that you have a correctly configured TrustelemConnect connector
- Define a secret then copy it
#### Big-Ip Configuration
- In the main tab click on Access > Authentication > Radius
- click on Create
- Give a name to your server, in Mode select Authentication and select Direct in Server Connection
- In the Server Address field, put the IP address of the server on which is running TrustelemConnect and put 1812 in the Port field
- In the Secret and Confirm Secret fields, paste the Secret you copied beforehand
- Next to Character Set select Utf-8 then click on Finished
- In the main tab, click on Access > Profiles/Policies > Access Profiles (Per-Session Policies)
- click on Edit, on your VPN access policy row
- Click on the + between Logon Page and Advanced Resource Assign then in the Authentication tab, select RADIUS Auth
- Click on Add Item then select your freshly created AAA Server. click on Save
- On the Big-Ip page header, click on Apply Access Policy
# Facebook Workplace
- Sign in to your Facebook Workplace subscription with an admin account
- Click on Company Dashboard and go to Parameters > Authentication
- Select « Allow users to login via : SAML only »
- Choose your preferred session duration options
- Enter the 3 following parameters:
- SAML URL
```exp
https://mydomain.trustelem.com/app/3XXXXX/sso
```
- SAML Issuer URI
```exp
https://mydomain.trustelem.com/app/3XXXXX
```
- SAML certificate
```exp
$cert = "MIIDXXX...XXXNTYw=="
```
- Configure Trustelem by setting the ACS URL and Audience URL parameters, accessible through the Hide setup instruction bottom-right button of this panel
- Click on Test SSO
- Once the test is OK, click on Save
# Freshdesk
- Open an administrator session on `https://sub-domain.freshdesk.com/`
- Click on **Admin** in the top menu
- In section **General Settings**, click on **Security**
- Turn on **Single Sign On (SSO)**
- Select **SAML SSO**
- Enter the 3 following parameters:
- SAML Login URL:
```exp
https://mydomain.trustelem.com/app/124XXX/sso
```
- Logout URL:
```exp
https://mydomain.trustelem.com/app/124XXX/on_logout
```
- Security Certificate Fingerprint (*available in the setup page of your Trustelem application --> Display setup instructions*)
- Enter user(s) of your choice in field **Send notifications** to of section **Admin Notifications**
- Save
# GitHub
#### GitHub Configuration
- Log into GitHub with the session of the owner of the organization, then go into the organization settings and into Organization Security
- Click on Enable SAML authentication and fill the following fields:
- Sign on URL
```exp
https://mydomain.trustelem.com/app/33XXXX/sso
```
- Issuer
```exp
https://mydomain.trustelem.com/app/33XXXX
```
- Public certificate
```exp
$cert = "MIIDXXX...XXXNTYw=="
```
#### Trustelem Configuration
- On Trustelem, fill the Organization Name field with your GitHub organization's name
- On GitHub you can click on Test SAML Configuration and then on Save
#### Information
- Single sign-on in GitHub authenticates to a specific organization in GitHub and does not replace the authentication of GitHub itself. Therefore, if the user's github.com session has expired, you may be asked to authenticate with GitHub's ID/password during the single sign-on process
- By using SSO, a user could automatically join the GitHub organization even if not invited previously
- To sum up, on GitHub SSO allows to access an organization easily but does not replace the manual authentication of the user
# GlassFrog
#### GlassFrog Configuration
- Log into your GlassFrog admin account and go to Organization Settings and to the SAML Settings tab
- Download the application metadata and import them in Configure using by choosing Metadata File
- You can then choose to manually create GlassFrog accounts or to automatically create them
- You can also force SSO login or let it be optional
- Once done, click on Enable
#### Trustelem Configuration
- Copy the given Issuer on GlassFrog and paste it in the Issuer field on Trustelem
# Google
- Open a session as an administrator on [https://admin.google.com](https://admin.google.com)
- Click on « **Security** » (may be hidden under « Other commands »)
- Click on « **Setup Single Sign-On (SSO)** »
- Check « **Setup SSO with third party identity provider** »
- Enter the 3 following parameters:
- Sign-in page URL:
```exp
https://mydomain.trustelem.com/app/17XXX/sso
```
- Sign-out page URL:
```exp
https://mydomain.trustelem.com/app/17XXX/slo
```
- Change password URL:
```exp
https://mydomain.trustelem.com/#security
```
- Download the **security certificate** from Trustelem and upload it in the Google set up page
- Don't use a domain specific issuer
- Don't use a network mask, unless for testing
# Harness
#### Harness Configuration
- Log into your Harness admin session, go to Access Management in Security and then click on Authentication Settings
- Click on Add SSO Providers, choose SAML and fill the following fields:
- Display Name
```exp
Trustelem
```
- Group Attribute Name
```exp
email
```
- Download Trustelem metadata and upload them in Upload a new SAML Metadata File
#### Trustelem Configuration
- On Harness, copy the link given at the top of the SAML configuration tab and paste it on the Assertion Consumer Service URL field on Trustelem
# ITBoost
#### ITBoost Configuration
- Log into your admin session on ITBoost
- In the settings, go to Advanced Settings and then click on Login Method
- In the Enforce login field, select SSO and fill the following fields:
- IDP ID
```exp
Other
```
- Entity ID
```exp
https://mydomain.trustelem.com/app/33XXXX
```
- Certificate
```exp
$cert = "MIIDXXX...XXXNTYw=="
```
- Login URL
```exp
https://mydomain.trustelem.com/app/33XXXX/sso
```
- Logout URL
```exp
https://mydomain.trustelem.com/app/33XXXX/on_logout
```
#### Trustelem Configuration
- On Trustelem, fill the Domain name field by writing the name of your domain
# Join.me
- Send an email to [domain-verification@LogMeIn.com](mailto:domain-verification@LogMeIn.com?subject=Trustelem%20SSO%20setup%20for%20my%20join.me%20subscription%20-%20Domain%20verification) for initiating a domain verification request.
- Download your metadata file and send it to [domain-verification@LogMeIn.com](mailto:domain-verification@LogMeIn.com?subject=Trustelem%20SSO%20setup%20for%20my%20join.me%20subscription%20-%20Metadata)
*The metadata file can be found in the Trustelem setup page of your application.*
- Await confirmation from support.
# KnowledgeOwl
#### KnowledgeOwl Configuration
- Log into your KnowledgeOwl admin session and in Settings, click on Security
- In the SAML SSO Integration section, click on Enable SSO and fill the following fields:
- IdP entityID
```exp
https://mydomain.trustelem.com/app/33XXXX
```
- IdP Login URL
```exp
https://mydomain.trustelem.com/app/33XXXX/sso
```
- IdP Logout URL
```exp
https://mydomain.trustelem.com/app/33XXXX/on_logout
```
- Click on Map SAML Attributes and fill the following fields:
- Username / Email
```exp
email
```
- First Name
```exp
firstname
```
- Last Name
```exp
lastname
```
- If needed, you can map other attributes and send them with the advanced settings script on Trustelem, for example:
```ts
function CustomSAMLResponse(msg: SAMLResponse, user: User, groups: Groups, deny: Deny): void {
msg.setAttr("username", user.firstname+"."+user.lastname);
}
```
- Download the Trustelem certificate and import it by clicking on Upload IdP Certificate
- In Advanced Option, check the second option, Issue a remote logout request using the IdP logout URL when a reader logs out
- You can restrict access to SSO by checking Restrict Access to SSO
#### Trustelem Configuration
- On Trustelem, write your KnowledgeOwn base in the corresponding field
# Leapsome
#### Leapsome Configuration
- Log into your Leapsome admin session and go to Admin Settings
- Go to the Single Sign On (SSO) tab and click on Enable SAML-based single sign-on
- Then fill the following fields:
- SSO Login URL (supplied by identity provider)
```exp
https://mydomain.trustelem.com/app/33XXXX/sso
```
- Certificate (supplied by identity provider)
```exp
$cert = "MIIDXXX...XXXNTYw=="
```
#### Trustelem Configuration
- Then copy the URL given in Reply URL (receives response from your identity provider) and paste it in the corresponding field on Trustelem
# Lockself
#### Introduction
- Lockself use SAML 2.0 to federate identities.
- In SAML terminology, there is a client application which is called Service Provider (SP) and an identity provider (IdP), here Trustelem.
#### Application configuration elements, on the SP side
- Definition of the pages where SSO authentication is enabled (LoginPath)
- Definition of the SAML URL for the SP side: Assertion Consumer Service (ACS)
- Definition of the identifier attribute (NameID) and its format
- Definition of the IdP (Trustelem) connection URLs
- Definition of the certificate(s) used for encryption and/or the signature of SAML content.
*Note: these configuration data can be requested in metadata.xml format.*
#### Application configuration elements, on the IdP side
- **EntityID:** application identifier → must be identical to what was indicated on the SP side
- **Assertion Consumer Service (ACS):** URL on the SP side for receiving SAML assertions generated by the IdP → must be identical to what was indicated on the SP side
- **NameID Attribute:** name of the attribute containing the user's identity in the SAML response provided by the IdP Trustelem to the SP application → must be identical to what was indicated on the SP side
- **NameID Format:** format of the NameID attribute. Except in special cases, use the default value → must be identical to what was indicated on the SP side
- **Attributes List:** additional attributes that can be embedded by the IdP into the SAML responses, and used by the application on the SP side
- **RelayState:** URL of the page to which the user should be redirected after authentication
- **Custom login URL:** URL used to initialize login via SAML 2.0 in the Trustelem user's dashboard
- **Custom scripting:** script to add/modify attributes in the SAML responses (example: attribute from the Active Directory)
# Mod Auth Mellon
#### Configuration
- Download the Trustelem metadata file.
- Install mod\_auth\_mellon for Apache Linux (for example **apt install libapache2-mod-auth-mellon** for Ubuntu/Debian). This mod may require activation.
- Execute [the script to create Mellon's data](https://raw.githubusercontent.com/UNINETT/mod_auth_mellon/master/mellon_create_metadata.sh). It will create 3 files: key/certificate/metadata, required by Mellon.
- In the metadata file generated previously (.xml), add after the line <AssertionConsumerService...>:
```exp
urn:oasis:names:tc:SAML:1.1:nameid-format:emailAddress
```
*NameIDFormat" has to be adapted if you use a different one in Trustelem and Mellon.*
- Put the 4 previous files (key/certificate/metadata Mellon + metadata Trustelem) in a folder accessible for the Web Server (for example **/etc/apache2/mellon**).
- Complete the settings file of you Web Server (in the Apache folder **sites-available**).
*The following example has to be adapted, it was made for a source folder at the root (/) and with the hostname* ***localhost***.
```exp
Require valid-user
AuthType "Mellon"
MellonEnable "auth"
MellonDefaultLoginPath "/"
MellonEndpointPath "/endpoint"
MellonSPentityId "https://localhost"
# Files generated by the script:
MellonSPPrivateKeyFile "/etc/apache2/mellon/https_localhost.key"
MellonSPCertFile "/etc/apache2/mellon/https_localhost.cert"
MellonSPMetadataFile "/etc/apache2/mellon/https_localhost.xml"
# Metadata Trustelem:
MellonIdPMetadataFile "/etc/apache2/mellon/metadata-125021.xml"
```
- Set up Trustelem with the following parameters:
**- EntityID**: put the value of MellonSPentityId defined in the configuration above
**- AssertionConsumerService**: put the combination **`https://[hostname]/[MellonEndpointPath]/postResponse`**
*With the previous example, the ACS would be: `https://localhost/endpoint/postResponse`*
#### Notes
- The attributes sent by Trustelem are made available by Mellon under the designation **MELLON\_ATTRIBUTE=attribute** (they can be found in PHP under $\_SERVER).
- The name of the attributes can be changed by adding in the location part, the directive: **MellonSetEnvNoPrefix "NAME\_ATTRIBUTE" "attribute"**.
# Mod Auth OpenIDC
#### Configuration
- Install mod\_auth\_openidc for Apache: [https://github.com/zmartzone/mod\_auth\_openidc/](https://github.com/zmartzone/mod_auth_openidc/)
*Use* ***apt install libapache2-mod-auth-openidc*** *for a Debian system.*
- Load the module in Apache via httpd.conf:
```exp
LoadModule auth_openidc_module modules/mod_auth_openidc.so
```
*Use* ***a2enmod mod\_auth\_openidc*** *and restart Apache for Debian*
- Complete Apache's httpd.conf file.
*The following example requires customization according to your context.*
```exp
# Server setup
ServerName myapplication.tld
# ... your particular directives ...
# OpenID Connect setup
OIDCProviderMetadataURL https://mydomain.trustelem.com/app/146XXX/.well-known/openid-configuration
OIDCClientID trustelem.oidc.XXXXXXXXX
OIDCClientSecret XXXXXXXX
OIDCRedirectURI https://myapplication.tld/redirect_uri
OIDCCryptoPassphrase XXXXXXXX
OIDCScope "openid"
AuthType openid-connect
Require valid-user
# Specific session cookie durations (seconds)
OIDCSessionInactivityTimeout 300
OIDCSessionMaxDuration 36000
```
The **OIDCCryptoPassphrase** parameter is used in particular for encrypting user session cookies.
- For logging out users from inside the application, you have to associate a logout URL to an HTML element like a button or a link. This URL is defined by the redirect\_uri with a ***logout=*** parameter and the post-logout URL in a URL-encoded format.
*For example, the logout URL could be:* ***`https://myapplication.tld/redirect_uri?logout=https%3A%2F%2Fmyapplication.tld`***
- Setup Trustelem with the following parameters:
**- RedirectURI:** this URL is defined in the web server configuration (see httpd.conf).
*With the previous example, the RedirectURI would be:* ***`https://myapplication.tld/redirect_uri`***
**- Login URL:** the application's URL starting the OIDC flow. It is used as a target for the application on the Trustelem user's dashboard.
*With the previous example, the URL would be:* ***`https://myapplication.tld/sso-login`***
**- PostLogoutRedirectURI:** the URL that indicates where to go after a logout. It is usually defined in the logout HTML element of your application.
*With the previous logout example, the PostLogout URL would be:* ***`https://myapplication.tld`***
#### Notes
- The attributes sent by Trustelem are provided to the application under the designation **$\_SERVER\["OIDC\_CLAIM\_nom"\]**, where the name is defined in the Trustelem-hosted script in the field called **custom claims**.
*For example, if you add the following custom claim, you will find the user firstname into the variable* ***$\_SERVER\["OIDC\_CLAIM\_attr1"\]***:\*
```ts
claims["attr1"] = user.firstname;
```
- If the user authenticated with mod\_auth\_openidc doesn't exist in the application, we recommend to create the user using the attributes sent by Trustelem.
This auto-provisioning system enables the implementation of internal rights management based on attributes sent by Trustelem.
This completes access control policies defined in Trustelem.
# Moodle
Moodle uses plugins to manage OpenID Connect authentication.
#### Download and Install
- Download the plugin here.
- To install the plugin, follow instructions in the README.md file in the root folder of the archive.
- After installation, ensure the plugin files have the correct permissions :
```bash
chown -R www-data:www-data oidc/
```
#### Configuration
- To configure the plugin, from the Moodle Administration block, go to "Site Administration > Plugins > Authentication > Manage Authentication"
- Click the icon to enable the plugin, then visit the settings page to configure the plugin
- Fill the following fields: {{customValue('tokenURL')}}
```exp
Provider Name : leave empty or set the name of your choice
Client ID : trustelem.oidc.gvsgcy3e
Client Secret : PMlrIbFW6goMduZkPdaJj8yv99nbT33W{{customValue('tokenURL')}}
Authorization Endpoint : https://mydomain.trustelem.com/app/383693/auth
Token Endpoint https://mydomain.trustelem.com/app/383693/token
Resource https://mydomain.trustelem.com/app/383693/userinfo
Scope : openid profile email
```
* We recommend to activate the following option:
* Force redirect. You can use the "?noredirect=1" URL param if your configuration is not working
* Setup Trustelem with the following parameters:
* Your Moodle server URL
* Login URL: the application's URL starting the OIDC flow. It is used as a target to the application on the Trustelem user's dashboard.
The URL may be : https://yourmoodledomain/
#### Optional configuration
* You can add the following code in the setClaims function of the "custom claims" section of trustelem application configuration to use user email instead of his identifier as username in Moodle application.
```ts
claims["sub"] = user.email
```
# Nextcloud
- Login as an administrator to your Nexcloud instance at **`https://nextcloud.domain.com`**
- Enable the "**SSO & SAML authentication**" app
- Go to your SAML settings at **`https://nextcloud.domain.com/settings/admin/saml`**
#### Settings
- Attribute to map the UID to:
```exp
email
```
- Do not enable option "**Only allow authentication if an account is existent on some other backend. (e.g. LDAP)**"
#### Identity provider Data
- Identifier of the IdP entity:
```exp
https://mydomain.trustelem.com/app/166XXX
```
- URL Target of the IdP where the SP will send the Authentication Request Message
```exp
https://mydomain.trustelem.com/app/166XXX/sso
```
#### Optional identity provider settings
- URL Location of the IdP where the SP will send the SLO Request
```exp
https://mydomain.trustelem.com/app/166XXX/slo
```
- Certificate (*available in the setup page of your Trustelem application*)
#### Attribute mapping
- Use: ***displayname*** and ***email***
#### Security settings / Signatures and encryption required
- Enable the following options:
- "Indicates a requirement for the samlp:Response, samlp:LogoutRequest and samlp:LogoutResponse elements received by this SP to be signed"
- "Indicates a requirement for the saml:Assertion elements received by this SP to be signed"
# OAuth 2
#### Introduction
These settings allow you to connect Trustelem with any OAuth 2.0 compliant implementation.
Before you start the configuration make sure to have access to the OAuth 2.0 settings of the client application.
#### Configuration
- **ClientID**
This value is used identify your application. Use it as the clientID setting of your application.
```exp
trustelem.oauth2.gi4dXXXX
```
- **ClientSecret**
This value authenticate your application on Trustelem, a secure random value is proposed by default. Use it as the clientSecret setting of your application.
```exp
ZeRQXFTVaIJ3qqKuXXXXXXXXXXXXXXX
```
- **RedirectURI**
List of authorized callback addresses that Trustelem will redirect users to. Enter the value(s) prescribed by your client application.
- **Login URL (optional)**
This URL is used to provide a direct link to your client application on the Trustelem user dashboard. Enter here the starting point of the OAuthauthorization flow of your client application.
- **Authorize endpoint**
This value is a read-only value given by Trustelem. Use it as the authorizationURL in your application settings.
```exp
https://mydomain.trustelem.com/app/62XXX/auth
```
- **Token endpoint**
This value is a read-only value given by Trustelem. Use it as the grantURL in your application settings.
```exp
https://mydomain.trustelem.com/app/62XXX/token
```
- **Resource endpoint**
Use this service (GET), with the OAuth access\_token as HTTP header and with the required scope so as to get corresponding values.
```exp
https://mydomain.trustelem.com/app/62XXXresource
```
Authentication header:
```exp
Authorization: Bearer < access_token >
```
Available scopes are:
- **email**
- **given\_name**
- **family\_name**
- **organization**
- **phone**
- **groups**
# Office 365
#### Introduction
- Office 365 does not expose any web interface for setting up Single Sign-On, you must issue a few Powershell commands.
- The following command require a Windows computer with Powershell ≥ 5.0 installed.
#### Setup Powershell environment
- Start Powershell as administrator and enter the following command:
```powershell
Install-Module MSOnline
```
#### Connect to Azure AD
- In Powershell, enter the following command and enter your Office 365 administrator credentials:
```powershell
connect-msolservice
```
#### Change Office federation settings
- Issue the following command to load the certificate:
```powershell
$cert = "MIIDXXX...XXXZWCxicZzKAgV"
```
*The contents of the certificat is available on the setup page of your Trustelem application*
- Choose a federation brand name for your organization, for instance:
```powershell
$FederationBrandName = "mydomain.com"
```
- Execute the following commands (adapt the **DomainName**, the **URLs** and keep the backquotes characters **`** ):
```powershell
Set-MsolDomainAuthentication -DomainName mydomain.com -Authentication managed
Set-MsolDomainAuthentication -DomainName mydomain.com `
-FederationBrandName $FederationBrandName `
-Authentication Federated `
-PassiveLogOnUri https://mydomain.trustelem.com/app/34XXX/sso `
-SigningCertificate $cert `
-IssuerUri https://mydomain.trustelem.com/app/34XXX/mydomain.com `
-LogOffUri https://mydomain.trustelem.com/app/34XXX/slo `
-PreferredAuthenticationProtocol SAMLP
```
### Note for Azure AD users
⚠️**Using an external IdP like Trustelem (via SAML) to federate Azure AD / Office 365 for users that exist only in the cloud leads to several critical issues and is strongly discouraged:**
- **Azure passwords no longer work — authentication is fully offloaded to the IdP.**
- **Users can't be created directly with federated domains — PowerShell is required.**
- **Each user needs a manually set onPremisesImmutableId via PowerShell.**
- **No automated provisioning, and more complex support.**
The consequences are the following:
- After this setup, your Azure users will not have the possibility to use their Azure AD password anymore : they have to use a Trustelem password instead.
Go to your Azure AD directory on Trustelem > Enabled **Use Trustelem as password source**
- If the synchronized users only exist on an Azure which is not linked to an AD, then you'll need to verify if they have an **onPremisesImmutableId**. You also need to add this attribute to Trustelem:
Go to your Azure AD directory on Trustelem > tick **Advanced options** > enter **onPremisesImmutableId** in **Custom attributes**
Powershell script example to add onPremisesImmutableId to existing users:
```sh
# Install the Microsoft Graph PowerShell module
Install-Module Microsoft.Graph -Scope CurrentUser
# Connect to Microsoft Graph with the necessary scopes
Connect-MgGraph -Scopes "User.ReadWrite.All", "Directory.AccessAsUser.All"
# Replace with your temporary fallback domain (e.g., yourdomain.onmicrosoft.com)
$tmpUPN = "yourdomain.onmicrosoft.com"
# Retrieve all users who don't have an OnPremisesImmutableId set
$users = Get-MgUser -All | Where-Object { -not $_.OnPremisesImmutableId }
foreach ($user in $users) {
$currentUPN = $user.UserPrincipalName
$initialDomain = $currentUPN.Split("@")[1]
$newUPN = $currentUPN.Replace("@$initialDomain", "@$tmpUPN")
# Temporarily change UPN to a domain that allows ImmutableId update
Update-MgUser -UserId $user.Id -UserPrincipalName $newUPN
# Generate a new unique ImmutableId (Base64-encoded GUID)
$newImmutableId = [System.Convert]::ToBase64String([Guid]::NewGuid().ToByteArray())
# Assign the ImmutableId to the user
Update-MgUser -UserId $user.Id -OnPremisesImmutableId $newImmutableId
# Revert UPN back to the original domain
Update-MgUser -UserId $user.Id -UserPrincipalName $currentUPN
}
# List users who still don't have an ImmutableId (if any)
$usersWithoutImmutableId = Get-MgUser -All | Where-Object { -not $_.OnPremisesImmutableId } | Select-Object UserPrincipalName
Write-Output "Users without OnPremisesImmutableId:"
$usersWithoutImmutableId.UserPrincipalName
```
Powershell script example to create a new user with onPremisesImmutableId:
```sh
Connect-MgGraph -Scopes "User.ReadWrite.All", "Directory.AccessAsUser.All"
# Password profile as plain hashtable
$passwordProfile = @{
Password = "TemporaryPassword123!"
ForceChangePasswordNextSignIn = $true
}
# Build full user creation parameters in a hashtable (sûr et lisible)
$params = @{
DisplayName = "Peter Doe"
GivenName = "Peter"
Surname = "Doe"
UserPrincipalName = "peter.doe@your_domain.onmicrosoft.com"
MailNickname = "peterdoe"
PasswordProfile = $passwordProfile
AccountEnabled = $true
}
# Create user
$newUser = New-MgUser @params
# If created, assign ImmutableId and switch UPN
if ($newUser -and $newUser.Id) {
$immutableId = [System.Convert]::ToBase64String([Guid]::NewGuid().ToByteArray())
Update-MgUser -UserId $newUser.Id -OnPremisesImmutableId $immutableId
Update-MgUser -UserId $newUser.Id -UserPrincipalName "peter.doe@your_federated_domain.fr"
} else {
Write-Error "User creation failed. Aborting further operations."
}
Disconnect-MgGraph
```
# Olfeo SaaS
- Go to your **Olfeo saas** subscription
- In **Configuration** > **Directory**, make sure you have added a directory via Active Directory or Azure AD
- See the [Olfeo startup guide](https://doc.saas.olfeo.eu/fr/guide-de-d%C3%A9marrage.html)
- Note the attribute used as the user identifier: userPrincipalName, sAMAccountName, or email
- Edit your directory, then click **Authentication**.
- Choose the **SAML** authentication method
- Copy the **Entity Identifier** value into the **EntityID** field of the Trustelem application
- Copy the **Response URL** value into the **Assertion Consumer Service** field of the Trustelem application
- Copy the **Connection URL** value into the specific **login URL** field of the Trustelem application
- In the field **NameID Attribute** of the Trustelem application, enter the value corresponding of the user identifier noted earlier
- Download the **Trustelem metadata file**
- In Olfeo saas, import the content of the downloaded file into the Supplier Metadata field
# OpenID Connect
#### Introduction
Trustelem supports authorization code and implicit flows, as well as the [OpenID Connect Discovery 1.1](https://openid.net/specs/openid-connect-discovery-1_0.html) standard.
#### If your application support the discovery standard
You need to configure the application with the following settings:
- **ClientID**
```exp
trustelem.oidc.gi2dXXXX
```
- **ClientSecret**
```exp
kmzHGEKEKFH51r0xXXXXXXXXXXXXX
```
- **Issuer**
```exp
https://mydomain.trustelem.com/app/150XXX
```
- **Metadata URL** (if required)
```exp
https://mydomain.trustelem.com/app/150XXX/.well-known/openid-configuration
```
#### If your application does not support the discovery standard
Additional parameters are necessary:
- **Authorize endpoint**
```exp
https://mydomain.trustelem.com/app/150XXX/auth
```
- **Token endpoint**
```exp
https://mydomain.trustelem.com/app/150XXX/token
```
- **User Info endpoint**
```exp
https://mydomain.trustelem.com/app/150XXX/userinfo
```
- **JWKS**
```exp
{"keys":[{"kty":"RSA","use":"sig","kid":"150XXX","alg":"RS256","n":"XXX...XXX","e":"AQAB"}]}
```
#### Note
- **RedirectURI:** this URL has to be the same as the one defined in the application.
*For example, the URL could be:* ***`https://myapplication.tld/redirect_uri`***
- **Login URL:** the application's URL starting the OpenID Connect flow. It is used as a target to the application on the Trustelem user's dashboard.
*For example, the URL could be:* ***`https://myapplication.tld/sso-login`***
- For logging out users from inside the application, you have to associate a logout URL to an HTML element like a button or a link.
This URL is defined by the redirect\_uri with a ***logout=*** parameter and the post-logout URL in a URL-encoded format.
*For example, the logout URL could be:* ***`https://myapplication.tld/redirect_uri?logout=https%3A%2F%2Fmyapplication.tld`***
- **PostLogoutRedirectURI:** the URL that indicates where to go after a logout. It is usually defined in the logout HTML element of your application.
*With the previous logout example, the PostLogout URL would be:* ***`https://myapplication.tld`***
# OpenVPN
#### OpenVPN Configuration
- Before starting, please be sure to have a functional VPN
*Note: Please be sure to have a TrustelemConnect app correctly configured*
- Install the openvpn-auth-ldap package on the vpn machine by running the apt install openvpn-auth-ldap command
- Copy the file that was created /usr/share/doc/openvpn-auth-ldap/examples/auth-ldap.conf this way /etc/openvpn/auth/ldap.conf
- Setup a custom LDAP service account as well as a custom LDAP password on the trustelem app settings (optional)
- Copy the field's content below into the ldap.conf file you just copied and change the Bind DN line with the required information
```exp
# URL of the server where TrustelemConnect is running
URL ldap://address:port
# Bind DN
BindDN cn=trustelem,DC=mydomain,DC=trustelem,DC=com
# Bind password
Password xNc3x8T0hFtKKpQq
# Network timeout (in seconds)
Timeout 30
# Enable Start TLS
TLSEnable no
# Follow LDAP Referrals (anonymously)
FollowReferrals yes
# TLS CA Certificate File
TLSCACertFile /usr/local/etc/ssl/ca.pem
# TLS CA Certificate Directory
TLSCACertDir /etc/ssl/certs
# Client Certificate and key
# If TLS client authentication is required
TLSCertFile /usr/local/etc/ssl/client-cert.pem
TLSKeyFile /usr/local/etc/ssl/client-key.pem
# Cipher Suite
# The defaults are usually fine here
# TLSCipherSuite ALL:!ADH:@STRENGTH
# Base DN
BaseDN DC=mydomain,DC=trustelem,DC=com
# User Search Filter
SearchFilter "(mail=%u)"
# Require Group Membership
RequireGroup false
# Add non-group members to a PF table (disabled)
#PFTable ips_vpn_users
# Uncomment and set to true to support OpenVPN Challenge/Response
#PasswordIsCR false
```
- Add the line plugin /usr/lib/openvpn/openvpn-auth-ldap.so /etc/openvpn/auth/ldap.conf to your server config file
- Restart your OpenVPN server
#### OpenVPN configuration
Before starting, please be sure to have a functional VPN
Note: Please be sure to have a TrustelemConnect app correctly configured
- On the administrator dashboard, under the authentication category click on general and turn on radius
- At the bottom of the page click on Save
- On the administrator dashboard, under the authentication category click on radius
- Select PAP authentication method, in the host field enter the address of the server where your TrustelemConnect app is running
- Enter your secret in the Shared Secret field as well as the port in the Authentication Port field (often 1812)
#### OpenVPN configuration
Before starting, please be sure to have a functional VPN
- On the administrator dashboard, under the settings category click on user authentication
- Click on edit, select saml and click on the configure button
- Copy the Issuer Name value in the Entity ID field on the trustelem configuration page
- On the next page select IdP Metadata XML and copy the metadata.xml content into the planned empty field
- Click on next then finish
#### Trustelem configuration
In the trustelem Login URL field enter:
- The same value of the EntityID field in order to show an help application to configure OpenVPN on the user dashboard
- Or '-' in order to hide the OpenVPN app from the user dashboard
# Opsgenie
#### Opsgenie Configuration
- Log into your Opsgenie admin session and in Settings go to Login and SSO
- If you're using Atlassian login siwtch to Opsgenie login
- Go to the SAML tab and fill the following fields:
- SAML 2.0 Endpoint:
```exp
https://mydomain.trustelem.com/app/33XXXX/sso
```
- SLO Endpoint (optional):
```exp
https://mydomain.trustelem.com/app/33XXXX/on_logout
```
- X.509 Certificate:
```exp
$cert = "MIIDXXX...XXXNTYw=="
```
- You can also check Provision new users on the first login automatically if you want new users to have their accounts automatically created on Opsgenie at their first login through SSO
#### Trustelem Configuration
- On Opsgenie copy the link in the Identifier field and paste it in the corresponding field on Trustelem
- On Opsgenie copy the link in the SAML 2.0 Service URL field and paste it in the corresponding field on Trustelem
# OwnCloud
#### Introduction
- OwnCloud use SAML 2.0 to federate identities.
- In SAML terminology, there is a client application which is called Service Provider (SP) and an identity provider (IdP), here Trustelem.
**Nota:** For more details about OwnCloud setup, contact us
#### Application configuration elements, on the SP side
- Definition of the pages where SSO authentication is enabled (LoginPath)
- Definition of the SAML URL for the SP side: Assertion Consumer Service (ACS)
- Definition of the identifier attribute (NameID) and its format
- Definition of the IdP (Trustelem) connection URLs
- Definition of the certificate(s) used for encryption and/or the signature of SAML content.
*Note: these configuration data can be requested in metadata.xml format.*
#### Application configuration elements, on the IdP side
- **EntityID:** application identifier → must be identical to what was indicated on the SP side
- **Assertion Consumer Service (ACS):** URL on the SP side for receiving SAML assertions generated by the IdP → must be identical to what was indicated on the SP side
- **NameID Attribute:** name of the attribute containing the user's identity in the SAML response provided by the IdP Trustelem to the SP application → must be identical to what was indicated on the SP side
- **NameID Format:** format of the NameID attribute. Except in special cases, use the default value → must be identical to what was indicated on the SP side
- **Attributes List:** additional attributes that can be embedded by the IdP into the SAML responses, and used by the application on the SP side
- **RelayState:** URL of the page to which the user should be redirected after authentication
- **Custom login URL:** URL used to initialize login via SAML 2.0 in the Trustelem user's dashboard
- **Custom scripting:** script to add/modify attributes in the SAML responses (example: attribute from the Active Directory)
# PagerDuty
#### PagerDuty Configurationy
- Log into your PagerDuty admin session and go to Account Settings and in the Single Sign-On tab
- Choose the SAML option and fill the following fields:
- X.509 Certificate
```exp
$cert = “MIIDXXX…XXXNTYw==”
```
- Login URL
```exp
https://https://mydomain.trustelem.com/app/33XXXX/sso
```
- Logout URL (optional)
```exp
https://https://mydomain.trustelem.com/app/33XXXX/on_logout
```
- By checking Allow username/password login you allow users to log in with their username and password and don't force them to log in through SSO
- By checking Auto-provision users on first login you allow users who do not have an account in PagerDuty to be created and to join your organization at their first login through SSO
#### Trustelem Configuration
- On Trustelem, write your PagerDuty organization name in the corresponding field
- You can also modify the custom scripting and add a role attribute in the script Four different roles can be send as attributes: admin (Global Admin), limited\_user (Responder), user (Manager) and read\_only\_user (Stakeholder) If a user logs in through SSO for the first time, his role will be this attribute. If there's no attribute his role will be 'user'
```exp
https://https://mydomain.trustelem.com/app/33XXXX/on_logout
```
# ParkMyCloud
#### ParkMyCloud Configuration
- Log into your ParkMyCloud admin session and go to the Single Sign-On tab
- Click on Enabled
- [Download the app metadata](/app/metadata), in the IdP configuration setting choose Upload an IdP metadata file and upload the file
#### Trustelem Configuration
- On Trustelem, fill Organization name with your ParkMyCloud organization name
# Pingboard
#### Pingboard Configuration
- Log into your Pingboard admin session and in the Admin tab click on Sync & Import
- In the Ongoing Data Sync section, click on Custom SSO and go to the Settings tab
- Open Trustelem metadata, copy and paste its content in the IdP Metadata section
- Then fill the following fields:
- Sign in with
```exp
Trustelem
```
- Name ID Format
```exp
urn:oasis:names:tc:SAML:1.1:nameid-format:emailAddress
```
#### Trustelem Configuration
- On Trustelem, write your Pingboard base-url on the corresponding field. You can find it in your Pingboard url: `https://[base-url].pingboard.com/`
# Pipedrive
- Log into your admin session on Pipedrive
- On the top right corner, go to Company settings and then to Single sign-on
- In the SAML configuration for Pipedrive section, enter the following parameters:
- Issuer:
```exp
https://mydomain.trustelem.com/app/33XXXX
```
- Single Sign On (URL):
```exp
https://mydomain.trustelem.com/app/33XXXX/sso
```
- X.509 certificate:
```exp
$cert = "MIIDXXX...XXXNTYw=="
```
- Once you're done, click on **Save** and test
- If the SSO connection fails and all the fields were correctly completed, change the URL from `https://domain-name.pipedrive.com/settings/sso?success=0` to `https://domain-name.pipedrive.com/settings/sso?success=1`
- Click on **Enable SSO/SAML for users**
#### Trustelem Configuration
- Still on Pipedrive, in the SAML configuration for your Identity Provider (IDP) section, copy the Single Sign On (SSO) url
- On Trustelem, cut the link in the Single Sign On URL field
# Proxyclick
#### Proxyclick Configuration
- Log into your Proxyclick admin session and in Settings go to Integrations
- Browse the Marketplace and in the Single Sign On tab choose the Generic SAML application
- Issuer
```exp
https://mydomain.trustelem.com/app/33XXXX
```
- SAML 2.0 Endpoint URL
```exp
https://mydomain.trustelem.com/app/33XXXX/sso
```
- SAML certificate
```exp
$cert = "MIIDXXX...XXXNTYw=="
```
#### Trustelem Configuration
- Copy the link given on Proxyclick in SAML Consumer URL and paste it on the corresponding field on Trustelem
- Copy the link given on Proxyclick in SAML SSO Redirect URL and paste it on the corresponding field on Trustelem
# Pulse Secure
Before we start, please be sure to have a functional VPN
First of all, in the Trustelem app settings, enable the authentication method you want to use
#### Trustelem Configuration
- In the Entity ID field, put your Pulse Secure server's SAML Entity ID then save
#### Pulse Secure Configuration
- Go in System > Configuration > SAML then click on New Metadata Provider
- Click on browse and upload the metadata file, check identity provider then click on save changes
- Go in System > Configuration > SAML then click on Settings. Enter your Pulse Secure server FQDN
- Go in Authentication > Auth. Servers then add a new SAML server from the drop-down list
- Under Settings select SAML 2.0 and select the Metadata radio button
- Under SSO Method, select Post and the certificate if necessary
- Click on Save Changes
- Go on Authentication > Sign-In Policies
- Click on the interested population realm (ex: Users) then select your SAML authentication server
- Click on Save Changes
Before we start, please be sure to have a functional VPN
First of all, in the Trustelem app settings, enable the authentication method you want to use
#### Trustelem Configuration
- Go on the Service tab and be sure that you have a correctly configured TrustelemConnect connector
- On the trustelem app settings define a secret then copy it
#### Pulse Secure Configuration
- Go in Authentication > Auth. Servers then add a new RADIUS server from the drop-down list
- Under Primary Server, enter the TrustelemConnect server IP as well as the port below (often 1812)
- In the Shared Secret field enter the radius secret you copied previously
- To activate MFA: Under Custom RADIUS Rules click on Add Custom Radius Rule
- In the drop-down list select Access Challenge
- Add a new Reply-Message(18) criteria that matches the expression of value (.\*)
- Click on Save Changes
- Click on Save Changes
- Go on Authentication > Sign-In Policies
- Click on the interested population realm (ex: Users) then select your RADIUS authentication server
- Click on Save Changes
# Pydio
Pydio requires a plugin to enable OpenID Connect authentication.
#### Download and installation
- Download the plugin here.
- Unpack the archive and move authfront.openid to the plugin directory of your Pydio server (typically: /usr/share/pydio plugins).
- Ensure the plugin files have the correct permissions :
```sh
chown -R www-data:www-data authfront.openid/
```
- Open your Pydio admin dashboard, find the plugin under Authentication and enable it
#### Configuration
- Configure the plugin with the following values:
- OpenID Issuer
```exp
https://mydomain.trustelem.com/app/3XXXXX
```
- OpenID Jwks
```json
{"keys":[{"kty":"RSA","use":"sig","kid":"58930","alg":"RS256","n":"03DSSaM_B0G70aclJFw-QK6HRl9hkFg2W5HKCGuAHm5wt2tP4FcQ8RMtLZ_WsdeFlUe9VdUGfACCSExq32k4XDR0PA5FJ9sE2pfGXIyyUP2drhqDI1Q754faHPjvkX5niiQkaNFby4HBjvsH6VWVU5PfHoHEeT20qemANWNlrfw8-jkMlN1aioWAuWI9L-OtGqUHEbZy_zj3GrZrAN7G73rClAtcgsIfeqkg3y5g2p4qRynS_MMmpuYiGz89Hcrr3lS52tKjHATskkII-eA-_78SB413KVKxRYSK9DjlA-Wm5Ott4AN99d6sVUIj0jp-fWSIueE4zy4OKrrQR91IYQ","e":"AQAB"}]}
```
- OpenID Configuration
```json
{"issuer":"https://wallix-jflacher.trustelem.com/app/384294","authorization_endpoint":"https://wallix-jflacher.trustelem.com/app/384294/auth","token_endpoint":"https://wallix-jflacher.trustelem.com/app/384294/token","userinfo_endpoint":"https://wallix-jflacher.trustelem.com/app/384294/userinfo","jwks_uri":"https://wallix-jflacher.trustelem.com/app/384294/jwks","end_session_endpoint":"https://wallix-jflacher.trustelem.com/app/384294/end_session","scopes_supported":["email","family_name","given_name","groups","name","openid","organization","phone","profile","uid"],"response_types_supported":["code","code id_token","id_token","id_token token"],"grant_types_supported":["authorization_code","implicit"],"subject_types_supported":["public"],"display_values_supported":["page"],"claims_supported":["sub","iss","auth_time","acr","name","given_name","family_name","profile","email","locale","phone_number"],"ui_locales_supported":["fr-FR","en-GB"],"id_token_signing_alg_values_supported":["RS256"],"token_endpoint_auth_methods_supported":["client_secret_basic","client_secret_post"]}
```
- OpenID ClientID
```exp
pydio_client_id
```
# Rollbar
#### Rollbar Configuration
- Log into your Rollbar admin session, go to Settings and then to Identity Provider
- In SAML Identity Provider choose Other
- Open Trustelem metadata, copy and paste its content in the SAML Metadata field
#### Trustelem Configuration
- On Trustelem, write your Rollbar account name in the corresponding field (you can find it in Settings > General > Account Details)
# Salesforce
#### Introduction
- You have to configure both Salesforce and Trustelem so as to align single sign-on parameters.
#### Access to Salesforce parameters
- Login as administrator to [https://login.salesforce.com](https://login.salesforce.com)
- In section « **Administer** », click on « **Security Controls** »
- Click on « **Configure single-sign on for your organization** »
#### Trustelem Configuration
- Select a certificate for this application
- Choose to enable or disable **automatic user provisioning**
- In the Salesforce administration console, find the parameter named « **Salesforce Login URL** » (starting with ***`https://login.salesforce.com/?saml=<...>`***), and paste its value in the corresponding Trustelem field
- Get the **ProfileID** corresponding the to profile that will be given to users created by automatic provisioning: open the profile details in the Salesforce console, the **ProfileID** is in the URL
- Paste this value in the field named « User creation ProfileID » in Trustelem
- **Nota:** Salesforce also allows to use directly the Profile name instead of its ID
#### Salesforce Configuration
- On Salesforce single sign-on parameters panel, click on button « **Edit** »
- In section « **Federated Single Sign-On Using SAML** »:
- Check option « **SAML Enabled** »
- Check option « **User Provisioning Enabled** »
- For parameter « **SAML Version** », select « **2.0** »
- For parameter « **Issuer** », input:
```exp
https://mydomain.trustelem.com/app/17XXX
```
- Download the certificate from Trustelem (.pem file) and select it as parameter « **Identity Provider Certificate** »
- For parameter « **Identity Provider Login URL** », input:
```exp
https://mydomain.trustelem.com/app/17XXX/sso
```
- For parameter « **Identity Provider Logout URL** », input:
```exp
https://mydomain.trustelem.com/app/17XXX/slo
```
- Let parameter « **Custom Error URL** » empty
- For parameter « **SAML Identity Type », choose « Assertion contains the Federation ID from the User object** »
- For parameter « **SAML Identity Location », choose « Identity is in the NameIdentifier element of the Subject statement** »
- For parameter « **Entity ID** », choose « **`https//saml.salesforce.com`** »
- For parameter « **Service Provider Initiated Request Binding** », choose « **HTTP Redirect** »
- Click on button « **Save** »
# SAML 2
#### Introduction
The SAML 2.0 configuration varies from application to application.
This page provides information about the most commonly used settings on both the application and Trustelem.
In SAML terminology, there is a client application which is called Service Provider (SP) and an identity provider (IdP), here Trustelem.
#### If you are the application developer
**Note:** our recommendation is to use OpenID Connect rather than SAML 2.0. OpenID Connect is more modern and more simple than SAML 2.0. If you still want to use SAML, you have 3 options:
- Deploy a SAML module in the framework underlying the application (e.g. Wordpress, Drupal, Symphony). This option does not require any development in the application itself.
- Deploy a SAML module in the application's frontal web server (Apache, Nginx).
- Use a SAML 2.0 library that will authenticate the user.
#### Application configuration elements, on the SP side
- Definition of the pages where SSO authentication is enabled (LoginPath)
- Definition of the SAML URL for the SP side: Assertion Consumer Service (ACS)
- Definition of the identifier attribute (NameID) and its format
- Definition of the IdP (Trustelem) connection URLs
- Definition of the certificate(s) used for encryption and/or the signature of SAML content.
*Note: these configuration data can be requested in metadata.xml format.*
#### Application configuration elements, on the IdP side
- **EntityID:** application identifier → must be identical to what was indicated on the SP side
- **Assertion Consumer Service (ACS):** URL on the SP side for receiving SAML assertions generated by the IdP → must be identical to what was indicated on the SP side
- **NameID Attribute:** name of the attribute containing the user's identity in the SAML response provided by the IdP Trustelem to the SP application → must be identical to what was indicated on the SP side
- **NameID Format:** format of the NameID attribute. Except in special cases, use the default value → must be identical to what was indicated on the SP side
- **Attributes List:** additional attributes that can be embedded by the IdP into the SAML responses, and used by the application on the SP side
- **RelayState:** URL of the page to which the user should be redirected after authentication
- **Custom login URL:** URL used to initialize login via SAML 2.0 in the Trustelem user's dashboard
- **Custom scripting:** script to add/modify attributes in the SAML responses (example: attribute from the Active Directory)
# Slack
#### Trustelem Configuration
- Enter the value of your slack sub-domain in the corresponding field on Trustelem.
*For example for mydomain.slack.com, enter mydomain*
#### Slack Configuration
- Log in your Slack workspace
- Click on the drop-down menu then Parameters and administration -> Workspace parameters
- Click on the Authentication tab and setup SAML Authentication.
- Paste the following URL in the SAML 2.0 Endpoint (HTTP) field.
```exp
https://mydomain.trustelem.com/app/33XXXX/sso
```
- Paste the following URL in the Identity Provider Issuer field.
```exp
https://mydomain.trustelem.com/app/33XXXX
```
- Paste the certificate into the Public Certificate field
```exp
$cert = "MIIDXXX...XXXNTYw=="
```
- In Advanced Options click on expand
- Disable Sign
- In the field AuthnContextClassRef change to Don't send this value
- In the field Service Provider Issuer let the default url [https://slack.com](https://slack.com)
- Enable Responses Signed and Assertions Signed
- Click on Save Configuration
# SmartRecruiters
#### SmartRecruiters Configuration
- Log into your SmartRecruiters admin session and in the Settings go to Web SSO
- Enable Web SSO, edit the configuration and choose an algorithm and a certificate in the SmartRecruiters Configuration section, it doesn't matter which ones
- Then fill the following parameters:
- Identity Provider URL
```exp
https://mydomain.trustelem.com/app/33XXXX
```
- Identity Provider certificate
```exp
$cert = "MIIDXXX...XXXNTYw=="
```
- NameID Format
```exp
urn:oasis:names:tc:SAML:1.1:nameid-format:emailAddress
```
#### Trustelem Configuration
- On Trustelem, fill SmartRecruiters company identifier with the corresponding value
Notes:
- There isn't additional configuration for the mobile application
- For a direct authentication, use the link: `https://www.smartrecruiters.com/web-sso/saml/[CompanyIdentifier]/login`
- The users manually created in SmartRecruiters can't authenticate with SSO because they don't have a SSO identifier, but you can add one with the API
- For a SSO Identifier update for existing users, all users can be changed at once by asking the SmartRecruiters support team\*
#### Add/edit a user with a SSO Identifier using API
- Create an API key on this [page](https://www.smartrecruiters.com/account/sign-in?redir=%2Fsettings%2Fconfiguration%2Fapi-integrations) or copy the existing one
- Then on this [page](https://dev.smartrecruiters.com/customer-api/live-docs/user-api/#/users) paste the API key on X-SmartToken
- To create a new user:
- In POST/users click on Try it out and paste this model adapted for your user:
```exp
{
"email": "user-email-address",
"firstName": "user-firstname",
"lastName": "user-lastname",
"systemRole": {
"id": "role-id",
"name": "role-name"
},
"ssoIdentifier": "user-email-address"
}
```
- Execute en copy the replied user id
- In PUT/users/{id}/activation, click on Try it out, paste the user id and execute
- To update an existing user:
- In GET/users click on Try it out, execute and copy the id of the wanted user
- In PATCH/users/{id} click on Try it out, paste the user id and then the following model adapted for your user:
```exp
[ { "op":"add", "path":"/ssoIdentifier", "value":"user-email-address" }]
```
# Snowflake
#### Snowflake Configuration
- Log into your Sysadmin or Accountadmin account on Snowflake
- Go on Worksheets, create a new worksheet and copy this in it:
```exp
use role accountadmin;
alter account set sso_login_page = TRUE;
alter account set saml_identity_provider =
'{
"certificate": "MIIDUTCCAjmgAwIBAgIXXX",
"issuer": "https://mydomain.trustelem.com/app/33XXXX",
"ssoUrl": "https://mydomain.trustelem.com/app/33XXXX/sso",
"type" : "custom",
"label" : "Trustelem"
}';
```
- Then click on Run
#### Trustelem Configuration
- Copy your Snowflake account URL: it should look like this `https://[account_name].snowflakecomputing.com/` or this `https://[account_name].[region_id].snowflakecomputing.com/`
- On Trustelem, paste this URL in the EntityID, do not forget the "/" at the end
# SolarWinds Cloud
#### SolarWinds Configuration
- Log into your SolarWinds admin session and go to Settings > Organization Settings > Security
- Activate SAML and fill the following fields:
- Issuer
```exp
https://mydomain.trustelem.com/app/3XXXXX
```
- SAML URL
```exp
https://mydomain.trustelem.com/app/33XXXX/sso
```
- Single Logout URL
```exp
https://mydomain.trustelem.com/app/3XXXXX/on_logout
```
- Certificate
```exp
$cert = "MIIDXXX...XXXNTYw=="
```
- Then go to the Role Mapping tab and write the attributes names you wish for each role (optional)
#### Trustelem Configuration
- Go back to the Configuration tab, copy the ACS URL given value and paste it in the corresponding field on Trustelem
- You can then add roles to send to SolarWinds in Custom scripting
For example, we want users to have the member role for SolarWinds except John Doe who will be administrator.
On SolarWinds, in Role Mapping > Organization Roles we write the value 'adminSW' for Admin and 'memberSW' for Member.
- On Trustelem we add this custom script:
```js
function CustomSAMLResponse(msg: SAMLResponse, user: User, groups: Groups, deny: Deny): void {
msg.addAttr("groups", "memberSW");
if (user.email == "john.doe@trustelem.com") {
msg.addAttr("groups","adminSW");
}
}
```
# Sprout Social
#### Sprout Social Configuration
- Download the app metadata, send them to the Sprout Social support and ask them to configure SSO with a custom IdP on your account
# StatusHub
- Login as administrator to [https://statushub.com/](https://statushub.com/)
- Paste the content of the metadata Trustelem on **Status sites** / **Edit** / **Restricted Access**
*The metadata file is available on the setup page of your Trustelem application*
- Copy/Paste the **StatusHub SAML login URL** into the field **StatusHub URL** in the setup page of your Trustelem application
# Tableau
#### Tableau Configuration
- Log into your admin session on Tableau Online
- Go to Settings, then on Authentication and in Authentication types, check SAML to active SSO
- Click on Edit Connection
- In the 4th step, import Trustelem metadata file
- In the 5th step, under Display Name, replace FirstName and LastName by firstname and lastname and then click on Apply
#### Trustelem Configuration
- Go back on the 1st step and copy Tableau Online entity ID and Assertion Consumer Service URL to cut them on Trustelem in the corresponding fields
# ThousandEyes
#### ThousandEyes Configuration
- Log into your ThousandEyes admin session and in Account Settings click on Organization Settings
- In Setup Single Sign-On click on Enable Single Sign-On and choose the Metadata File for the configuration
- Download the metadata and import the file
- Click on override next to Logout Page URL and write the following URL:
```exp
https://mydomain.trustelem.com/app/3XXXXX/on_logout
```
- You can then click on **Run Single Sign-On Test** and **Save**
# TYPO3
- TYPO3 allows you to install [extensions](https://extensions.typo3.org/).
- In order to use the SSO, you have to install an **OpenID Connect** or **SAML2.0** extension.
- For more details contact our support and indicate which extension you want to use: support@trustelem.com
# UseResponse
#### UseResponse Configuration
- Log into your admin session on UseResponse
- Go on Applications in the bottom left corner, scroll until you find Single Sign-On and click on Enable
- Then click on Settings and select the SAML method
- You can now complete the following parameters:
- idP Entity ID or Issuer:
```exp
https://mydomain.trustelem.com/app/3XXXXX
```
- External Login URL:
```exp
https://mydomain.trustelem.com/app/3XXXXX/sso
```
- External Logout URL:
```exp
https://mydomain.trustelem.com/app/3XXXXX/on_logout
```
- Identity Provider Certificate:
- Download the certificate here, select Certificate instead of Fingerprint and put the certificate
- Attribute to be used as Email:
```exp
email
```
- Attribute to be used as First Name:
```exp
firstname
```
- Attribute to be used as Last Name:
```exp
lastname
```
- Attribute to be used as Team Name:
```exp
organization
```
#### Trustelem Configuration
- You have to complete three fields on Trustelem (EntityID, Assertion Consumer Server URL et Single Logout Service URL) with the information available on UseResponse's page where you've just set the settings
- Once all the fields completed, you can click on Submit on UseResponse
# Velpic
#### Velpic Configuration
- Log into your Velpic admin session, go to Admin and then to the Integration tab
- Choose the Plugins option, select Add Plugin and choose SAML 2.0
- Then fill the following fields:
- Enter a service name
```exp
Trustelem
```
- Issuer URL
```exp
https://mydomain.trustelem.com/app/3XXXXX
```
- Download Trustelem metadata and import them in Provider Metadata Config
#### Notes
- Warning: the identifier used for Velpic SSO authentication is Trustelem email, it has to match a user's username on Velpic to authenticate successfully
- By checking Auto create new users, Trustelem users will be created on Velpic at their first connection
#### Trustelem Configuration
- Copy the link given in the Single sign on URL on Velpic and paste it in the corresponding field on Trustelem
# WALLIX Access Manager
#### Contents
- [Trustelem Radius on Access Manager for AD users](https://trustelem-doc.wallix.com/books/trustelem-applications/page/wallix-access-manager#bkmrk-trustelem-radius-on--0)
- [Trustelem Radius on Access Manager for AM users](https://trustelem-doc.wallix.com/books/trustelem-applications/page/wallix-access-manager#bkmrk-trustelem-radius-on--1)
- [Trustelem SAML on Access Manager for AD users](https://trustelem-doc.wallix.com/books/trustelem-applications/page/wallix-access-manager#bkmrk-trustelem-saml-on-ac)
- [Trustelem SAML on Access Manager for Trustelem users](https://trustelem-doc.wallix.com/books/trustelem-applications/page/wallix-access-manager#bkmrk-trustelem-saml-on-ac-0)
- [Debug](https://trustelem-doc.wallix.com/books/trustelem-applications/page/wallix-access-manager#bkmrk-debug)
#### Trustelem Radius on Access Manager for AD users
Install **Trustelem Connect**
Start by installing Trustelem Connect.
This will give Trustelem the ability to process Radius authentications.
The documentation is the following:
[https://trustelem-doc.wallix.com/books/trustelem-administration/page/ldap-radius-trustelem-connect](https://trustelem-doc.wallix.com/books/trustelem-administration/page/ldap-radius-trustelem-connect)
You don't need to read the chapter **Setup an application to use Trustelem Connect**, the specific instructions for an Access Manager application will be detailed in this chapter.
The common mistakes will be also detailed, but if the authentication is not working you should start by reading the **Debug** chapter in this [LDAP-Radius - Trustelem Connect](https://trustelem-doc.wallix.com/books/trustelem-administration/page/ldap-radius-trustelem-connect#bkmrk-debug) documentation.
On **Trustelem admin page**
- Go on the tab **Apps** and create an **Access Manager** application
- Let the **root url** / **organization identifier** / **domain** fields empty
- Enable the **Radius** protocol
- Go on the Service setup in the **Install Trustelem Connect** chapter
- Click on **Add an application +** and select the **Access Manager**
- Enable **Radius protocol** by clicking on the **Radius button**
- the listen address can be **localhost**, all existing IP address on the machine = **\***, or a specific IP = **...**
- this will open the defined udp (Radius) or tcp (LDAP) port on the machine running **Trustelem Connect** on the IP 127.0.0.1 (localhost) OR on all local IPs (\*) OR on a specific local IP (...)
- if you have a dedicated VM for the connector, choose \*
- If you don't already have a Bastion using it, you can let the default port 1812. Otherwise, you can use 2812, 3812...
- Click **Save**[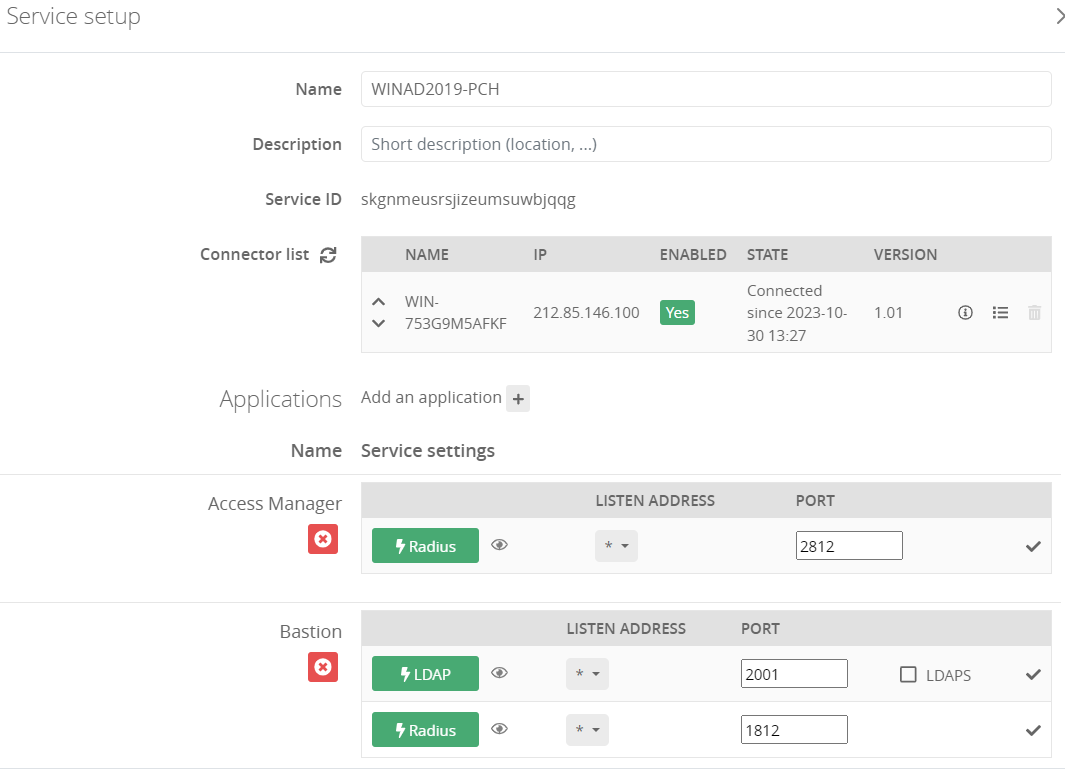](https://trustelem-doc.wallix.com/uploads/images/gallery/2023-10/serviceam.PNG)
On **Access Manager admin page**
- Add a Radius Server on Access Manager: **Configuration/RADIUS Servers**
- **Organization:** select the organization where your AD users are
- **Name:** choose what you want
- **Host:** the IP/fqdn of the machine running **Trustelem Connect**
- **Protocol:** PAP
- **Authentication Port:** the port is defined on the **Trustelem Service** previously setup (should be 1812 or 2812)
- **Connection Timeout:** let de default value, unless you have latency on your network
- **Login type:** simple login
- **Shared Secret:** this secret can be found in the Trustelem Access Manager app model.
- **NAS Identifier:** empty [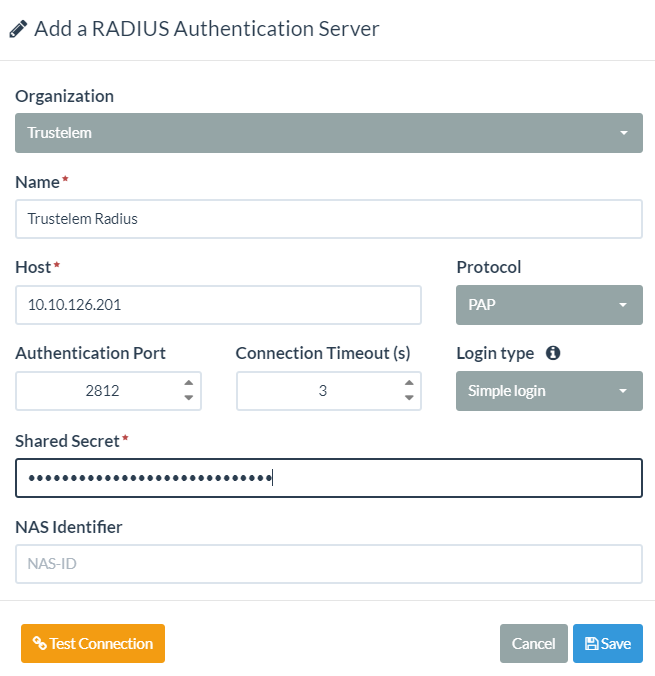](https://trustelem-doc.wallix.com/uploads/images/gallery/2023-10/radiusam.PNG)
- Click on **Test Connection** then **Save**
- Edit the Access Manager domain used for the authentication of your AD users --> **Configuration** > **Domains** > should be the **Active Directory** domain
- In the field **Associated Authenticators**: **Active Directory Authenticator** Factor 1 - **Radius Authenticator** Factor 2
You can't test the authentication yet, first you need to define the **access rules** on Trustelem.
The documentation is provided in the page: [https://trustelem-doc.wallix.com/books/trustelem-administration/page/access-rules](https://trustelem-doc.wallix.com/books/trustelem-administration/page/access-rules)
For this kind of authentication, you need a **Radius access rule** set to **2nd factor only**.
Note: for the user authentication, first provide the **AD login and password** then provide the **Trustelem TOTP code**, even if the name of the input is **Password** again.
#### Trustelem Radius on Access Manager for AM users
Install **Trustelem Connect**
Start by installing Trustelem Connect.
This will give Trustelem the ability to process Radius authentications.
The documentation is the following:
[https://trustelem-doc.wallix.com/books/trustelem-administration/page/ldap-radius-trustelem-connect](https://trustelem-doc.wallix.com/books/trustelem-administration/page/ldap-radius-trustelem-connect)
You don't need to read the chapter **Setup an application to use Trustelem Connect**, the specific instructions for an Access Manager application will be detailed in this chapter.
The common mistakes will be also detailed, but if the authentication is not working you should start by reading the **Debug** chapter in this [LDAP-Radius - Trustelem Connect](https://trustelem-doc.wallix.com/books/trustelem-administration/page/ldap-radius-trustelem-connect#bkmrk-debug) documentation.
On **Trustelem admin page**
- Go on the tab **Apps** and create an **Access Manager** application
- Let the **root url** / **organization identifier** / **domain** fields empty
- Enable the **Radius** protocol
- Go on the Service setup in the **Install Trustelem Connect** chapter
- Click on **Add an application +** and select the **Access Manager**
- Enable **Radius protocol** by clicking on the **Radius button**
- the listen address can be **localhost**, all existing IP address on the machine = **\***, or a specific IP = **...**
- this will open the defined udp (Radius) or tcp (LDAP) port on the machine running **Trustelem Connect** on the IP 127.0.0.1 (localhost) OR on all local IPs (\*) OR on a specific local IP (...)
- if you have a dedicated VM for the connector, choose \*
- If you don't already have a Bastion using it, you can let the default port 1812. Otherwise, you can use 2812, 3812...
- Click **Save**[](https://trustelem-doc.wallix.com/uploads/images/gallery/2023-10/serviceam.PNG)
On **Access Manager admin page**
- Add a Radius Server on Access Manager: **Configuration/RADIUS Servers**
- **Organization:** select the organization where your AM users are
- **Name:** whatever you want
- **Host:** the IP/fqdn of the machine running **Trustelem Connect**
- **Protocol:** PAP
- **Authentication Port:** the port is defined on the **Trustelem Service** previously setup (should be 1812 or 2812)
- **Connection Timeout:** let de default value, unless you have latency on your network
- **Login type:** simple login
- **Shared Secret:** this secret can be found in the Trustelem Access Manager app model.
- **NAS Identifier:** empty [](https://trustelem-doc.wallix.com/uploads/images/gallery/2023-10/radiusam.PNG)
- Click on **Test Connection** then **Save**
- Edit the Access Manager domain used for the authentication of your AM users --> **Configuration** > **Domains** > should be the **local** domain
- In the field **Associated Authenticators**:
- if you want to keep AM user password: **Local database** Factor 1 - **Radius Authenticator** Factor 2
- if you want to use Trustelem password: **Local database** Factor Unused - **Radius Authenticator** Factor 1
You can't test the authentication yet, first you need to define the **access rules** on Trustelem.
The documentation is provided in the page: [https://trustelem-doc.wallix.com/books/trustelem-administration/page/access-rules](https://trustelem-doc.wallix.com/books/trustelem-administration/page/access-rules)
For this kind of authentication, you need a:
- **Radius access rule** set to **2nd factor only** if you want to keep AM user password
--> first provide the **local login and password** then provide the **Trustelem TOTP code**, even if the name of the input is **Password** again
- **Radius access rule** set to **2 factors** if you want to use Trustelem password
#### Trustelem SAML on Access Manager for AD users
On **Trustelem admin page**
- Go on the tab **Apps** and create an **Access Manager** application
- Enter the **root URL of your Access Manager** (ex: `https://wam.com/wabam`)
- Enter your **organization identifier** (you can find it in: Access Manager → Configuration → Organizations)
- The organization must have a Bastion configured
- The organization must not already have the needed domain used (see next point)--> a domain is unique in an organization.
- Enter the correct **domain** value. This domain has to match the **Authentication domain name** of your **Active Directory Authentication domain**[](https://trustelem-doc.wallix.com/uploads/images/gallery/2023-10/authdomainname.png)[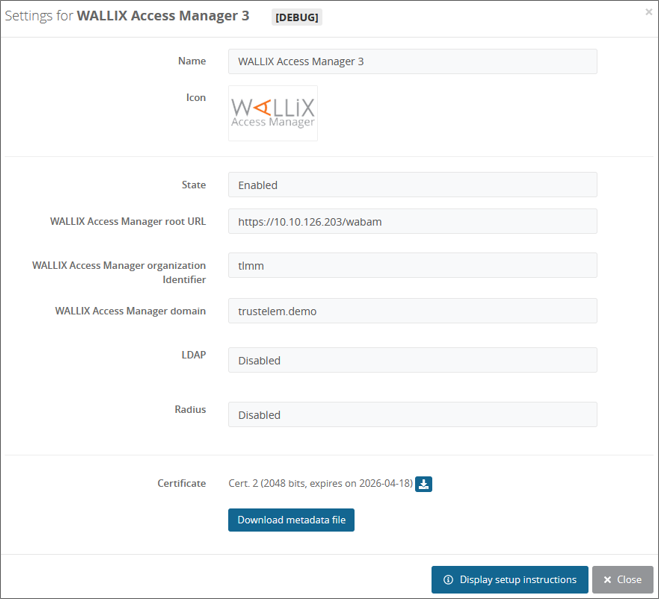](https://trustelem-doc.wallix.com/uploads/images/gallery/2022-07/am-app.png).
- If on Access Manager you need different profiles for Users, click on the **+** at the end of the line **Custom scripting**
- The point is to send the **name of an Access Manager profile** in a **SAML attribute named profile** :
```ts
//Define a default profile attribute which matches the name of the Access Manager profile
msg.setAttr("profile","User")
//Change the default profile depending on the email address
if(user.email=="rose.keler@trustelem.demo"){msg.setAttr("profile","Auditor")}
//Change the default profile depending on Trustelem groups
for (let group in groups) {
if(group=="Trustelem admin group name"){msg.setAttr("profile","Administrator")}
}
```
[](https://trustelem-doc.wallix.com/uploads/images/gallery/2022-07/am-app2.png)
- **Save** the modifications
- Download the **metadata file**
On **Access Manager admin page**
- Click on: **Configuration** → **SAML Identity Providers** → **+Add**
- Select your organization (the one with the identifier used on Trustelem setup)
- Choose a name, for the identity provider setup
- In the tab **Service Provider**:
- In the field **WALLIX-AM Entity ID**, enter the value **WALLIX-AM**
- Turn OFF **Sign Messages**, **Encrypt Messages**
- Turn ON **Signed Response**, **Signed Assertion**
- In the tab **Identity Provider**:
- Import the Trustelem metadata file
- Copy the **Redirect Binding Uri** and paste it in **Redirect Logout Uri**, replacing « sso » by « on\_logout »
- In the tab **Domain**:
- In the field **Domain Name**, enter the domain for federated users : still the same value used on the Bastion and on Trustelem setup
- Choose a **Default Profile** for new users.
- Usually it is **User**
- You can let **No Default Profile** if Trustelem is in charge of the profile.
- Click on the pen on the line **Attributes**, and enter the following attributes:
**Login** → uid
**Display Name Attribute** → displayname
**Email Attribute** → email
**Language Attribute** → lang **Profile Attribute** → let this field empty, or enter **profile** depending on if Trustelem provides this attribute or not
You can't test the authentication yet, first you need to define the **access rules** on Trustelem.
The documentation is provided in the page: [https://trustelem-doc.wallix.com/books/trustelem-administration/page/access-rules](https://trustelem-doc.wallix.com/books/trustelem-administration/page/access-rules)
For this kind of authentication, you need **internal and external** set to **2 factors**
#### Trustelem SAML on Access Manager for Trustelem users
On **Trustelem admin page**
- Go on the tab **Apps** and create an **Access Manager** application
- Enter the **root URL of your Access Manager** (ex: `https://wam.com/wabam`)
- Enter your **organization identifier** (you can find it in: Access Manager → Configuration → Organizations)
- The organization must have a Bastion configured
- The organization must not already have the needed domain used (see next point)--> a domain is unique in an organization.
- Enter the correct **domain** value. This domain has to match the **Authentication domain name** of your **Trustelem Active Directory Authentication domain**[](https://trustelem-doc.wallix.com/uploads/images/gallery/2023-10/authdomainname.png)[](https://trustelem-doc.wallix.com/uploads/images/gallery/2022-07/am-app.png).
- If on Access Manager you need different profiles for Users, click on the **+** at the end of the line **Custom scripting**
- The point is to send the **name of an Access Manager profile** in a **SAML attribute named profile** :
```ts
//Define a default profile attribute which matches the name of the Access Manager profile
msg.setAttr("profile","User")
//Change the default profile depending on the email address
if(user.email=="rose.keler@trustelem.demo"){msg.setAttr("profile","Auditor")}
//Change the default profile depending on Trustelem groups
for (let group in groups) {
if(group=="Trustelem admin group name"){msg.setAttr("profile","Administrator")}
}
```
[](https://trustelem-doc.wallix.com/uploads/images/gallery/2022-07/am-app2.png)
- **Save** the modifications
- Download the **metadata file**
On **Access Manager admin page**
- Click on: **Configuration** → **SAML Identity Providers** → **+Add**
- Select your organization (the one with the identifier used on Trustelem setup)
- Choose a name, for the identity provider setup
- In the tab **Service Provider**:
- In the field **WALLIX-AM Entity ID**, enter the value **WALLIX-AM**
- Turn OFF **Sign Messages**, **Encrypt Messages**
- Turn ON **Signed Response**, **Signed Assertion**
- In the tab **Identity Provider**:
- Import the Trustelem metadata file
- Copy the **Redirect Binding Uri** and paste it in **Redirect Logout Uri**, replacing « sso » by « on\_logout »
- In the tab **Domain**:
- In the field **Domain Name**, enter the domain for federated users : still the same value used on the Bastion and on Trustelem setup
- Choose a **Default Profile** for new users.
- Usually it is **User**
- You can let **No Default Profile** if Trustelem is in charge of the profile.
- Click on the pen on the line **Attributes**, and enter the following attributes:
**Login** → email
**Display Name Attribute** → displayname
**Email Attribute** → email
**Language Attribute** → lang **Profile Attribute** → let this field empty, or enter **profile** depending on if Trustelem provides this attribute or not
You can't test the authentication yet, first you need to define the **access rules** on Trustelem.
The documentation is provided in the page: [https://trustelem-doc.wallix.com/books/trustelem-administration/page/access-rules](https://trustelem-doc.wallix.com/books/trustelem-administration/page/access-rules)
For this kind of authentication, you need **internal and external** set to **2 factors**
#### Debug
**If the Radius authentication is not working:**
- Read the [debug chapter of LDAP-Radius Trustelem Connect](https://trustelem-doc.wallix.com/books/trustelem-administration/page/ldap-radius-trustelem-connect#bkmrk-debug)
- Verify if the protocol is set to **PAP**
- Reminder: if the password is not handle by Trustelem, the authentication is login + password (AD, local...) then Trustelem TOTP even if the input name is **Password** again.
**If the SAML authentication is not working:**
- Verify if the setup is correct: there is a lot of information to copy and paste, and an error can quickly happen.
- Verify the time on Access Manager: SAML assertion are valid for a short period.
- Verify if the user doesn't already exist. For instance if the SAML domain was used before for LDAP authentication, the users may already exist. In these case the authentication will not work and it has to be deleted first.
- Verify the attributes mapped in Access Manager
--> reminder: a local Trustelem user must have an uid set to email
- Verify if the domain used in the SAML setup is the same used on the Bastion for the Authentication domain name
If after that you still you don't have a working SAML authentication, you can try 2 things:
- Download the browser plugin **SAML tracer**. This plugin will show you the certificate and the attributes send by Trustelem to the Access Manager. [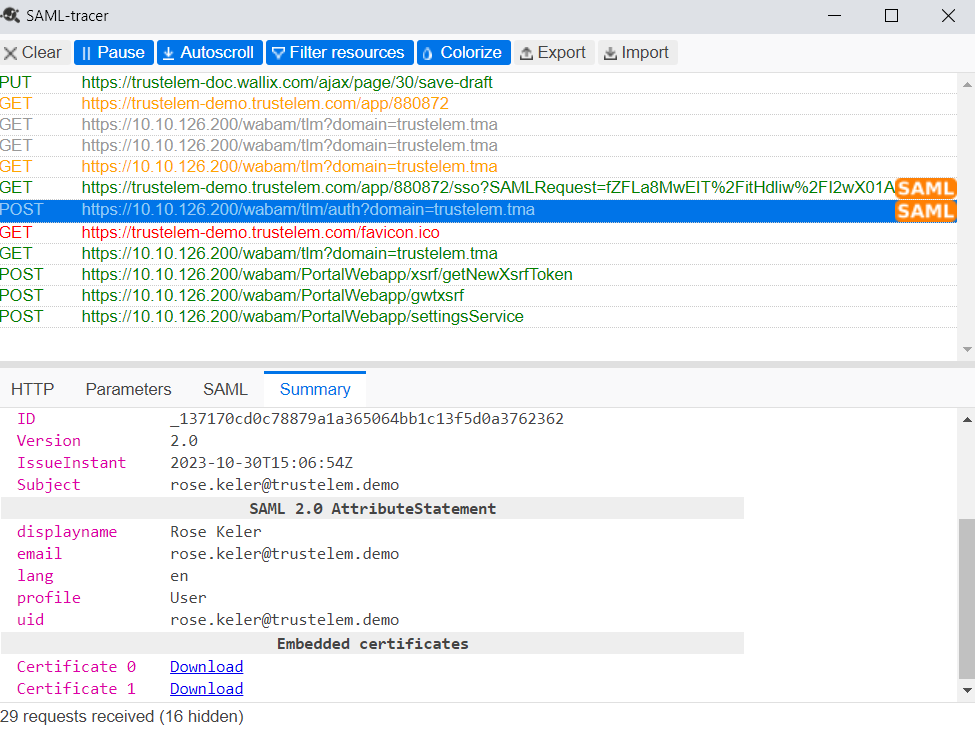](https://trustelem-doc.wallix.com/uploads/images/gallery/2023-10/saml-tracer.PNG)
- Activate Access Manager logs: **Settings** > **Application Settings** > **Configuration** > **SAML** enabled at DEBUG level
Try to authenticate again, then download the logs on the Access Manager logs setting page.
The files can help you to understand the issue, but they are not easy to read.
# WALLIX Bastion
#### Contents
- [Install Trustelem Connect](https://trustelem-doc.wallix.com/books/trustelem-applications/page/wallix-bastion#bkmrk-install-trustelem-co-0)
- [Trustelem LDAP on Bastion](https://trustelem-doc.wallix.com/books/trustelem-applications/page/wallix-bastion#bkmrk-trustelem-ldap-on-ba)
- [Trustelem Radius on Bastion for AD users](https://trustelem-doc.wallix.com/books/trustelem-applications/page/wallix-bastion#bkmrk-trustelem-radius-on-)
- [Trustelem Radius on Bastion for Bastion users](https://trustelem-doc.wallix.com/books/trustelem-applications/page/wallix-bastion#bkmrk-trustelem-radius-on--0)
- [Trustelem Radius on Bastion for Trustelem users](https://trustelem-doc.wallix.com/books/trustelem-applications/page/wallix-bastion#bkmrk-trustelem-radius-on--1)
#### Install Trustelem Connect
Start by installing **Trustelem Connect**.
This will give Trustelem the ability to process LDAP and Radius authentications.
The documentation is the following:
[https://trustelem-doc.wallix.com/books/trustelem-administration/page/ldap-radius-trustelem-connect](https://trustelem-doc.wallix.com/books/trustelem-administration/page/ldap-radius-trustelem-connect)
You don't need to read the chapter **Setup an application to use Trustelem Connect**, the specific instructions for a Bastion application will be detailed in the next chapters.
The common mistakes will be also detailed, but if the authentication is not working you should start by reading the **Debug** chapter in this [**LDAP-Radius - Trustelem Connect**](https://trustelem-doc.wallix.com/books/trustelem-administration/page/ldap-radius-trustelem-connect#bkmrk-debug) documentation.
#### Trustelem LDAP on Bastion
On **Trustelem admin page**
- Go on the tab **Apps**, and create a **Bastion** application
- Enable the **LDAP** protocol [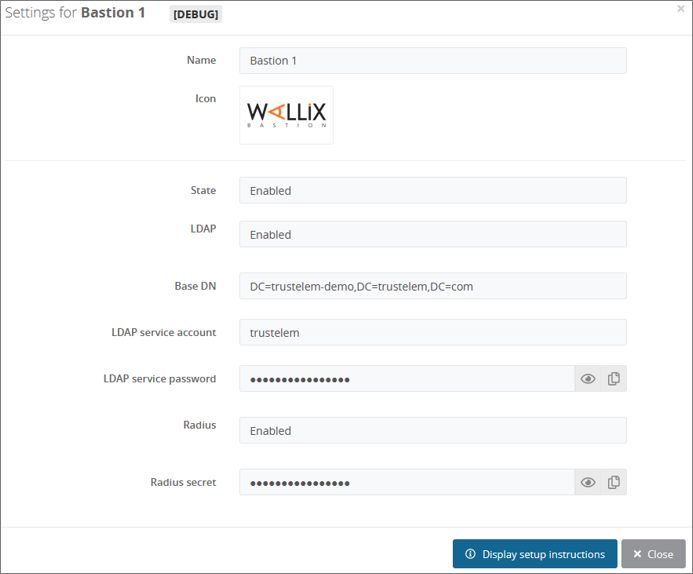](https://trustelem-doc.wallix.com/uploads/images/gallery/2022-07/bastion.png)
- Go on the **Service** setup in the **Install Trustelem Connect** chapter
- Click on **Add an application +** and select the **Bastion**
- Enable **LDAP protocol** by clicking on the **LDAP button**
- the listen address can be **localhost**, all existing IP address on the machine = **\***, or a specific IP = **...**
- this will open the defined udp (Radius) or tcp (LDAP) port on the machine running **Trustelem Connect** on the IP 127.0.0.1 (localhost) OR on all local IPs (\*) OR on a specific local IP (...)
- if you have a dedicated VM for the connector, choose **\***
- you can let the default port **2001**
- Click **Save**[!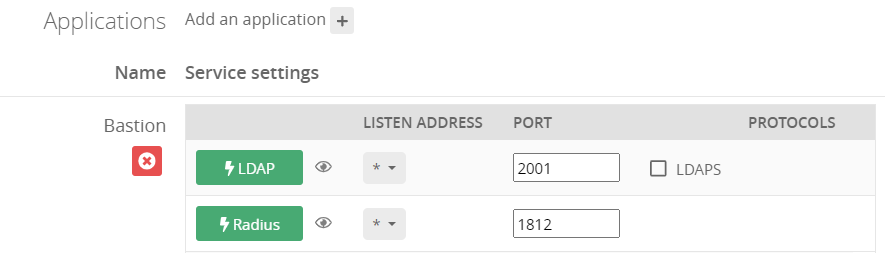](https://trustelem-doc.wallix.com/uploads/images/gallery/2023-10/protocolsservice.PNG)
On the **Bastion admin page**
- Go on **Configuration** > **External authentication**
- Create a new **Active Directory authentication**
- In the field **Authentication name** choose a name for your LDAP authentication like **Trustelem AD**
- In The fields **Server** and **Port**, write the IP / FQDN of the machine running **Trustelem Connect** and the port defined on the **Trustelem Service** previously setup (should be 2001)
- In the **Timeout** field let the default value, unless you have latency on your network [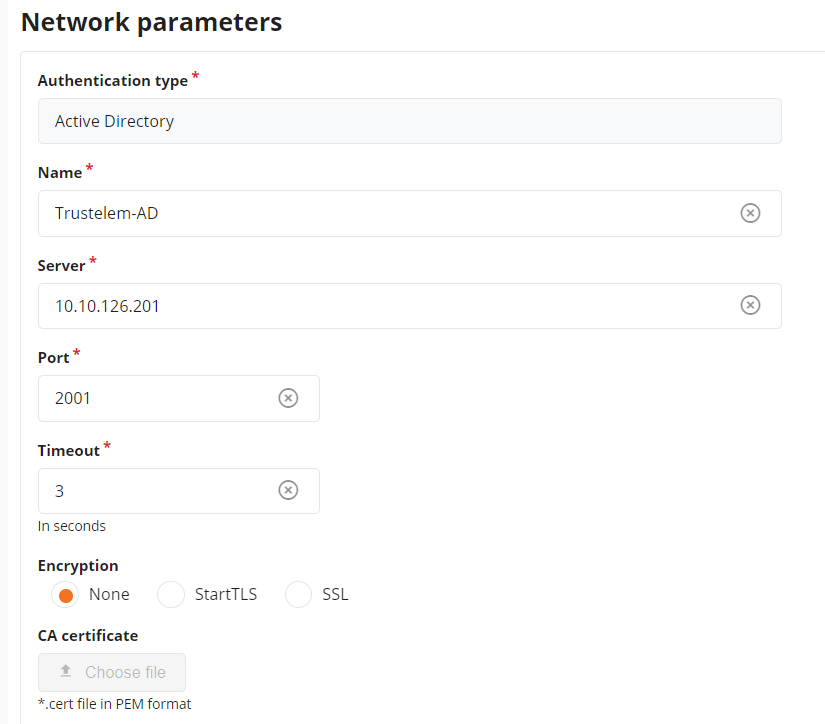](https://trustelem-doc.wallix.com/uploads/images/gallery/2023-10/externalad1.PNG)
- Let the **Bind method** to **simple**
- Enter **trustelem** in the field **User**.
*trustelem is the default value, but can be changed on the Trustelem Bastion app model. Of course if you changed it for a good reason, provide the right service account name*
- Provide the **password of trustelem account** in the fields **Password** and **Confirm Password**.
*This password can be found in the Trustelem Bastion app model.*[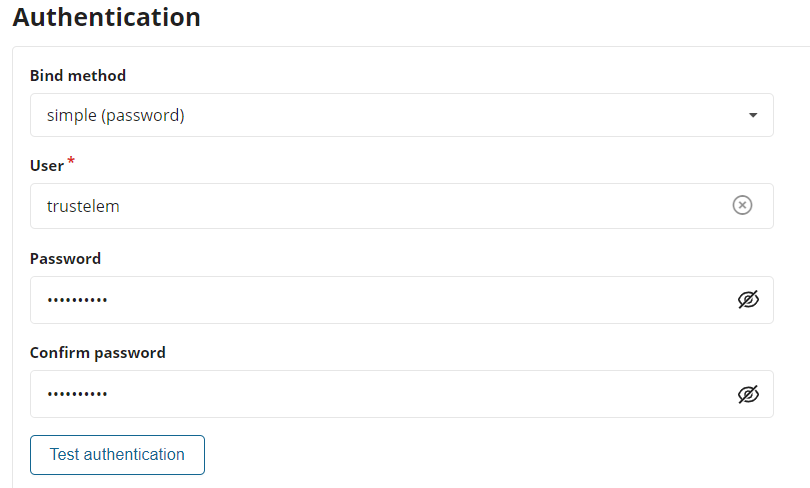](https://trustelem-doc.wallix.com/uploads/images/gallery/2023-10/externalad2.PNG)
- Write the **LDAP Base DN** provides in your Trustelem Bastion app model, in the **Base DN** field.
- Change the **Login attribute** and **User name attribute** to **mail**
- Usually Trustelem LDAP is used to provision **local Trustelem users** on the Bastion, and they can be authenticated only with the login attribute **mail**.
If for some reason you want to authenticate **synchronized Trustelem AD users** instead, you can use **sAMAccountName** for those attributes. [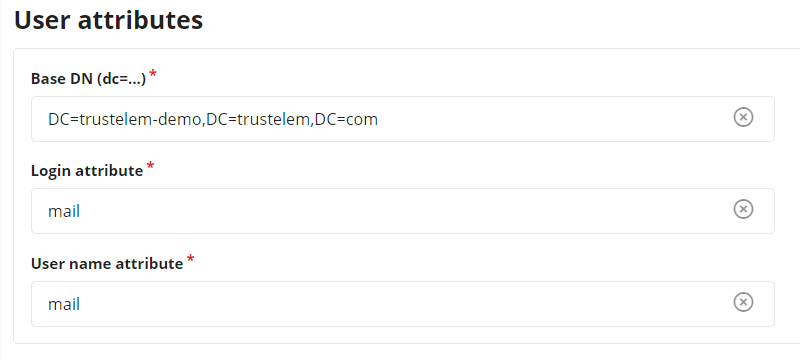](https://trustelem-doc.wallix.com/uploads/images/gallery/2023-10/externalad3.PNG)
- Click on **Test authentication**, you should see a message with **Authentication success**
- If not, read the [debug chapter of LDAP-Radius Trustelem Connect](https://trustelem-doc.wallix.com/books/trustelem-administration/page/ldap-radius-trustelem-connect#bkmrk-debug)
- Click on **Apply**
- Go on **Configuration** > **Authentication domains**
- Create a new **Active Directory authentication domain**
- Choose a **Server domain name** --> no impact on the setup
- Choose an **Authentication domain name** --> used for the Bastion/AM login (sAMAccountName@domain\_name, email@domain\_name...)
- In the tab **Directory** select the previous **Active Directory authentication**
- Enter a **Default email domain** in the corresponding field --> should not be used for this kind of authentication where the login is usually not the sAMAccountName
- Click on **Apply**
- On the top of the screen, click on **Mappings** --> in some Bastion versions, the mapping is not a different tab and can be set with the previous settings.
- Click on **Add**
- Select a **Bastion user group** and a **profile** --> define the available access
- Provide the **Trustelem group CN**
```
CN=[Trustelem Group Name],OU=Groups,DC=[Trustelem Domain],DC=trustelem,DC=com
```
\--> if you don't respect the case, the authentication won't work [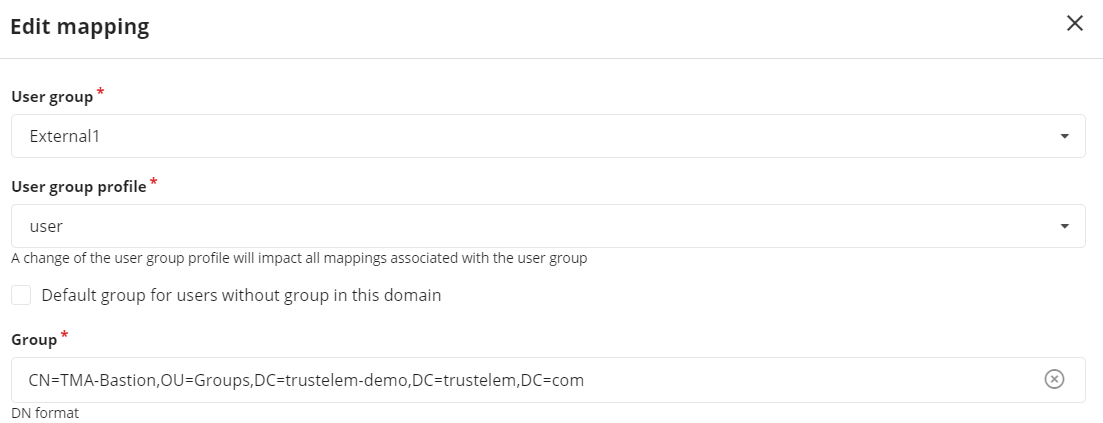](https://trustelem-doc.wallix.com/uploads/images/gallery/2023-10/mappingbastion.PNG)
- Click on **Apply an close**
You now have a working LDAP authentication, with access to targets based on Trustelem groups.
/!\\ Trustelem users will not be found by the Bastion before having an access rule (1 or 2 factors)
The documentation to defined the access rules is provided in the page: [https://trustelem-doc.wallix.com/books/trustelem-administration/page/access-rules](https://trustelem-doc.wallix.com/books/trustelem-administration/page/access-rules)
For this kind of authentication, you need a **LDAP access rule** set to **1 factor** if it will be conbined with a **Radius authentication** or **2 factors** if not.
##### What if I want to encrypt my LDAP flows?
The best way to encrypt the LDAP flows is simply to check startTLS on the Bastion. As Trustelem is compatible, flows are automatically encrypted.
The alternative is to implement LDAPS. To do this, there are several steps:
1/ Configure the connector.
On the Trustelem Connect folder, add a **config.ini** file and provide the following information
(adapted to your own repository and your own certifiates):
```
tls_cert = "C:\Program Files (x86)\Trustelem\connector.crt"
tls_cert_key = "C:\Program Files (x86)\Trustelem\connector.key"
```
Then, restart the connector service on your Virtual machine.
2/ Enable LDAPS on the Trustelem service.
3/ Enable SSL on the Bastion
4/ Optionally, add to the Bastion the authority certificate associated with the certificates used in step 1.
#### Trustelem Radius on Bastion for AD users
On **Trustelem admin page**
- Go on the tab **Apps**, and create a **Bastion** application (if not already done in a LDAP setup)
- Enable the **Radius** protocol [](https://trustelem-doc.wallix.com/uploads/images/gallery/2022-07/bastion.png)
- Go on the **Service** setup in the **Install Trustelem Connect** chapter
- Click on **Add an application +** and select the **Bastion** (if not already done in a LDAP setup)
- Enable **Radius protocol** by clicking on the **Radius button**
- the listen address can be **localhost**, all existing IP address on the machine = **\***, or a specific IP = **...**
- this will open the defined udp (Radius) or tcp (LDAP) port on the machine running **Trustelem Connect** on the IP 127.0.0.1 (localhost) OR on all local IPs (\*) OR on a specific local IP (...)
- if you have a dedicated VM for the connector, choose **\***
- you can let the default port **1812** but if you don't know if it is already used on the machine running the connector, choose **2812** instead
- Click **Save**[!](https://trustelem-doc.wallix.com/uploads/images/gallery/2023-10/protocolsservice.PNG)
On the **Bastion admin page**
- Go on **Configuration** > **External authentication**
- Create a new **Radius authentication**
- In the field **Name** choose a name for your Radius authentication like **Trustelem Radius**
- In The fields **Server** and **Port**, write the IP / FQDN of the machine running **Trustelem Connect** and the port defined on the **Trustelem Service** previously setup (should be 1812 or 2812)
- In the **Timeout** field let the default value, unless you have latency on your network
- Provide the **Radius secret** in the fields **New secret** and **Confirm secret**.
*This secret can be found in the Trustelem Bastion app model.*
- Check the option **Use mobile device for 2 factor authentication(2FA)**
- This option has be designed for MFA with push authentication. But the real effect is to skip the login + password step for the Radius authentication by automatically sending the login and an empty password.
- Here we want to use Active Directory for the login + password step, so we don't want to ask for the Radius password = we need to activate this option.
- Click on **Apply**[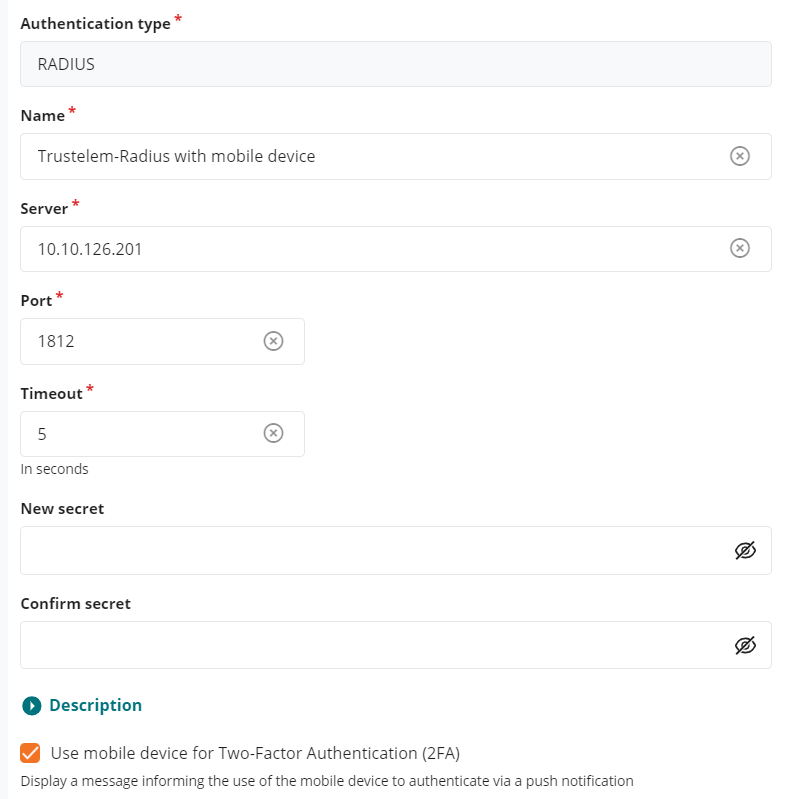](https://trustelem-doc.wallix.com/uploads/images/gallery/2023-10/externalradius.PNG)
- Go on **Configuration** > **Authentication domains**
- Click on your existing **Active Directory authentication domain**
- In the field **Secondary authentication** select the previous **Radius external authentication**
- Click on **Apply**
You can't test the authentication yet, first you need to define the **access rules** on Trustelem.
The documentation is provided in the page: [https://trustelem-doc.wallix.com/books/trustelem-administration/page/access-rules](https://trustelem-doc.wallix.com/books/trustelem-administration/page/access-rules)
For this kind of authentication, you need a **Radius access rule** set to **2nd factor only**If you want to skip the 2nd factor step for some users, you can select for them the rule **Always allow** instead on Trustelem.
If the authentication doesn't work correctly:
- Read the [debug chapter of LDAP-Radius Trustelem Connect](https://trustelem-doc.wallix.com/books/trustelem-administration/page/ldap-radius-trustelem-connect#bkmrk-debug)
- You can also verify if you checked the option **Use mobile device** on the **Radius external authentication**
#### Trustelem Radius on Bastion for Bastion users
On **Trustelem admin page**
- Go on the tab **Apps**, and create a **Bastion** application (if not already done in a LDAP setup)
- Enable the **Radius** protocol [](https://trustelem-doc.wallix.com/uploads/images/gallery/2022-07/bastion.png)
- Go on the **Service** setup in the **Install Trustelem Connect** chapter
- Click on **Add an application +** and select the **Bastion** (if not already done in a LDAP setup)
- Enable **Radius protocol** by clicking on the **Radius button**
- the listen address can be **localhost**, all existing IP address on the machine = **\***, or a specific IP = **...**
- this will open the defined udp (Radius) or tcp (LDAP) port on the machine running **Trustelem Connect** on the IP 127.0.0.1 (localhost) OR on all local IPs (\*) OR on a specific local IP (...)
- if you have a dedicated VM for the connector, choose **\***
- you can let the default port **1812** but if you don't know if it is already used on the machine running the connector, choose **2812** instead
- Click **Save**[!](https://trustelem-doc.wallix.com/uploads/images/gallery/2023-10/protocolsservice.PNG)
On the **Bastion admin page**
- Go on **Configuration** > **External authentication**
- Create a new **Radius authentication**
- In the field **Name** choose a name for your Radius authentication like **Trustelem Radius**
- In The fields **Server** and **Port**, write the IP / FQDN of the machine running **Trustelem Connect** and the port defined on the **Trustelem Service** previously setup (should be 1812 or 2812)
- In the **Timeout** field let the default value, unless you have latency on your network
- Provide the **Radius secret** in the fields **New secret** and **Confirm secret**.
*This secret can be found in the Trustelem Bastion app model.*
- Don't check the option **Use mobile device for 2 factor authentication(2FA)**
- This option has be designed for MFA with push authentication. But the real effect is to skip the login + password step for the Radius authentication by automatically sending the login and an empty password.
- Here we want to verify login + password + 2nd factor with Radius, because a local Bastion user can't have the authentication local password + Radius. So this option must not be activated.
- Click on **Apply**[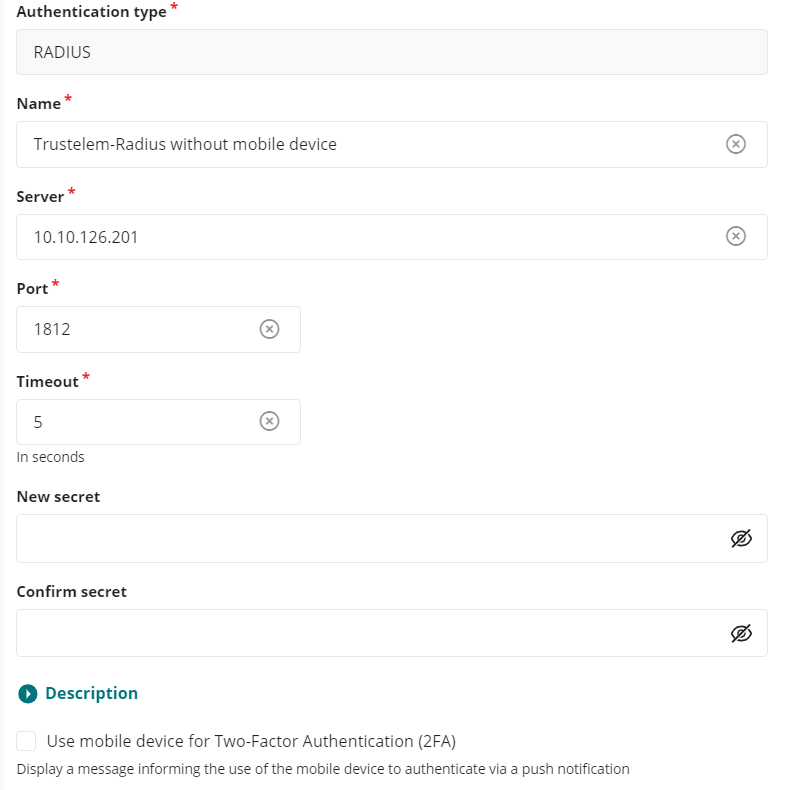](https://trustelem-doc.wallix.com/uploads/images/gallery/2023-10/externalradius2.PNG)
- Go on **Accounts**
- Click on an existing user
- Verify if his login (**UserName**) is something known by Trustelem : should be an email if the associated Trustelem user is a local one.
- In the field **Authentication and backup servers** select only the previous **Radius external authentication**
- As mentioned before, this user can't have a local password + Radius. If you select both, the Bastion will try the first method (local password). If it is a success, the authentication is completed, if not the Bastion will try the Radius authentication.
- Click on **Apply**
You can't test the authentication yet, first you need to define the **access rules** on Trustelem.
The documentation is provided in the page: [https://trustelem-doc.wallix.com/books/trustelem-administration/page/access-rules](https://trustelem-doc.wallix.com/books/trustelem-administration/page/access-rules)
For this kind of authentication, you need a **Radius access rule** set to **2 factors**
If the authentication doesn't work correctly:
- Read the [debug chapter of LDAP-Radius Trustelem Connect](https://trustelem-doc.wallix.com/books/trustelem-administration/page/ldap-radius-trustelem-connect#bkmrk-debug)
- As mentioned in this page, if the login of the local user is unknown by Trustelem the authentication won't work, but you'll have some logs
#### Trustelem Radius on Bastion for Trustelem users
On **Trustelem admin page**
- Go on the tab **Apps**, and create a **Bastion** application (if not already done in a LDAP setup)
- Enable the **Radius** protocol [](https://trustelem-doc.wallix.com/uploads/images/gallery/2022-07/bastion.png)
- Go on the **Service** setup in the **Install Trustelem Connect** chapter
- Click on **Add an application +** and select the **Bastion** (if not already done in a LDAP setup)
- Enable **Radius protocol** by clicking on the **Radius button**
- the listen address can be **localhost**, all existing IP address on the machine = **\***, or a specific IP = **...**
- this will open the defined udp (Radius) or tcp (LDAP) port on the machine running **Trustelem Connect** on the IP 127.0.0.1 (localhost) OR on all local IPs (\*) OR on a specific local IP (...)
- if you have a dedicated VM for the connector, choose **\***
- you can let the default port **1812** but if you don't know if it is already used on the machine running the connector, choose **2812** instead
- Click **Save**[!](https://trustelem-doc.wallix.com/uploads/images/gallery/2023-10/protocolsservice.PNG)
On the **Bastion admin page**
- Go on **Configuration** > **External authentication**
- Create a new **Radius authentication**
- In the field **Name** choose a name for your Radius authentication like **Trustelem Radius**
- In The fields **Server** and **Port**, write the IP / FQDN of the machine running **Trustelem Connect** and the port defined on the **Trustelem Service** previously setup (should be 1812 or 2812)
- In the **Timeout** field let the default value, unless you have latency on your network
- Provide the **Radius secret** in the fields **New secret** and **Confirm secret**.
*This secret can be found in the Trustelem Bastion app model.*
- Check the option **Use mobile device for 2 factor authentication(2FA)**
- This option has be designed for MFA with push authentication. But the real effect is to skip the login + password step for the Radius authentication by automatically sending the login and an empty password.
- Here we want to use Active Directory for the login + password step, so we don't want to ask for the Radius password = we need to activate this option.
- Click on **Apply**[](https://trustelem-doc.wallix.com/uploads/images/gallery/2023-10/externalradius.PNG)
- Go on **Configuration** > **Authentication domains**
- Click on your existing **Trustelem Active Directory authentication domain**
- In the field **Secondary authentication** select the previous **Radius external authentication**
- Click on **Apply**
You can't test the authentication yet, first you need to define the **access rules** on Trustelem.
The documentation is provided in the page: [https://trustelem-doc.wallix.com/books/trustelem-administration/page/access-rules](https://trustelem-doc.wallix.com/books/trustelem-administration/page/access-rules)
For this kind of authentication, you need a **Radius access rule** set to **2nd factor only**If you want to skip the 2nd factor step for some users, you can select for them the rule **Always allow** instead on Trustelem.
If the authentication doesn't work correctly:
- Read the [debug chapter of LDAP-Radius Trustelem Connect](https://trustelem-doc.wallix.com/books/trustelem-administration/page/ldap-radius-trustelem-connect#bkmrk-debug)
- You can also verify if you checked the option **Use mobile device** on the **Radius external authentication**
# Wombat Security
- Download your metadata file and send it to support@wombatsecurity.com.
*The metadata file can be found in the Trustelem setup page of your application.*
- Await confirmation from support.
# WordPress
#### Supported Features
The integration currently supports the following features:
- SAML
- OpenID Connect
- JIT (Just In Time) Provisioning
#### Configuration
##### Wordpress Config
- Download the OpenID Connect plugin for Wordpress (license: GPLv2): [https://wordpress.org/plugins/daggerhart-openid-connect-generic](https://wordpress.org/plugins/daggerhart-openid-connect-generic)
- Install the plugin using Wordpress admin page or by copying the downloaded content in **wordpress/wp-content/plugins**, then activate it in the **Plugins** tab of the Wordpress admin page.
- In **Settings**, then **OpenID Connect Client**, complete the following parameters:
```exp
Login Type: Auto Login-SSO
Client ID: trustelem.oidc.gi3XXXX
Client Secret Key: vly5yqnXXXX
OpenID Scope: email profile openid
Login Endpoint URL: https://mydomain.trustelem.com/app/160XXX/auth
Userinfo Endpoint URL: https://mydomain.trustelem.com/app/160XXX/userinfo
Token Validation Endpoint URL: https://mydomain.trustelem.com/app/160XXX/token
End Session Endpoint URL: https://mydomain.trustelem.com/app/160XXX/on_logout
Identity Key: name
Nickname Key: name
```
- We recommend to activate the following options:
- Link Existing Users: create unknown users or update existing users
- Redirect Back to Origin Page: redirect users to the page on which they were before the authentication
- Redirect to the login screen session is expired
- Enforce Privacy
- Nota:
- Those parameters are optional. Their description is in the Wordpress admin dashboard
- Let the other parameters to their original value
##### Trustelem Config
- Setup Trustelem with the following parameters:
- Wordpress server URL
- Login URL: the application's URL starting the OIDC flow. It is used as a target to the application on the Trustelem user's dashboard.
#### Beware of access control policies
- If the user identified by Trustelem doesn't exist in Wordpress, it will be automatically created.
- So access control policies have to be set up carefully on the **Access Rules** tab of the Trustelem admin dashboard.
##### Wordpress Config
- Download the SAML plugin for Wordpress: [https://wordpress.org/plugins/wp-saml-auth/](https://wordpress.org/plugins/wp-saml-auth/)
- Install the plugin using Wordpress admin page or by copying the downloaded content in wordpress/wp-content/plugins, then activate it in the Plugins tab of the Wordpress admin page.
- In Settings, then WP SAML AUTH, complete the following parameters:
- **Auto Provision**: if checked, a new Wordpress user will be provision at his first log in
- **Permit WordPress login**: if checked, Wordpress users can be authenticated using Trustelem and a standard login form
- **Get User By**: let default value "email"
- **Base URL**: provide Wordpress url, for example `https://mywordpress.tld`
- In Service Provider Settings:
- **Entity ID**: provide your Wordpress url, for example `https://wordpress.tld`
- **ACS**: provide your Wordpress login url, for example `https://wordpress.tld/wp-login.php`
- In Identity Provider Settings
```exp
Entity ID: https://mydomain.trustelem.com/app/160XXX/
Single SignOn Service URL: https://mydomain.trustelem.com/app/160XXX/sso
Single Logout Service URL: https://mydomain.trustelem.com/app/160XXX/on_logout
```
- Download the Trustelem application certificate and save it in your Wordpress repository
On the field **x509 Certificate Path** provide the path of your certificate
*For example ABSPATH/wp-content/cert-trustelem.pem*
- Certificate Fingerprint: let this field empty
- Certificate Fingerprint Algorithm: let this field empty
- In Attribute Mappings
```exp
user_login: email
user_email: email
display_name: displayname
first_name: firstname
last_name: lastname
```
- Click on Save Changes
##### Trustelem Config
- Setup Trustelem with the following parameters:
- Wordpress server URL
- Relay State: the Wordpress URL to target when users use Trustelem dashboard
# Workplace
- Sign in to your Facebook Workplace subscription with an admin account
- Click on **Company Dashboard** and go to **Parameters > Authentification**
- Select « **Allow users to login via: SAML only** »
- Choose your preferred session duration options
- Enter the 3 following parameters:
- SAML URL
```exp
https://mydomain.trustelem.com/app/76XXX/sso
```
- SAML Issuer URI
```exp
https://mydomain.trustelem.com/app/76XXX
```
- SAML certificate (*available in the set-up page of your Trustelem application*)
- Configure Trustelem by setting the **ACS URL** and **Audience URL** parameters
- Click on **Test SSO**
- Once the test is OK, click on **Save**
# Wrike
- Download your metadata file and send it to [support@team.wrike.com](mailto:support@team.wrike.com?subject=Trustelem%20SSO%20setup%20for%20my%20Wrike%20subscription).
*The metadata file can be found in the Trustelem setup page of your application.*
- Await confirmation from support.
# XWiki
#### XWiki Configuration
- Note: the following applies to Windows configuration
- Log into your XWiki admin account and go to the Administer Wiki section
- Go to the Extensions tab and install the OpenID Connect Authenticator extension
- Edit the XWiki.cfg file and write the following line :
```exp
xwiki.authentication.authclass=org.xwiki.contrib.oidc.auth.OIDCAuthServiceImpl
```
- Edit the XWiki.properties file and write the following lines:
```exp
oidc.xwikiprovider=https://mydomain.trustelem.com/app/150XXX
oidc.endpoint.authorization=https://mydomain.trustelem.com/app/150XXX/auth
oidc.endpoint.token=https://mydomain.trustelem.com/app/150XXX/token
oidc.endpoint.userinfo=https://mydomain.trustelem.com/app/150XXX/userinfo
oidc.scope=openid,profile,email
oidc.endpoint.userinfo.method=GET
oidc.user.nameFormater=${oidc.user.email}
oidc.user.subjectFormater=${oidc.user.subject}
oidc.clientid=trustelem.oidc.gvsteodb
oidc.secret=v0x8W4Gx97uycjBs18xeA5f6fkp2wyIY
oidc.endpoint.token.auth_method=client_secret_basic
oidc.skipped=false
```
- Reboot your XWiki server to take modifications into account
#### Notes
- This documentation applies if you have the standard flavor. If you have another flavor, the graphical user interface may differ
- oidc.scope parameter can be adapted to suit your needs
- For SSO to work with existing users, the field User on XWiki has to match their Trustelem email
- To disable Single Sign-On, change the oidc.skipped=false line to oidc.skipped=true
#### Trustelem Configuration
- On Trustelem, write your XWiki server URL in the corresponding field
#### Roles Configuration
- If you want to map your Trustelem roles with XWiki's ones you need to edit the XWiki.properties file and add these lines:
```exp
oidc.userinfoclaims=xwiki_groups
oidc.groups.mapping=YourXWikiGroup=YourTrustelemGroup
```
- The second line must be added for each mapping you want to do
- On Trustelem, you need to add these lines in the Custom claims script section:
```ts
const xwikiGroups: string[]= [];
for(let g in groups) {
xwikiGroups.push(g);
}
claims["xwiki_groups"] = xwikiGroups;
```
- You can also send more attributes to XWiki by adding these lines in the Custom claims script section (one line per attribute sent):
```ts
claims["name1"] = user.getAttr("attribute1");
```
- These attributes can then be used in XWiki, for example if you want to change usernames to email-attribute1, you'll need to edit xwiki.properties and write:
```exp
oidc.user.nameFormatter=${oidc.user.email}-${oidc.user.name1}
```
# You Don't Need a CRM
- Connect with an admin account to [https://www.nocrm.io](https://www.nocrm.io)
- Go to the **admin panel** and click on **Trustelem section**
- Enter your **Trustelem organization name**
# Zabbix
- Log into your Zabbix admin session and in Administration go to Authentication
- Go to the SAML tab, check Enable SAML authentication and fill the following fields:
- IdP entity ID
```exp
https://mydomain.trustelem.com/app/3XXXXX
```
- SSO service URL
```exp
https://mydomain.trustelem.com/app/3XXXXX/sso
```
- SLO service URL
```exp
https://mydomain.trustelem.com/app/3XXXXX/on_logout
```
- Username attribute
```exp
username
```
- SP entity ID
```exp
zabbix
```
- Download Trustelem certificate and go to the zabbix.conf.php file and at line $SSO\['IPD\_CERT'\]= '' add the path to the downloaded certificate For example on Ubuntu the conf file is located at /etc/zabbix/web/zabbix.conf.php and the line should look like $SSO\['IDP\_CERT'\] = '/home/user/cert.pem';
#### Trustelem Configuration
- On Trustelem add the path to Zabbix UI, it can look like `http://[ip-local]/zabbix/`
- By default the username will be the user email, if you want to change it and put firstname.lastname for example, you can add these lines in Custom scripting:
```ts
function CustomSAMLResponse(msg: SAMLResponse, user: User, groups: Groups, deny: Deny): void {
msg.setAttr("username", user.firstname+"."+user.lastname);
}
```
# Zendesk
#### Zendesk Configuration
- Log into your admin session on Zendesk and go the administration center (click on the four squares in the top right corner and then on admin center)
- Go the Security tab and then on Single Sign On
- Click on configure next to the SAML button
- Complete the following parameters:
- SAML SSO URL:
```exp
https://mydomain.trustelem.com/app/33XXXX/sso
```
- Remote logout URL:
```exp
https://mydomain.trustelem.com/app/33XXXX/on_logout
```
- Certificate fingerprint:
- Download the certificate \[here\]
- Find the certificate fingerprint by using Microsoft Management Console for example
- In Security for Staff members and End users you can chose to activate the external authentication via SAML by checking Single sign-on and then SAML
#### Trustelem Configuration
- Change the EntityID by replacing domain-name by your Zendesk domain name
- Do the same for the Assertion Consumer Service
- In Custom scripting, you can change the script [to customize the SAML response message](https://support.zendesk.com/hc/en-us/articles/203663676). For example to send a role:
```ts
function CustomSAMLResponse(msg: SAMLResponse, user: User, groups: Groups, deny: Deny): void {
msg.setAttr("role","admin");
}
```
# Zscaler Cloud
#### Zscaler Portal Cloud configuration
- Go to **Authentication Settings**:
```exp
https://admin.zscloud.net/#administration/auth-settings
```
- In the field **Authentication Type** select **SAML**
- Click on **Configure SAML**
- In the field **Login Name Attribute** write: **NameID**
**Note:** the default NameID is the user's **email**.
If you want to use the **upn** instead, enter the following script line in Trustelem application **Custom scripting** field (see below for a complete example):
```ts
function CustomSAMLResponse(msg: SAMLResponse, user: User, groups: Groups, deny: Deny): void {
msg.setNameID(user.upn);
}
```
- In the field **SAML Portal URL** write:
```exp
https://mydomain.trustelem.com/app/18XXXX/sso
```
- In **Public SSL Certificate**, upload the certificate of your Trustelem application
- Turn OFF both **Enable SCIM-Based Provisioning** and **Sign SAML Request**
#### If you want to turn ON the SAML Auto-Provisioning function
- In Zscaler, activate **SAML Auto-Provisioning** and enter the following attributes:
- User Display Name Attribute : **displayName**
- Group Name Attribute : **groups**
- Department Name Attribute : **department**
- In Trustelem application **Custom scripting** field, write:
```ts
function CustomSAMLResponse(msg: SAMLResponse, user: User, groups: Groups, deny: Deny): void {
msg.setAttr('displayName', user.firstname + ' ' + user.lastname);
msg.addAttr('groups', 'group1');
msg.addAttr('groups', 'group2');
msg.addAttr('groups', 'groupX');
msg.setAttr('department', 'my_department');
}
```
**Note:** instead of the constants "groupX" and "my\_department", you can use other user's attributes.
For instance if you want to use Trustelem group attribute:
```ts
for (let name in groups){
msg.addAttr('groups', name);
}
```
Here is a complete example of custom scripting:
[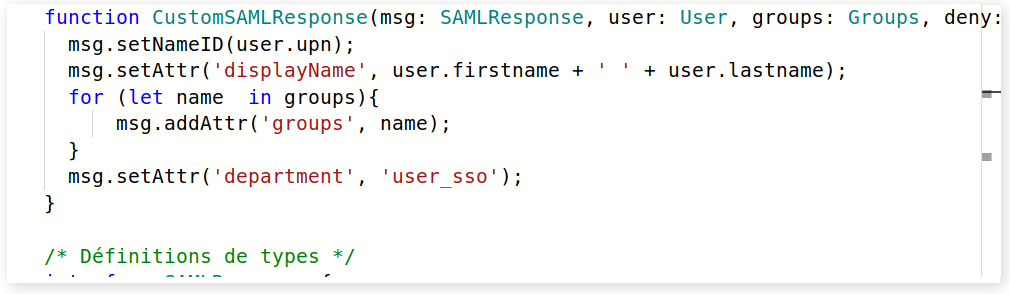](https://trustelem-doc.wallix.com/uploads/images/gallery/2022-06/zscaler-custom-script.PNG)
# WALLIX Bastion SAML
*This page is temporary, until we have a dedicated template on Trustelem and integration into the 'setup intructions' page dedicated to Bastion and AM.*
### Step 1: on Trustelem, create an application
As we don't have a dedicated template yet, you have to choose the **generic SAML2 model**.
Once the application is created, you can save it without any modification and then download the metadata file.
### Step 2: on the Bastion, create an External authentication
On the Bastion admin interface:
1. Create a new **SAML** external authentication (Configuration > External authentications)
2. Upload the Trustelem metadata file on the field **IdP metadata**
3. Complete the claims customization
- Username: email or sAMAccountName, depending on whether Trustelem users come from the AD or not.
- Display name: displayname
- Email: email
- Language: empty
- Group: groups
4. Click on apply
5. Copy the **SP entity ID** and the **SP assertion concumer service**
### Step 3: on the Bastion, create an Authentication domain
On the Bastion admin interface:
1. Create a new **Other IdPs** authentication domain (Configuration > Authentication domains)
2. Define a Domain server name
3. Define an Authentication domain name
- This value will be used to authenticate on the proxy if this Authentication domain is not the default one
- This value will be used in the Access Manager setup, if you want to use this product
4. Choose the Authentication protocole created in the 2nd step
5. Define the Label for authentication button on the login page
6. Define a default email domain
7. Choose a default language
8. Save the configuration
9. Copy the **IdP initiated URL**
### Step 4: on Trustelem, edit the previous application
Edit the application created at the 1st step.
- EntityID: SP entity ID copied during the 2nd step
- Assertion Consumer Service: SP assertion concumer service copied during the 2nd step
- NameID Format: default value
- NameID Attribute: default value
- Attributes List: email,displayname
- Custom login URL: IdP initiated URL copied during the 3rd step
- Custom script:
*This script can be adapted if something else should be sent to the Bastion*```ts
for (let g in groups){
msg.addAttr("groups",g);
}
```
### Step 5: define the access & rights
Now the setup is ready, but users can't authenticate on the Bastion and don't have rights.
1. On Trustelem, create permissions for users who should have access to the Bastion
2. On the Bastion Authentication domain (step 3), create the mapping between the Bastion user groups and the groups existing on Trustelem
### Access Manager with SAML Bastion
If you want to use Access Manager with SAML Bastion, the Access Manager should be > 5.0
In addition, some parameters on the SAML Access Manager should be identical as what was setup for the Bastion:
- AM Domain Name = Bastion Authentication domain name
- AM Login = Bastion Username
Finally, you have to create the same script for you SAML Access Manager app, as the one existing on the Bastion.
```ts
for (let g in groups){
msg.addAttr("groups",g);
}
```