# Active Directory users - Trustelem ADConnect
#### Contents
* [How does it work?](https://trustelem-doc.wallix.com/books/trustelem-administration/page/active-directory-synchronization#bkmrk-how-does-it-work%3F)
* [Prerequisites](https://trustelem-doc.wallix.com/books/trustelem-administration/page/active-directory-synchronization#bkmrk-prerequisites)
* [Setup on Windows](https://trustelem-doc.wallix.com/books/trustelem-administration/page/active-directory-synchronization#bkmrk-setup-on-windows)
* [Setup on Linux](https://trustelem-doc.wallix.com/books/trustelem-administration/page/active-directory-synchronization#bkmrk-setup-on-linux)
* [Debug](https://trustelem-doc.wallix.com/books/trustelem-administration/page/active-directory-synchronization#bkmrk-debug)
* [Updating the connector](https://trustelem-doc.wallix.com/books/trustelem-administration/page/active-directory-synchronization#bkmrk-updating-the-connect)
#### How does it work?
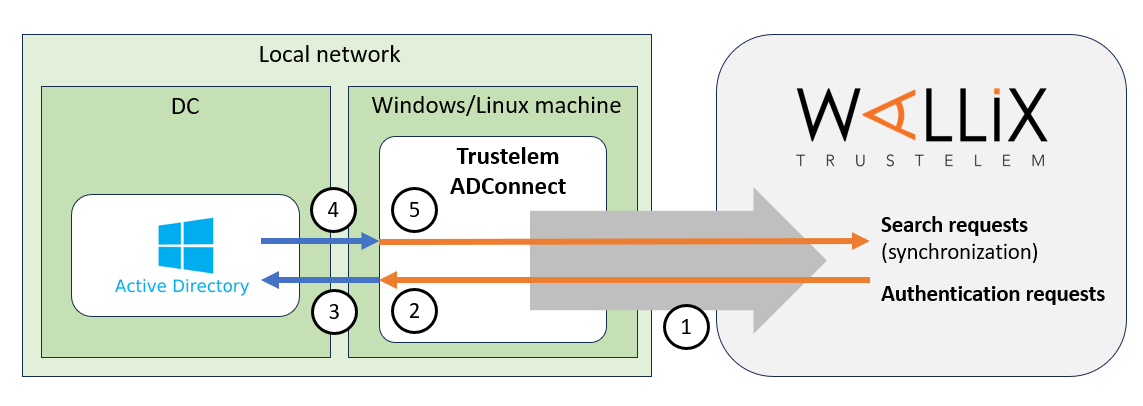
The goal is to use **Active Directory** as an identity provider for Trustelem.
To do so, a connector, **Trustelem ADConnect**, is installed on a customer Virtual Machine.
Using this connector, Trustelem can synchronize and authenticate users selected by Trustelem administrators, based on their AD memberOf.
[](https://trustelem-doc.wallix.com/uploads/images/gallery/2023-10/schema-tlm-adconnect.PNG)
1/ During the setup, **Trustelem ADConnect** opens a **websocket** to **admin.trustelem.com** using **port 443**.
**Note:** with the websocket, information is encrypted by TLS protocol and with an additional symmetric encryption.
2/ Trustelem sends search / authentication requests to **Trustelem ADConnect** using the **websocket**.
3/ **Trustelem ADConnect** sends the request to **Active Directory** using **LDAP(S)** with the service account running the connector.
4/ **Active Directory** replies to the request from **Trustelem ADConnect** using **LDAP(S)**.
5/ **Trustelem ADConnect** sends the answer to **admin.trustelem.com** using the **websocket**
**Note: thanks to this connector Trustelem does not store any password for Active Directory users.**
#### Prerequisites
* Prepare a VM, Windows Server or Linux, with minimal resources for the OS
* If you have only one VM which is down, the link to your AD is down too..
* The recommendation is 2 VM at least, to have a failover system
* Download Trustelem ADConnect on the VM (.exe or .tgz depending of the OS)
* [https://dl.trustelem.com/adconnect/](https://dl.trustelem.com/adconnect/)
* If the VM isn't a Windows Server in the AD domain, you need to open the flow from the VM to a DC
* tcp port 389 or 636
* The flow from the VM to **https://admin.trustelem.com** should be opened (IP: 185.4.44.22)
* tcp port 443
* A service account with "read only" rights should be created on your Active Directory
#### Setup on Windows
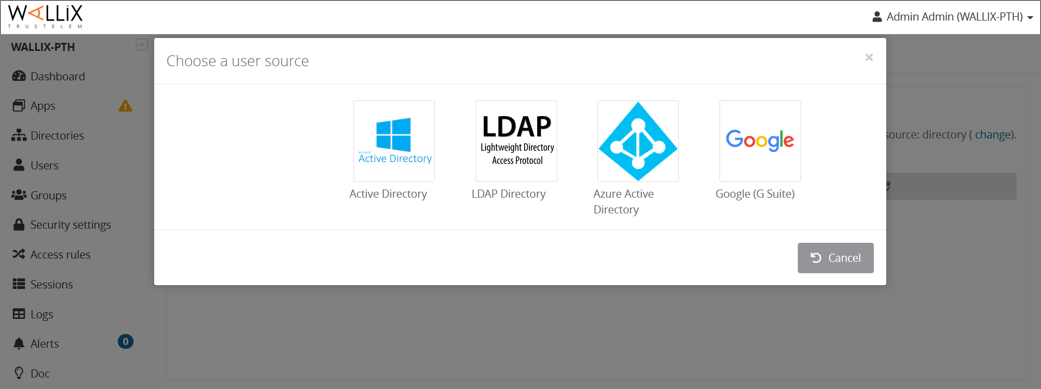
* Click on **Create** and select **Active Directory**.
[](https://trustelem-doc.wallix.com/uploads/images/gallery/2022-07/setupad1.png)
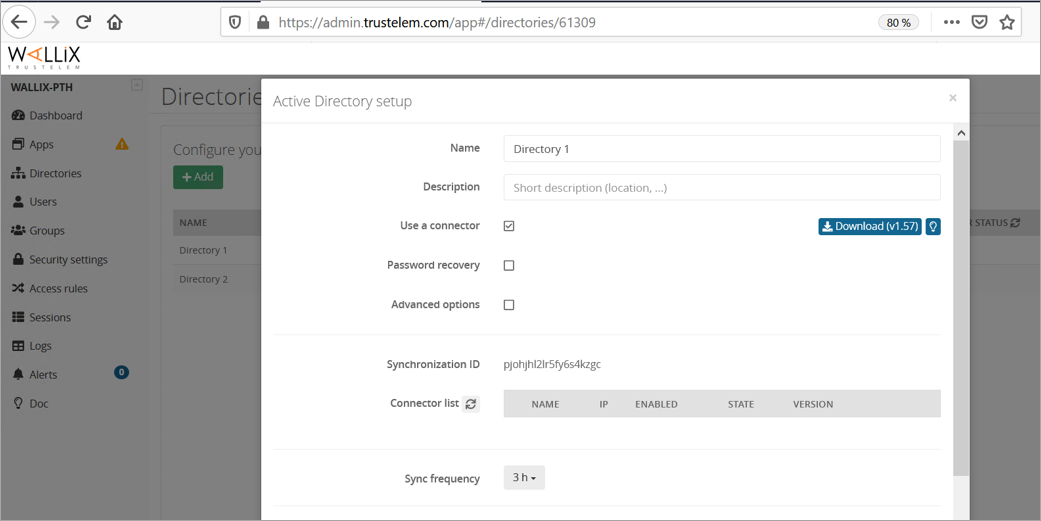
* Give a name to the new directory, and optionally a description.
* Ensure **Use a connector** is checked.
* Write down the **synchronization ID**, then click on **Save**.
[](https://trustelem-doc.wallix.com/uploads/images/gallery/2022-06/setup1-ad.png)
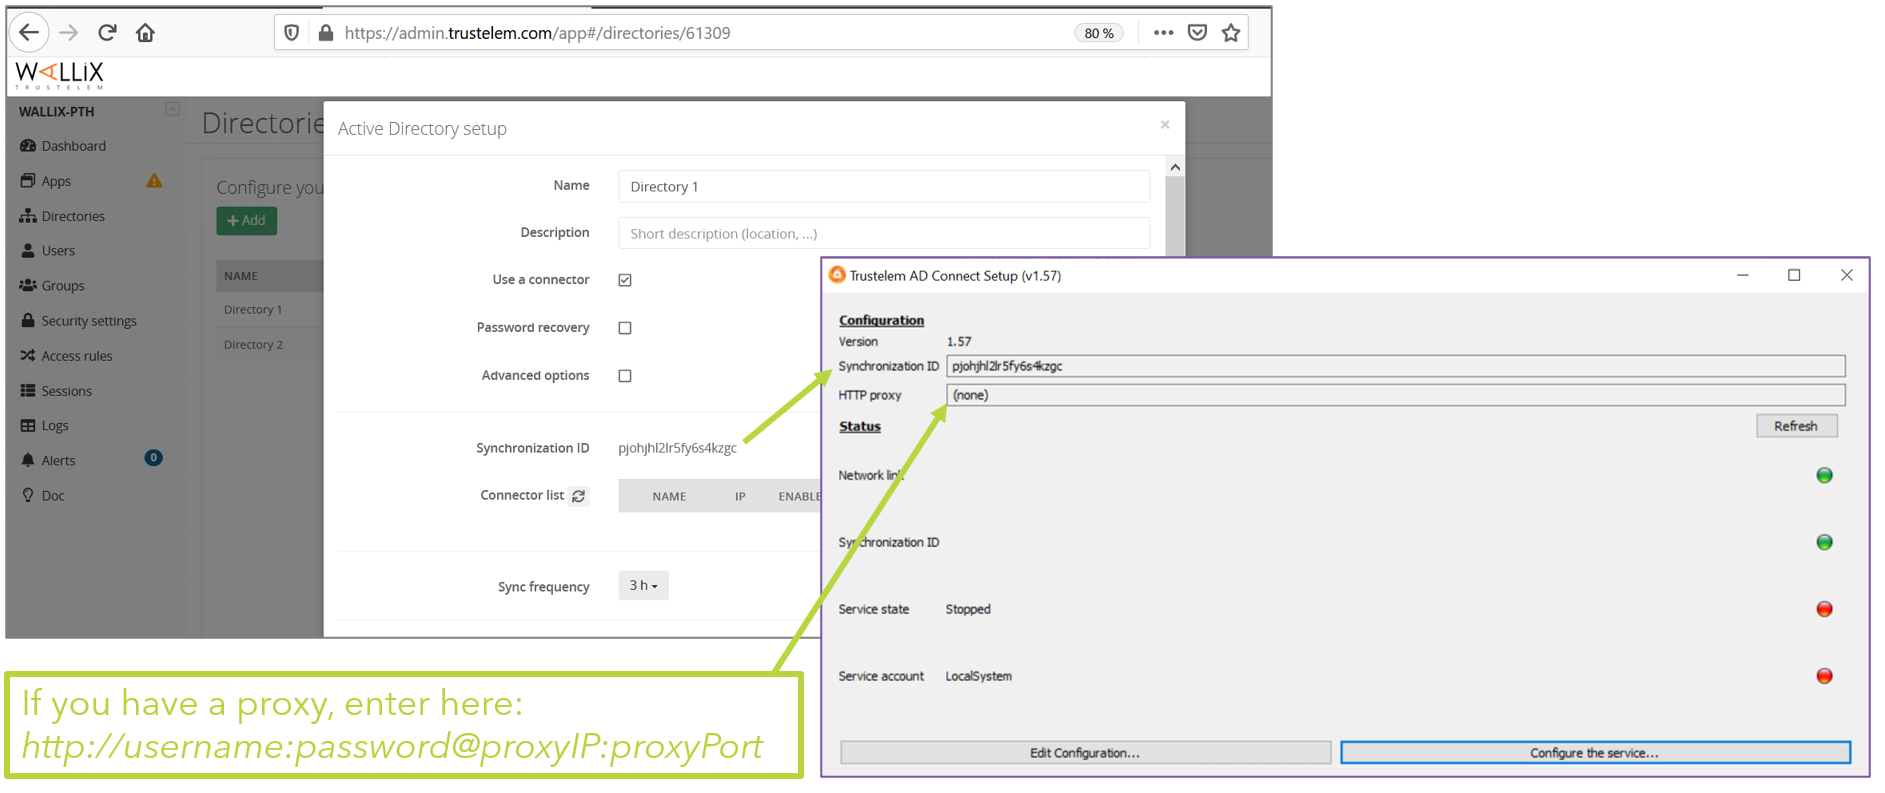
* On your VM, launch the installation software and paste the **synchronization ID** then click on **Validate the Configuration**
[](https://trustelem-doc.wallix.com/uploads/images/gallery/2022-07/setupad4.png)
* Configure Trustelem Service.
* Open Windows Services Manager (you can click on **Configure the service**).
* Select **Trustelem ADConnect** ».
* Right-click, select **Properties**.
[](https://trustelem-doc.wallix.com/uploads/images/gallery/2022-07/setupad5.png)
* On **General** tab, make sure that **Startup type** is set to **Automatic (Delayed Start)**.
* On **Log On** tab, select **This account** and enter the technical user's credentials.
* If the machine is not on the AD domain, you can't use the Log On tab of the service.
* Create a config.ini file in Trustelem setup directory
```
ldap_addr = ldap://ad_fqdn_or_ip
ldap_port = 389
# use the UPN
ldap_user = connector@ADdomain
ldap_password = xxxx
```
* If you want to use LDAPs, change the configuration to:
```
ldap_addr = ldaps://ad_fqdn_or_ip
# or
ldap_addr = ldaps://ad_fqdn_or_ip?tls_verify
# certificate has to be in Trustelem setup directory
ldap_port = 636
```
* Launch the service
[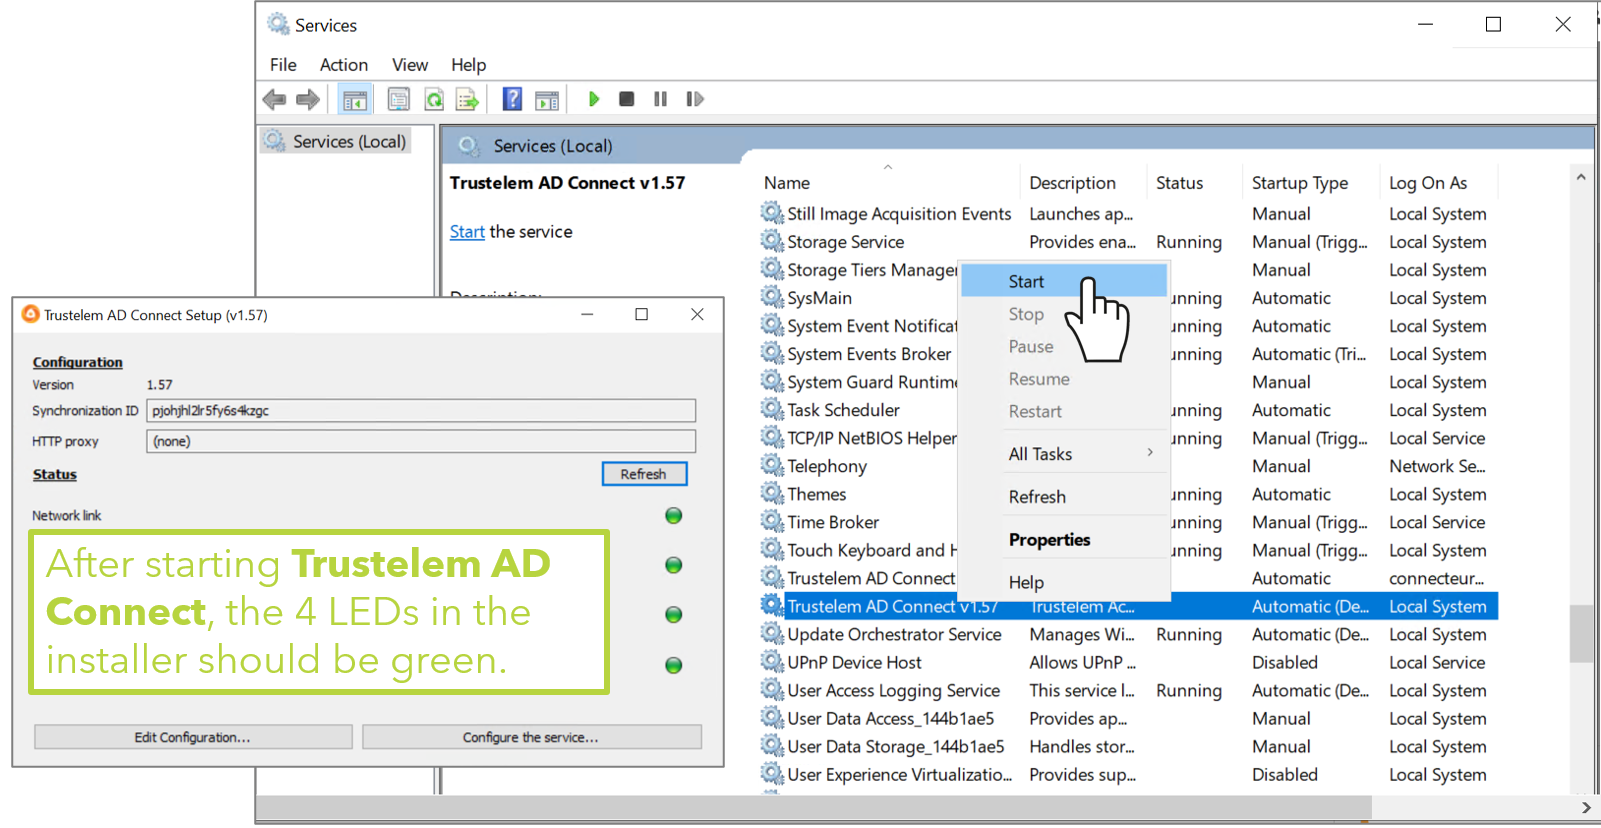](https://trustelem-doc.wallix.com/uploads/images/gallery/2022-07/setupad9.png)
*Note: if you used a config.ini file (machine not in the AD domain), the 4th led will be red.*
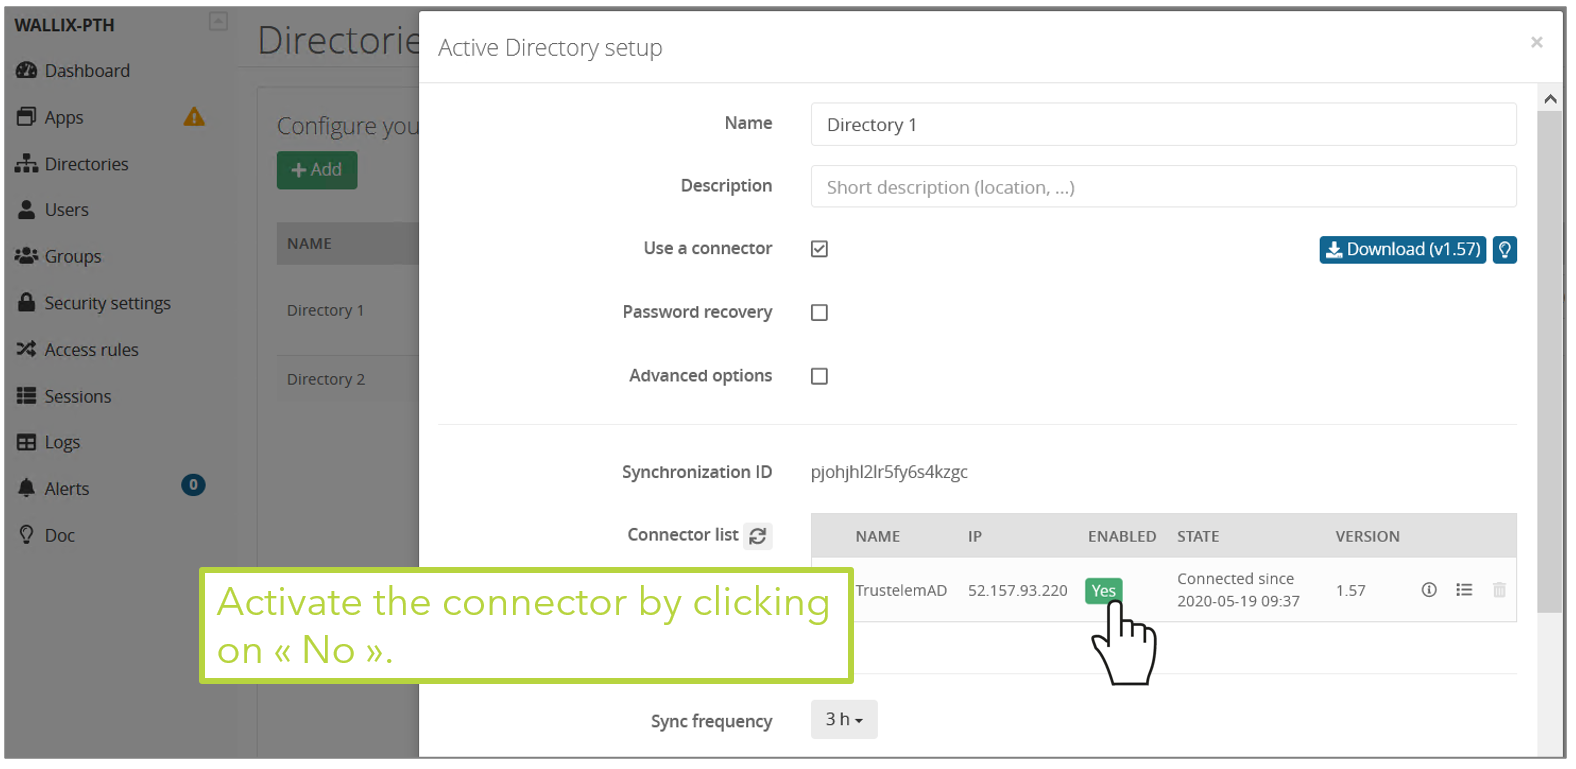
* Get back to the Trustelem admin dashboard, **Directory** tab
* Refresh the page: the connector should show up in the table.
* Once the connector is up, check the IP address, the server name and the service account (to avoid spoofing), then activate the connector by pushing the "No" button.
[](https://trustelem-doc.wallix.com/uploads/images/gallery/2022-07/setupad11.png)
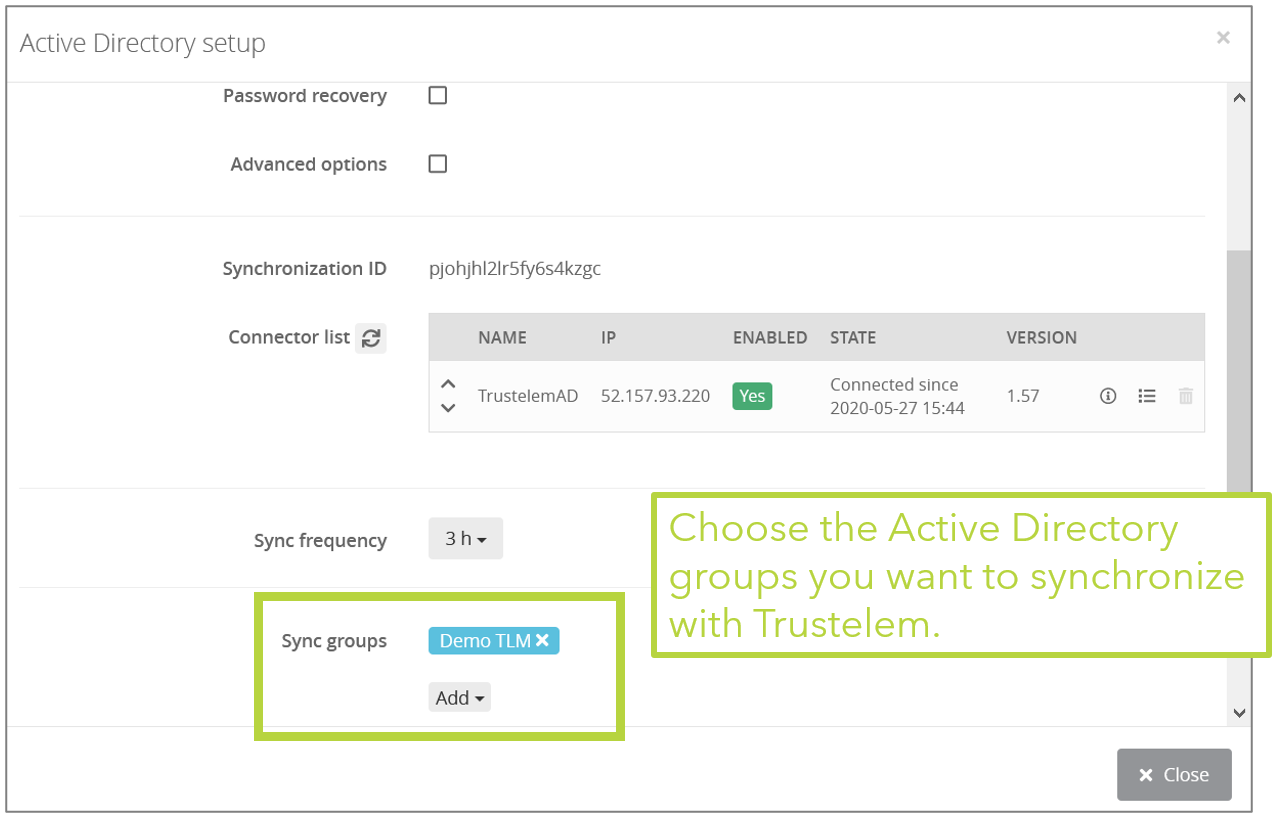
* Setup the appropriate synchronization frequency (nota: a high frequency increases the load of your domain controllers).
* Select the groups to be synchronized.
**WARNING: if you synchronize a user who has the same UPN/email as a local Trustelem account, then the 2 accounts will be merged and the password to use will be the one from Active Directory. This often happens when you have a local admin account, and then add new AD accounts.**
[](https://trustelem-doc.wallix.com/uploads/images/gallery/2022-07/setupad12.png)
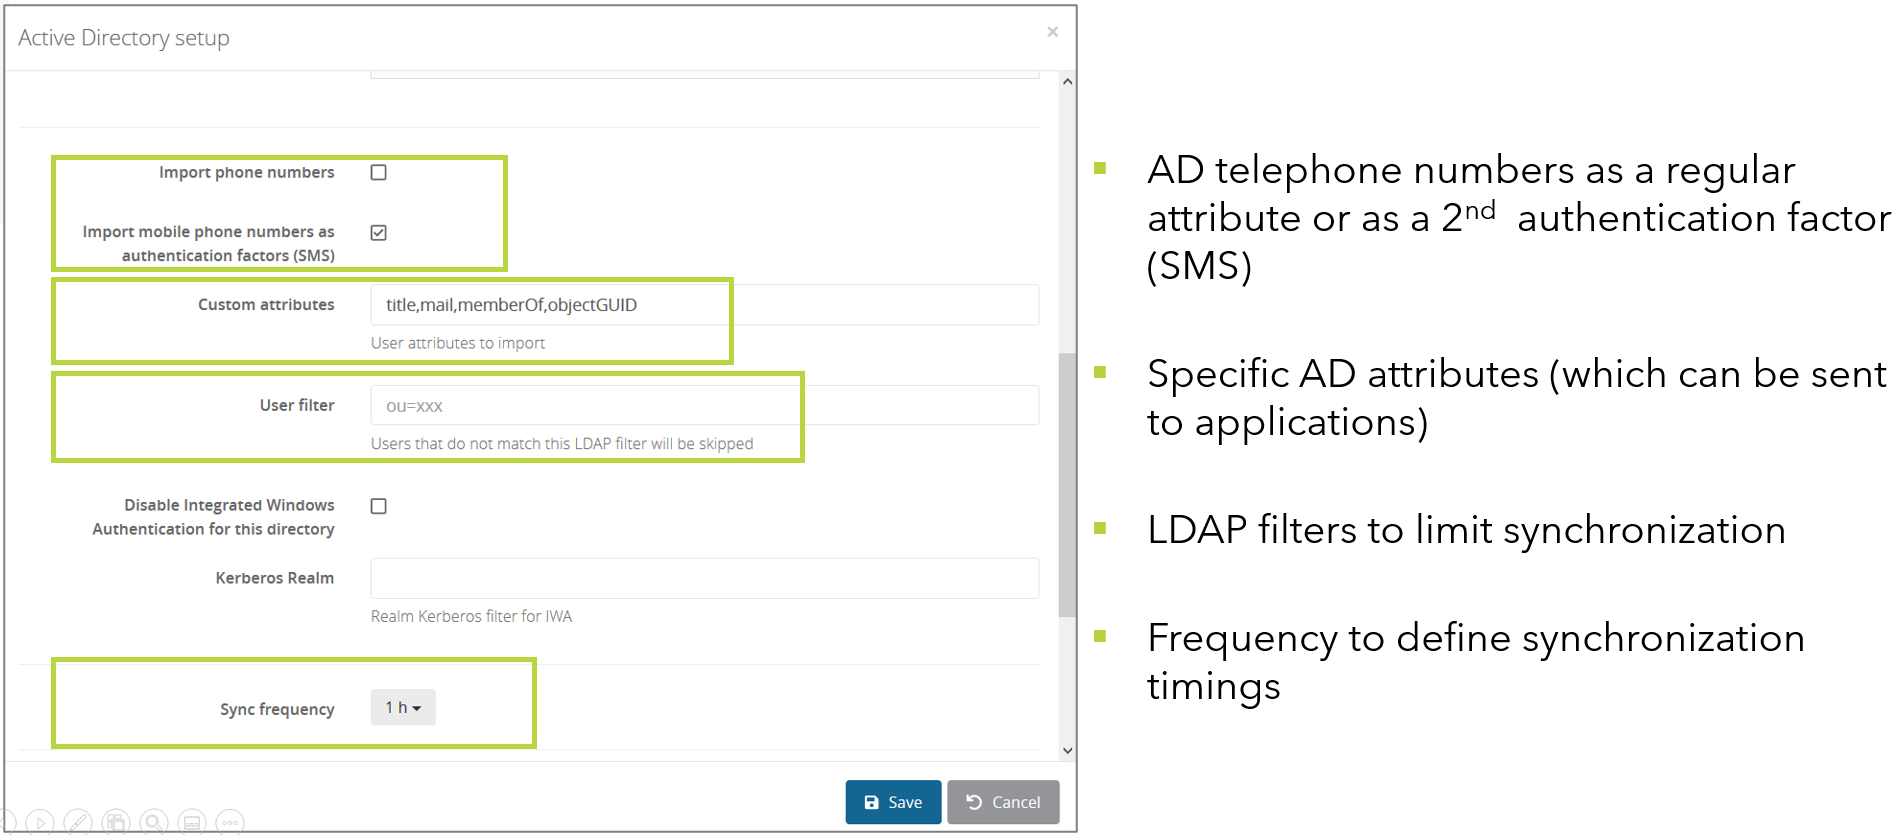
* By checking **Advanced options**, you can define a list of **Custom attributes** (title, memberOf,objectGUID,userPrincipalName...) to import with the users.
[](https://trustelem-doc.wallix.com/uploads/images/gallery/2022-07/setupad13.png)
* Click on **Save**.
#### Setup on Linux
* Click on **Create** and select **Active Directory**.
[](https://trustelem-doc.wallix.com/uploads/images/gallery/2022-07/setupad1.png)
* Give a name to the new directory, and optionally a description.
* Ensure **Use a connector** is checked.
* Write down the synchronization ID, then click on **Save**.
[](https://trustelem-doc.wallix.com/uploads/images/gallery/2022-06/setup1-ad.png)
* On your VM, launch the installation software from the .tgz file, using ./setup.sh with **root rights**
* To complete the configuration, edit /opt/wallix/trustelem-adconnect/config.ini file containing the synchronization id. A sample minimal config.ini would be:
```
sync_id = 2jy34wpcohrhdytr6hutym6qfi2l7nnw
state_dir = run/
ldap_addr = ldap://ad_fqdn_or_ip
ldap_port = 389
# use the UPN
ldap_user = connector@ADdomain
ldap_password = xxxx
# if there is a proxy
proxy = https://username:password@proxy_IP:proxy_port
```
* If you want to use LDAPs:
* change the configuration to:
```
ldap_addr = ldaps://ad_fqdn_or_ip
# or
ldap_addr = ldaps://ad_fqdn_or_ip?tls_verify
ldap_port = 636
```
* in order to set up the certificate validation correctly, you need to make sure the certificate is signed by a known CA. Check that the certificate is signed by a CA listed in `/etc/ssl/certs`.
If you need to add it, you can either symlink it from `/etc/ssl/certs` (the CA will be installed system wide) :
```
ln -nsf /path/to/public.crt /etc/ssl/certs/my-ca-name.crt
```
or you can set an environment variable `SSL_CERT_FILE=/path/to/public.crt` in the `trustelem-adconnect.service` file (the CA will be installed only locally, for the trustelem service) :
```
# in file /lib/systemd/system/trustelem-adconnect.service:
[Service]
Type = simple
ExecStart = ...
Environment = "SSL_CERT_FILE=/path/to/public.crt" # <- add this line
```
* After that, you can start the service with: **systemctl start trustelem-adconnect.service**
* Get back to the Trustelem admin dashboard, **Directory** tab
* Refresh the page: the connector should show up in the table.
* Once the connector is up, check the IP address, the server name and the service account (to avoid spoofing), then activate the connector by pushing the "No" button.
[](https://trustelem-doc.wallix.com/uploads/images/gallery/2022-07/setupad11.png)
* Setup the appropriate synchronization frequency (nota: a high frequency increases the load of your domain controllers).
* Select the groups to be synchronized.
**WARNING: if you synchronize a user who has the same UPN/email as a local Trustelem account, then the 2 accounts will be merged and the password to use will be the one from Active Directory. This often happens when you have a local admin account, and then add new AD accounts.**
[](https://trustelem-doc.wallix.com/uploads/images/gallery/2022-07/setupad12.png)
* By checking **Advanced options**, you can define a list of **Custom attributes** (title, memberOf,objectGUID,userPrincipalName...) to import with the users.
[](https://trustelem-doc.wallix.com/uploads/images/gallery/2022-07/setupad13.png)
* Click on **Save**.
#### Debug
The connector doesn't appear in the setup page on the admin page
* ping **admin.trustelem.com** on the machine running the connector to verify the outgoing flows
* verify the synchronization ID
* verify the proxy setup
* if the VM is a Windows machine, verify that you clicked on **Validate** on Trustelem ADConnect program
There is no group when I click on **Add** on the field **Sync groups**
* on the field **Connector list**, click on the **i** in a circle
* there is an error on the line **Server Link**
* **YES**
* watch the error to understand the issue
* verify the flows from the VM running the connector to the Active Directory
* verify the service account used for Trustelem AD Connect (UserPrincipalName and password)
* verify if you have a replication delay between the DC. For example, if you change the service account password just before the setup, the connector may reach an outdated DC that refuses the password.
* **NO**
* verify if the service account has the right to search groups on Active Directory
* try to refresh the page
My group doesn't contain all users
* If your group is **Domain users**, it's normal, it can't be used because it is not a real group
* Verify if the users doesn't have particular profiles which can't be found by the service account
* Verify if there is a replication delay between the DC. If you create users on a DC, it can take some time to replicate on the DC used by the connector.
* Verify if your service account has the right to search users in the selected groups
### Updating the connector
The connector Trustelem ADConnect can be updated without any service interruption:
* Install the [latest release of the connector](https://dl.trustelem.com/adconnect/) in parallel with your current connector.
* In the directory tab of the Trustelem administration console, select the relevant directory and ensure the new connector is listed first in order to be used in priority.
* Ensure that the new connector is working fine by checking its usage statistics, then you can disable the previous connector in the administration console.
* Finally, you can uninstall the previous connector from your server and then it can be deleted from the Trustelem administration console.