Trustelem administration
- Summary
- Access rules
- Active Directory users - Trustelem ADConnect
- API
- Application scripts
- Associating Google accounts on mobile devices
- Authentication with an external IDP
- Azure AD users
- Certificate renewal
- Custom themes
- Delegated administration
- Integrated Windows Authentication
- LDAP-Radius - Trustelem Connect
- Loss of a second factor
- Multi factors authentication
- On-premise SIEM
- Regular expressions
- Self-Service-Password-Reset
- Trustelem local users
- Trustelem password levels
- SCIM Client
Summary
WALLIX Trustelem provides Identity-as-a-Service (IDaaS) including a cloud Single Sign-On (SSO) and Multi-Factor Authentication (MFA).
- Trustelem manages applications authentications, with or without SSO or MFA
The goal is to unify, secure and simplify user access to their applications
- Block attacks (phishing, social engineering) and protect strategic assets (MFA
- Increase the efficiency of IT teams (SSO)
- Improve user experience (SSO)
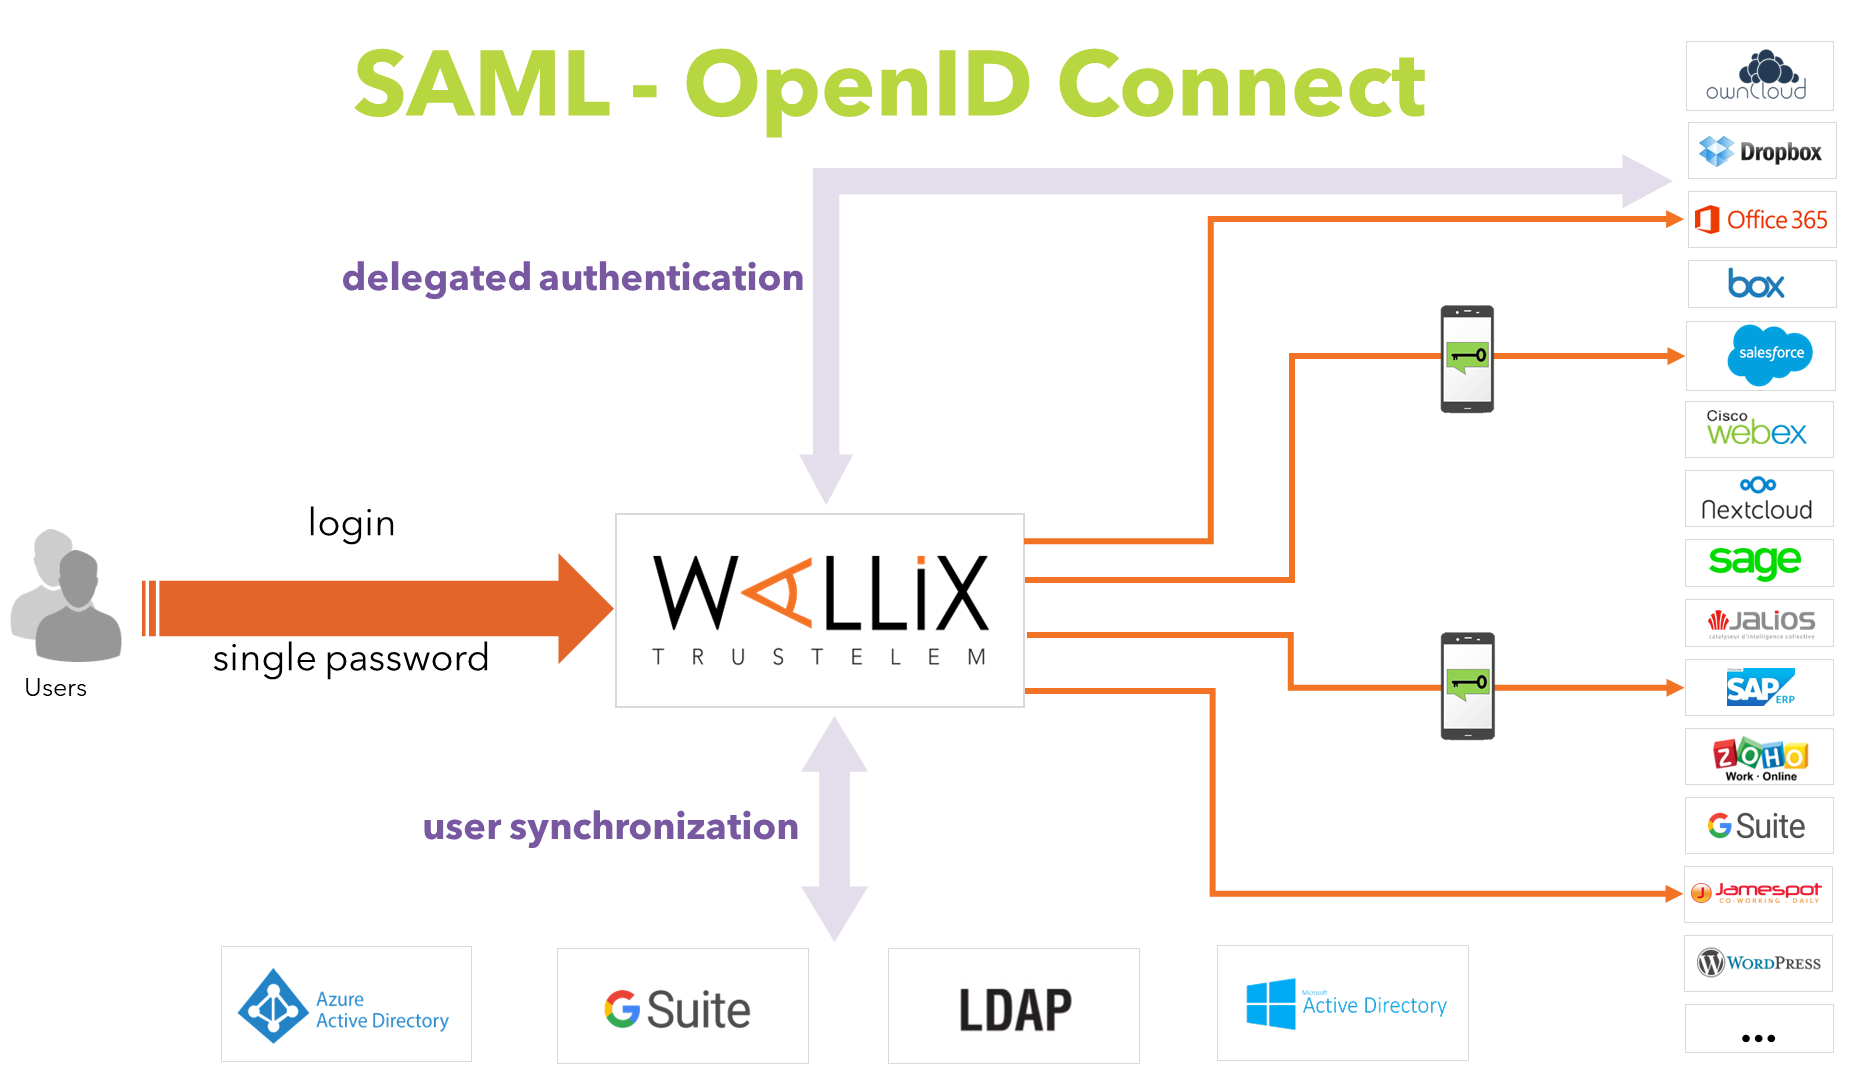 SSO with or without mfa, using web protocols
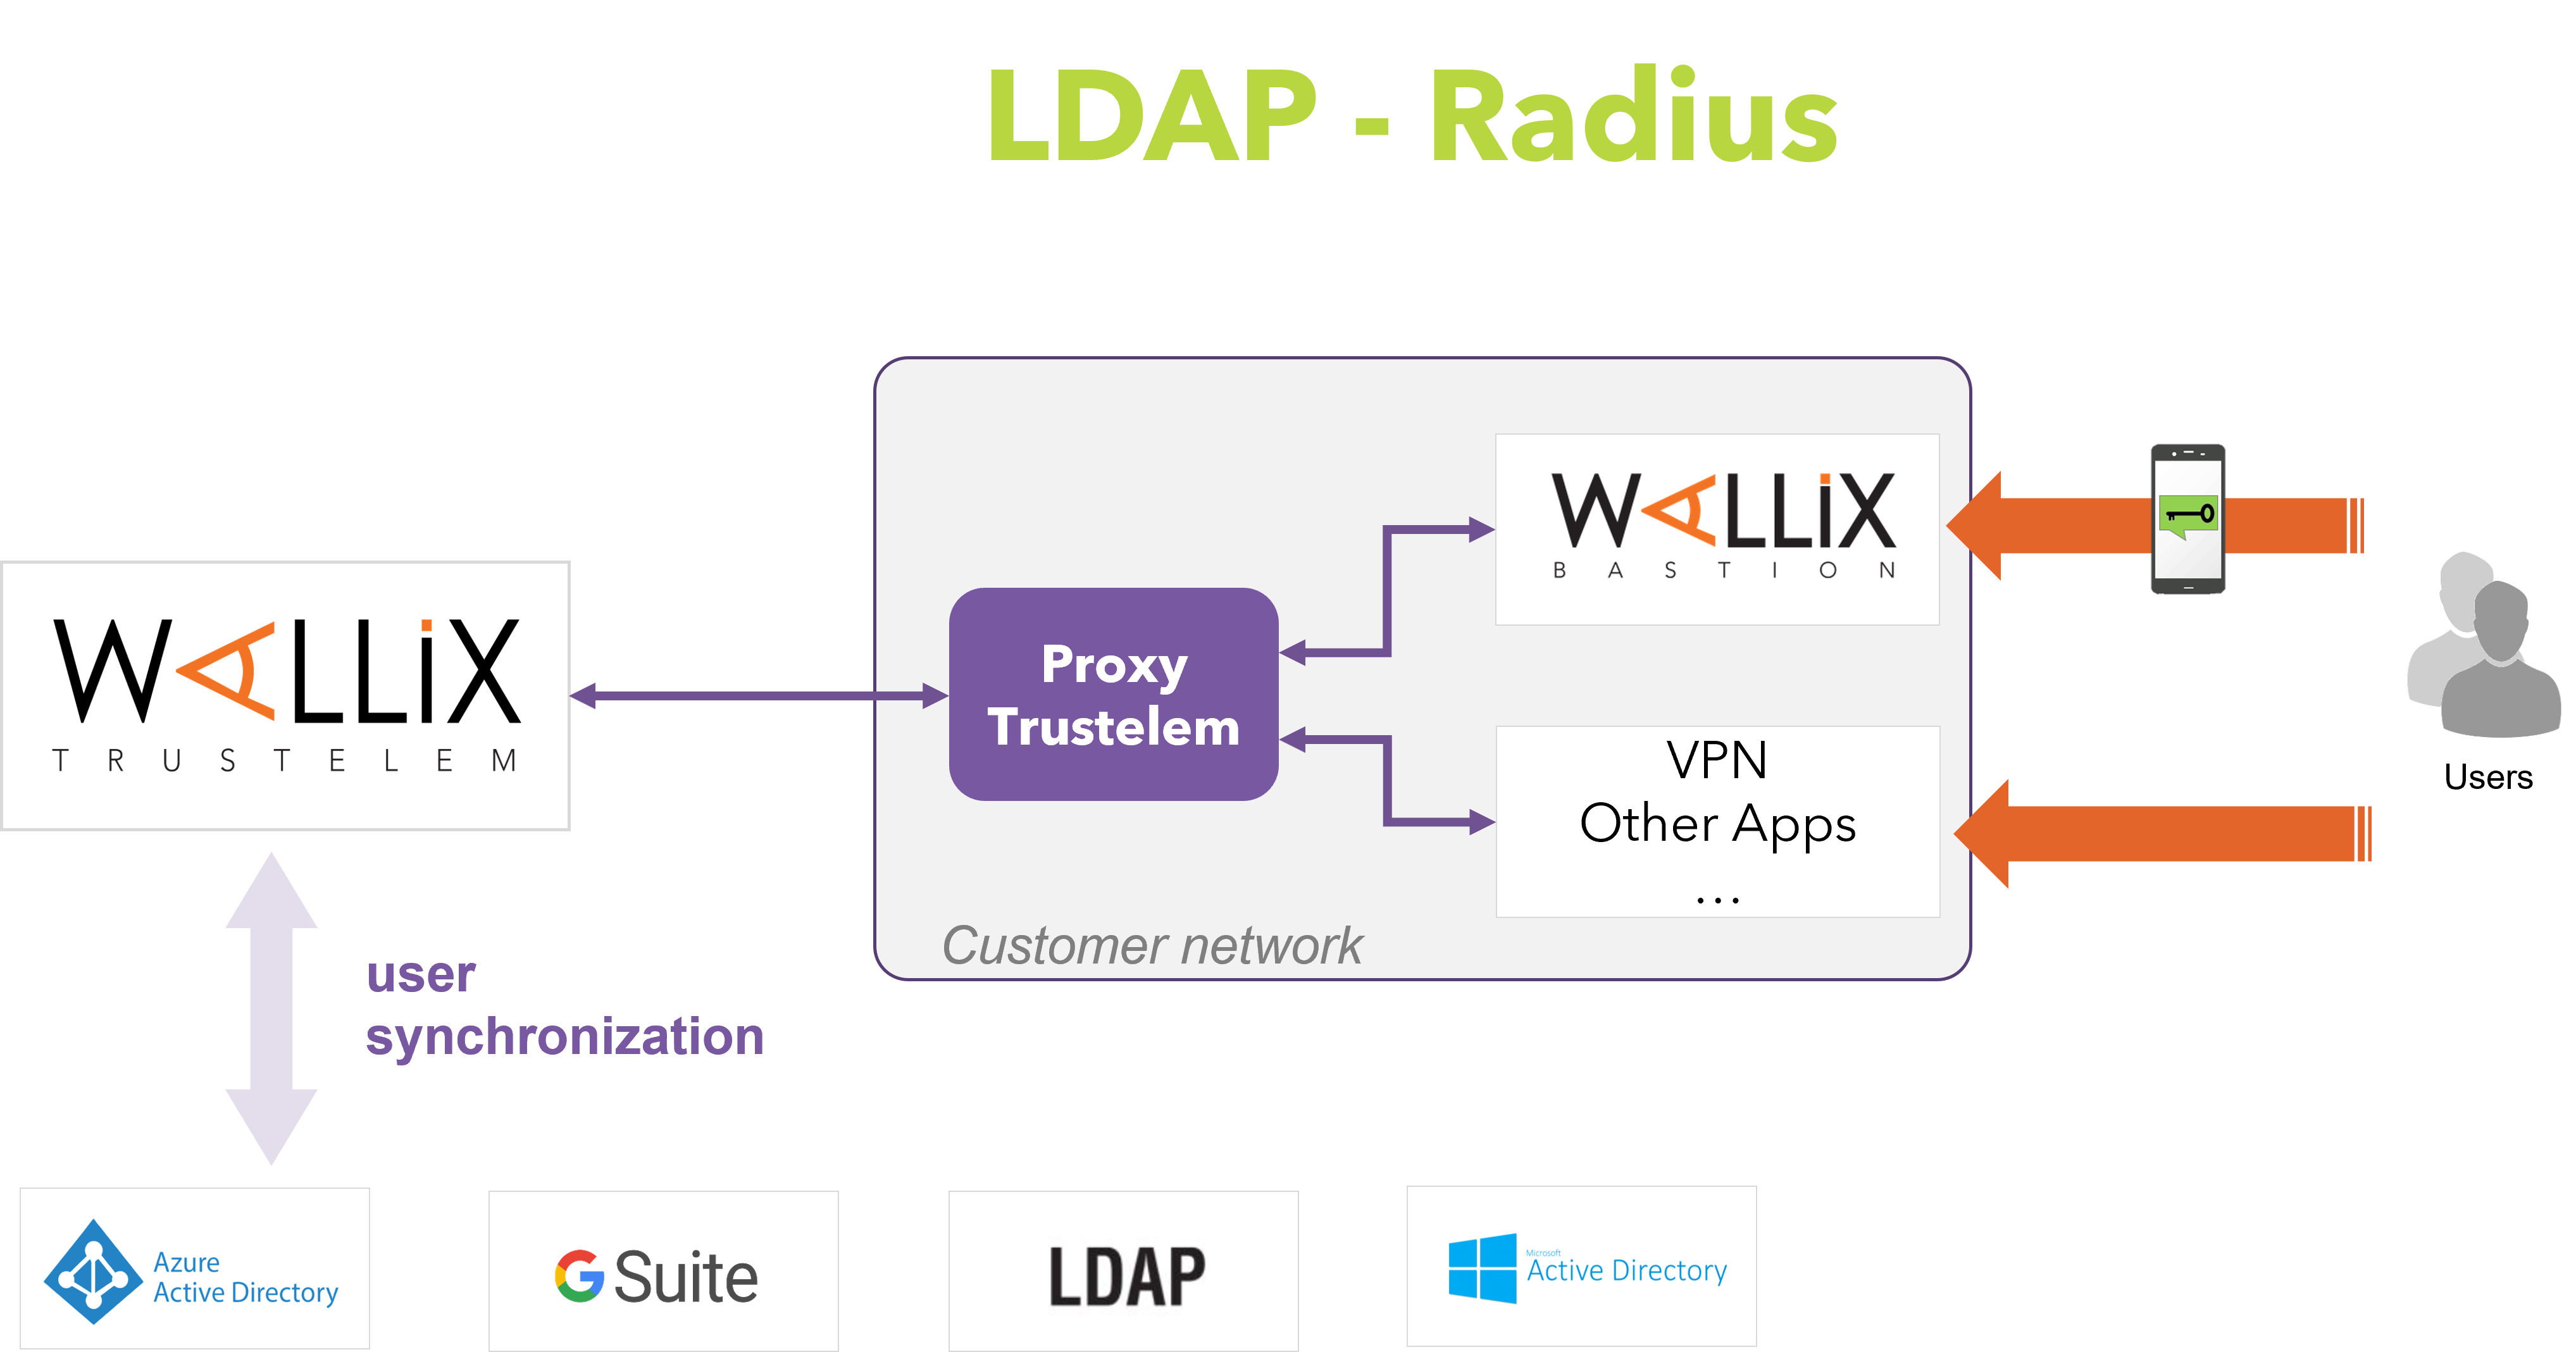 LDAP or Radius authentication, with or without MFA, but with no possibilities of SSO
Wallix Trustelem has an offer dedicated to WALLIX products (Bastion and Access Manager) which is named WALLIX Authenticator.
When you start with WALLIX Trustelem, you receive a domain.
This domain is used for:
-
users URL:
https://mydomain.trustelem.com
This URL gives access to a dashboard where all the allowed applications appear.

-
admin URL:
https://admin-mydomain.trustelem.com
This URL gives access to the admin dashboard where the subscription is setup.


In order to do this setup, there are 3 major steps:
-
Add users
-
Add applications
-
Setup access rules
In addition, Trustelem offers a lot of other features like passwordless authentication, self-service password reset, api...
Finally, you have tools to follow each event of your subscription.
Users created on Trustelem
-
For users that are not stored in corporate directories
-
Users are created in Trustelem administration console or with API
https://admin-mydomain.trustelem.com/app#/users -
The attributes of these users are fully editable
-
The passwords associated with these users accounts are stored by Trustelem
-
Trustelem accounts should only be used for:
-
temporary users for testing purpose
-
the definition of a backup administrator
-
users with no entry in directories such as partners, clients…
-
Users from Azure AD
-
It requires to add an Azure AD directory on Trustelem:
https://admin-mydomain.trustelem.com/app#/directories -
Users with their attributes can be synchronized
-
It doesn’t allow the use of the Azure AD password
Note: in practice it’s possible but it will only work if Office 365 is not federated. In other cases these users have a password stored by Trustelem -
Synchronization requires the creation of an “application” in Azure AD admin console for authorizing Trustelem to request Azure AD data
-
Documentation: https://trustelem-doc.wallix.com/books/trustelem-administration/page/active-directory-synchronization
Users from GSuite
-
It requires to add an GSuite directory on Trustelem:
https://admin-mydomain.trustelem.com/app#/directories -
Users with their attributes can be synchronized
-
It doesn’t allow the use of GSuite passwords
-
The passwords associated with these users accounts are stored by Trustelem
-
The GSuite subscription is identified by one of its admin email address
For the moment, the documentation is only available directly on the directory settings, on Trustelem admin console.
Users from Active Directory
-
Most common source of users
-
This directory offers more features than others:
- users synchronization with their attributes
- use of the AD passwords into Trustelem login page
- reset directory passwords using Trustelem
- complete a passwordless authentication
-
Documentation: https://trustelem-doc.wallix.com/books/trustelem-administration/page/active-directory-synchronization
Notes
-
There are connectors for synchronizing GSuite or Azure AD with Active Directory.
-
An AD synchronized with GSuite or Azure AD can then be synchronized with Trustelem too.
-
Benefits:
- no password stored
- self service reset passwords
- passwordless authentication
There are different kinds of applications:
-
SAML2.0
-
OpenID Connect
-
Basic without SSO
-
LDAP
-
Radius
SAML and OpenID Connect
These protocols are used for Single Sign On authentications.
To authenticate to your application, you need to authenticate to Trustelem with a browser first.
Then, if you go to another application using SAML/OpenID Connect, you are already authenticated to Trustelem so you don't have to provide your credentials again.
Consequently, you have a single sign on.
To setup these applications, you need to establish a trust relationship between the application and Trustelem.
The goal is to give to the application the ability to verify the identity of Trustelem and the URL needed to communicate.
When a user wants to authenticate, the application can redirect him to Trustelem then use the attributes received without risks.
So implementing SSO authentication for a client application consists in:
-
configuring the client application.
-
creating a Trustelem application using:
- a generic models which will always work with applications supporting SAML or OpenID Connect, but have generic documentation.
- a pre-integrated models which have a simple setup and detailed procedure.
Example for Google application:

Note: you can find the documentation of each application on their settings page, or on this website.
Basic without SSO
The authentication on these applications is only possible by providing a username and a password stored by the application.
That means Trustelem can't provide the users identity to the application.
Consequently, add an application like that allows to have a redirection link on the user dashboard but not to authenticate.
Note: Trustelem is working on a passwords keeper in order to improve the security and the user experience for these applications.
LDAP and Radius
With these protocols, the authentication on Trustelem has to be done for each authentication on the application.
So the credentials used are still unique, and still the same as for other Trustelem authentications, but it's not a single sign on.
LDAP and Radius can be activated on each kind of generic models, or on specific pre-integrated models (WALLIX Bastion, VPN...).
Note: you can find the documentation on the pre-integrated applications settings page, and you have a global documentation about LDAP and Radius on this website.
When you have users and applications, you can create access-rules in order to define how users will authenticate to an application.
Documentation about access rules: https://trustelem-doc.wallix.com/books/trustelem-administration/page/access-rules
Documentation about multi factors authentication: https://trustelem-doc.wallix.com/books/trustelem-administration/page/multi-factors-authentication
Integrated Windows Authentication (IWA)
Integrated Windows Authentication (IWA) is an authentication using the Kerberos token of the user Windows session.
For a user point of view, it's a passwordless authentication.
Documentation: https://trustelem-doc.wallix.com/books/trustelem-administration/page/integrated-windows-authentication
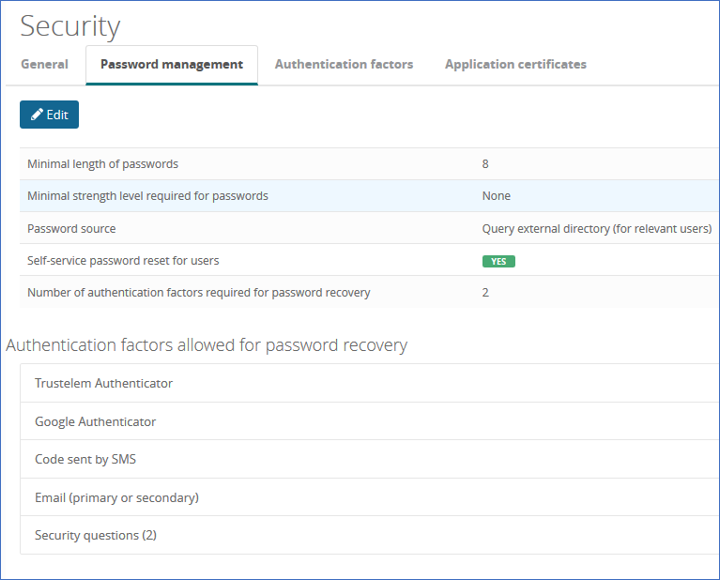
Self Service Password Reset (SSPR)
The Self Service Password Reset (SSPR) allows user to reset his password using Trustelem login page.
-
A user provides his login and additional secrets to Trustelem.
-
Then he can define a new password.
-
This new password is saved on Trustelem or sent to Active Directory.
Documentation: https://trustelem-doc.wallix.com/books/trustelem-administration/page/self-service-password-reset
Replace the password by a certificate
By uploading a root certificate or users' certificates on to Trustelem, it is possible to remove the first authentication (login+password authentication).
Documentation: coming soon
API
Using APIs, you can create your own tools to manage your subscription: synchronize users from local files, build your own form for user creation, create alerts based on the logs...
Documentation: https://trustelem-doc.wallix.com/books/trustelem-administration/page/api
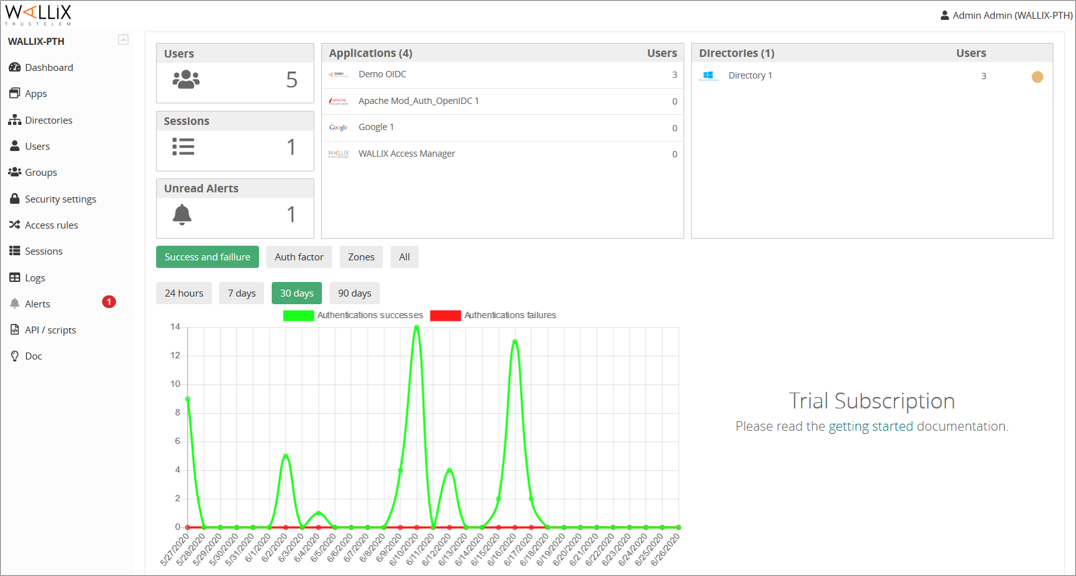
Admin Dashboard
https://admin-mydomain.trustelem.com/app#/dashboard
The dashboard provides a summary of the subscription state:
-
users in the subscription
-
users authenticated
-
unread alerts
-
authentication succeed / failed, with MFA or not
-
number of users by applications
-
number of users by directories (the led indicates if the directory synchronization works, needs attention or doesn’t work)
Logs
https://admin-mydomain.trustelem.com/app#/logs
Every interaction with Trustelem from administrators, users or directories is visible here.

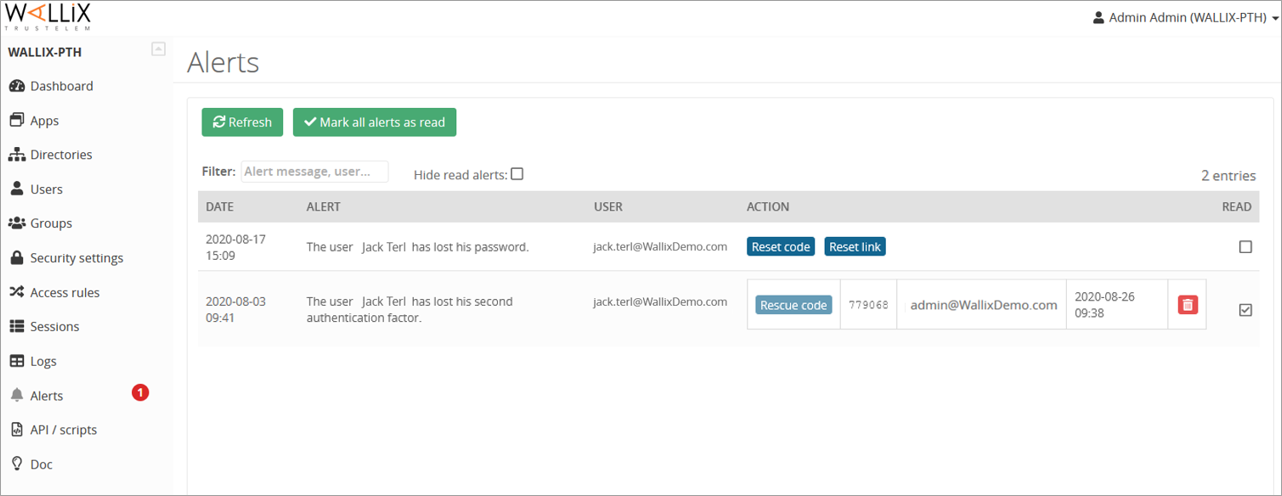
Alerts
https://admin-mydomain.trustelem.com/app#/alert
When a user requests help (for an authentication or a self-service password reset), administrators receive an email to notify them of the new alert.
The admin can generate a code/link required to unlock the user.
Sessions
https://admin-mydomain.trustelem.com/app#/sessions
Users logged in Trustelem are visible here.
The red trash allows the administrators to kill the session.
Note: killing a Trustelem session doesn’t mean users will be disconnected from their applications.

1/ Add users and groups
-
Setup directories if needed
- Active Directory
- Azure AD
- GSuite
- LDAP
-
Add Trustelem users / groups
-
Define the administrator accounts
2/ Setup Multi Factor Authentication
-
Activate login and auto-enroll for the wanted factors
-
Select 2 factors for Trustelem admin accesses
3/ Add applications
-
Do the configuration for both applications and Trustelem
-
Verify if the authentication is working
4/ Setup access rules
-
Define the internal / external IP areas of the company
-
Create access rules depending on users, applications, protocols, IP areas, MFA
5/ Activate the needed advanced features
-
Setup Integrated Windows Authentication
-
Setup certificate authentication
-
Setup self-service password reset
-
Setup the APIs
6/ Get prepared for production phase
-
Prepare the enrolment plan: population, procedure, schedule
-
Communicate to users about:
- The SSO activation, objectives and date
- The applications list
- How to access to Trustelem (login+password, MFA, IWA…)
- The enrolment plan
-
Communicate a reminder the day before with the same information
7/ Switch to production
-
Activate SSO in the applications
-
Just after the switch, inform users about it
8/ Follow-up
-
Verify in the alerts if there isn’t an abnormal number of users requiring some help
-
Verify with the logs if users actually access their applications
Access rules
Contents
- What access rules are?
- Priorities
- Web authentication - Apps SAML, OpendID Connect, and No SSO
- LDAP authentication
- Radius authentication
What access rules are?
- Permissions help define how users can access which apps.
- They can ask for simple authentications (login + password), multi factors authentications (login + password + 2nd factor) or deny an access
- They can be managed using the tab Access rules of Trustelem admin page.
- They can be managed using the API
- They are some default access rules defined on Security settings / General / Default authentication level for users which allow to control multiple applications access rules with one setting.
- For web authentication, you can have a rule depending on the user public IP. If the IP is known the rule internal applies, if not the rule external applies.
If possible, an access rule should always apply to a group.
Doing that you only have to add users to the right groups to manage the access.
It is also a way to have a limited number of access rules and a better visibility.
Of course you can still search for a user in the Access rules tab to see which permissions are applied, even if they are related to a group.
Priorities
When a user / group is affected by more than one access rule for a single application, the following priorities apply:
-
1/ A user access rule wins over a group access rule, whether it is more restrictive or not, a group rule wins over an "everyone" rule
-
2/ The most restrictive access rule wins
In summary:
Access forbidden (user) > 2 factors (user) > 1 factor (user) > Access forbidden (group) > 2 factors (group) > 1 factor (group)
Example
John Doe is in groups "Customer Success" and "Support" and he wants to authenticate on salesforce.
Permissions defined:
-
Subscription default: internal -> 1 factor | external -> 2 factors
-
Customer Success for salesforce: internal -> 1 factor | external -> 2 factors
-
Support for salesforce: internal -> 2 factors | external -> forbidden
-
John Doe for salesforce: internal -> no rule | external -> 2 factors
No permission is set to the default value, so this setting doesn't apply.
For internal zone we have 1 factor (customer success) and 2 factors (support) for groups and no rule specified for his account --> the authentication will use 2 factors
For external zone we have 2 factors (customer success) and forbidden (support) for groups and 2 factors for his account --> the authentication will use 2 factors again.
--> John needs 2 factors to access salesforce for both internal and external zone.
Web authentication - Apps SAML, OpendID Connect, and No SSO
Permissions for this apps may depend on the user's public IP address.
In this case, the internal IPs must be defined on Security settings / General / Internal network.
Internal IPs are usually the public IPs of the company offices.
If the user has a known public IP, the access rule for internal zone applies, if not the access rule for external zone applies
Possible values:
-
no rule: does not apply any rule, so other permissions can remain active
For instance, if you want to overload an existing external zone permission, and not a internal zone permission, you can set the internal zone permission to no rule -
Default: apply the default rule defined in Security settings / General / Default authentication level for users
-
1 factor: only one authentication factor is needed to access the application (login + password OR certificate OR Kerberos)
-
2 factors: two authentication factors are needed to access the application
-
Forbidden: the user can’t access the application
LDAP authentication
LDAP applications do not provide users public IP, so there are no internal and external permissions.
1 factor or 2 factors LDAP permissions allow the application to:
- source users --> LDAP search
- authenticate users with permission --> LDAP bind
If a user doesn't have a LDAP 1 or 2 factors permission, the application can't find him with a search request
Possible values:
-
no rule: does not apply any rule, so users can't be sourced and can't be authenticated
-
1 factor: users can be sourced, and only one authentication factor is needed to access the application
-
2 factors: users can be sourced, and two authentication factors are needed to access the application. LDAP is not designed for MFA, so if you use this permission:
- If the user provides login + password and have WALLIX Authenticator, Trustelem will only answer after the validation of a push notification (**only possible if the app have a timeout long enought)
- If the user provides login + password and doesn't have WALLIX Authenticator, the authentication will failed
- The user can provides his login + password and TOTP code sticked together (for instance: mypasswordTOTP)
-
Forbidden: the user can’t access the application and can't be sourced
Radius authentication
Radius applications do not provide users public IP, so there are no internal and external permissions.
Possible values:
-
no rule: does not apply any rule, so users can't be authenticated
-
Always allow: accept the authentication if the login is known, without any verification on the password/2nd factor
This permission is used in specific scenarios, when you defined a radius authentication in addition to another authentication (AD usually) and you want some users to authenticate using 2nd factors, and some users using only 1 factor. -
2nd factor only: only the second factor are needed to access the application. This permission is used when you have a radius authentication in addition to another authentication (AD usually).
-
2 factors: two authentication factors are needed to access the application.
If the application supports Radius in 2 steps (Access Request then Challenge request) you can provide login + password then MFA
If the application doesn't support Radius in 2 steps, you can provide login + password and code sticked together -
Forbidden: the user can’t access the application
Active Directory users - Trustelem ADConnect
Contents
How does it work?
The goal is to use Active Directory as an identity provider for Trustelem.
To do so, a connector, Trustelem ADConnect, is installed on a customer Virtual Machine.
Using this connector, Trustelem can synchronize and authenticate users selected by Trustelem administrators, based on their AD memberOf.
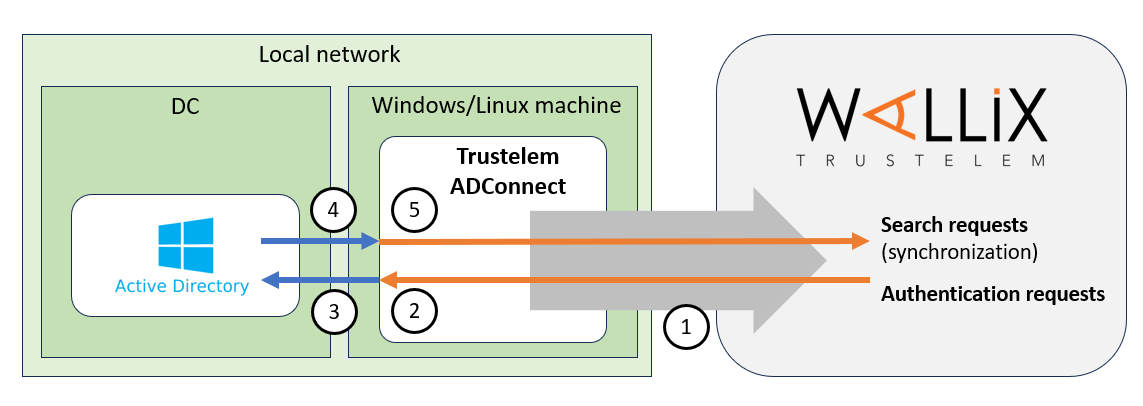
1/ During the setup, Trustelem ADConnect opens a websocket to admin.trustelem.com using port 443.
Note: with the websocket, information is encrypted by TLS protocol and with an additional symmetric encryption.
2/ Trustelem sends search / authentication requests to Trustelem ADConnect using the websocket.
3/ Trustelem ADConnect sends the request to Active Directory using LDAP(S) with the service account running the connector.
4/ Active Directory replies to the request from Trustelem ADConnect using LDAP(S).
5/ Trustelem ADConnect sends the answer to admin.trustelem.com using the websocket
Note: thanks to this connector Trustelem does not store any password for Active Directory users.
Prerequisites
- Prepare a VM, Windows Server or Linux, with minimal resources for the OS
- If you have only one VM which is down, the link to your AD is down too..
- The recommendation is 2 VM at least, to have a failover system
- Download Trustelem ADConnect on the VM (.exe or .tgz depending of the OS)
- If the VM isn't a Windows Server in the AD domain, you need to open the flow from the VM to a DC
- tcp port 389 or 636
- The flow from the VM to https://admin.trustelem.com should be opened (IP: 185.4.44.22)
- tcp port 443
- A service account with "read only" rights should be created on your Active Directory
Setup on Windows
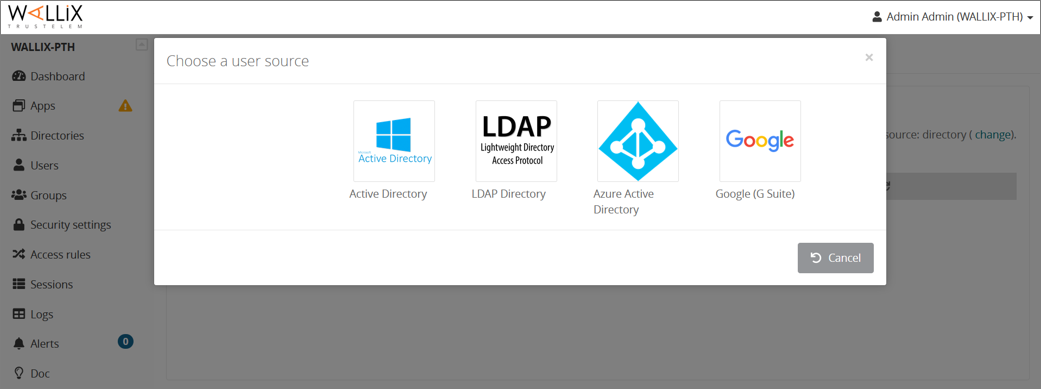
- Click on Create and select Active Directory.

- Give a name to the new directory, and optionally a description.
- Ensure Use a connector is checked.
- Write down the synchronization ID, then click on Save.

- On your VM, launch the installation software and paste the synchronization ID then click on Validate the Configuration

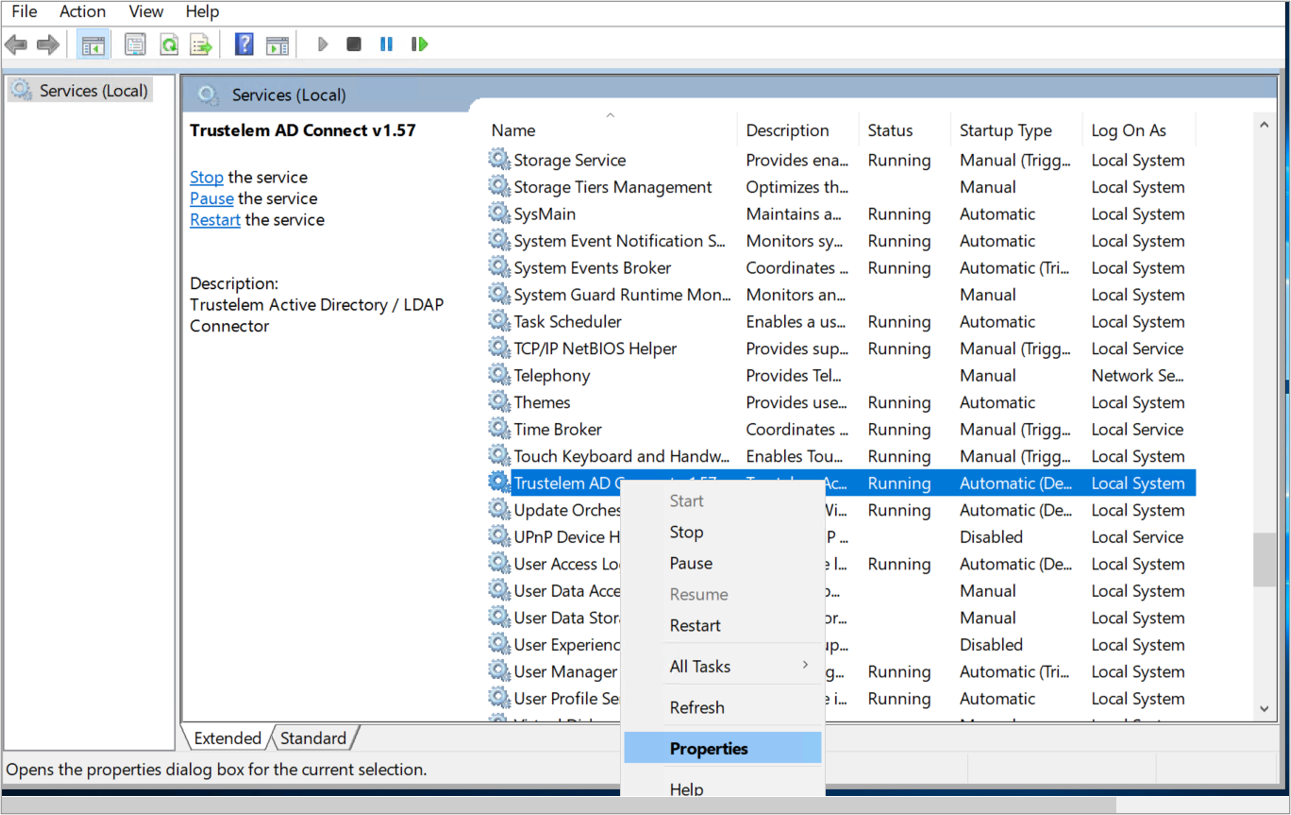
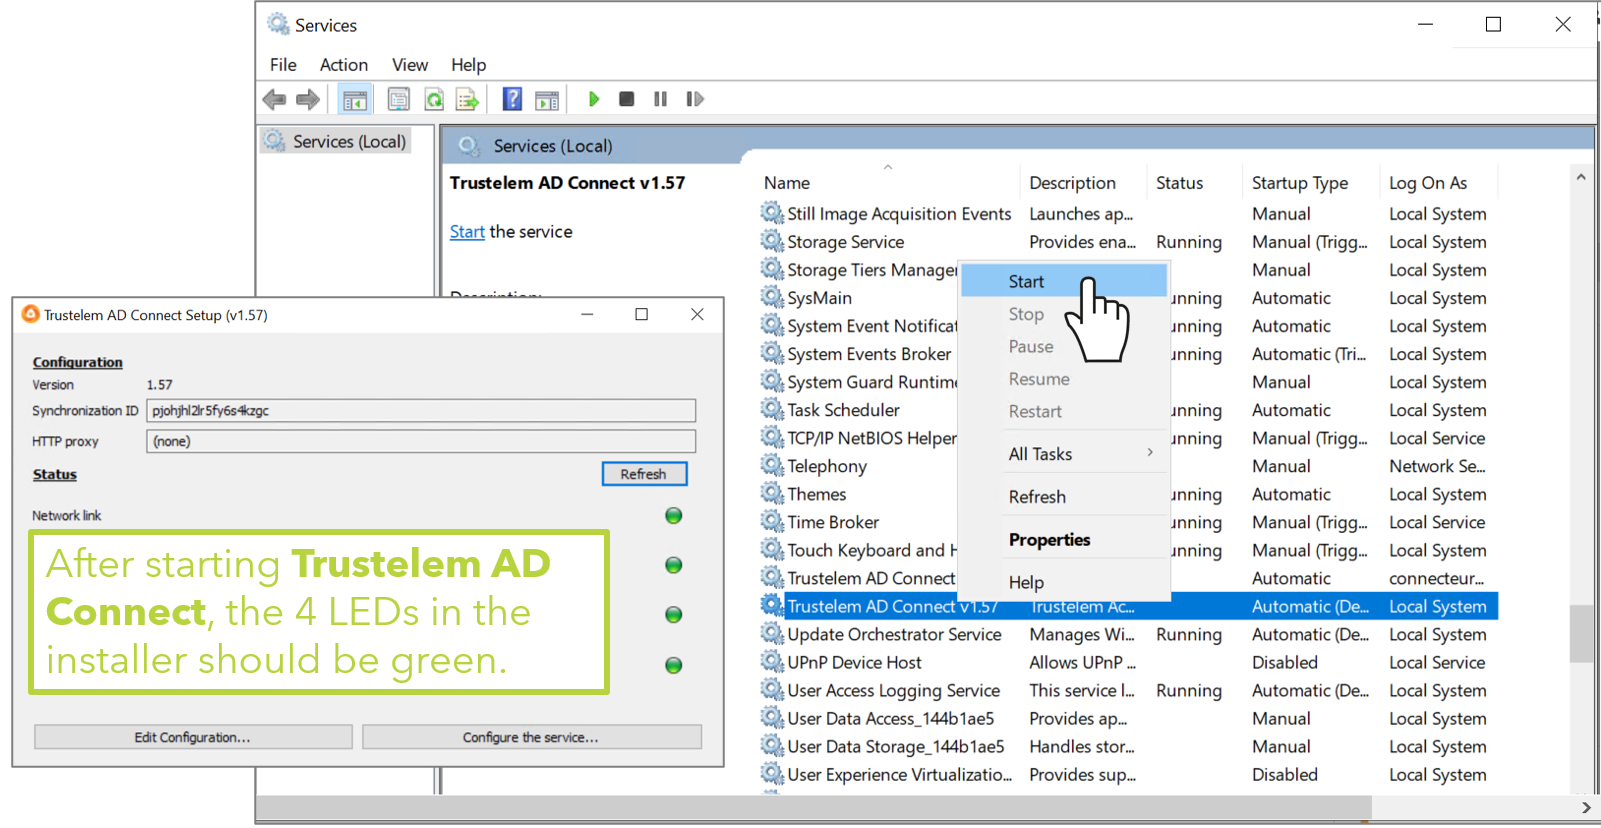
- Configure Trustelem Service.
- Open Windows Services Manager (you can click on Configure the service).
- Select Trustelem ADConnect ».
- Right-click, select Properties.

- On General tab, make sure that Startup type is set to Automatic (Delayed Start).
- On Log On tab, select This account and enter the technical user's credentials.
- If the machine is not on the AD domain, you can't use the Log On tab of the service.
- Create a config.ini file in Trustelem setup directory
ldap_addr = ldap://ad_fqdn_or_ip ldap_port = 389 # use the UPN ldap_user = connector@ADdomain ldap_password = xxxx - If you want to use LDAPs, change the configuration to:
ldap_addr = ldaps://ad_fqdn_or_ip # or ldap_addr = ldaps://ad_fqdn_or_ip?tls_verify # certificate has to be in Trustelem setup directory ldap_port = 636
- Create a config.ini file in Trustelem setup directory
- Launch the service
 Note: if you used a config.ini file (machine not in the AD domain), the 4th led will be red.
- Get back to the Trustelem admin dashboard, Directory tab
- Refresh the page: the connector should show up in the table.
- Once the connector is up, check the IP address, the server name and the service account (to avoid spoofing), then activate the connector by pushing the "No" button.

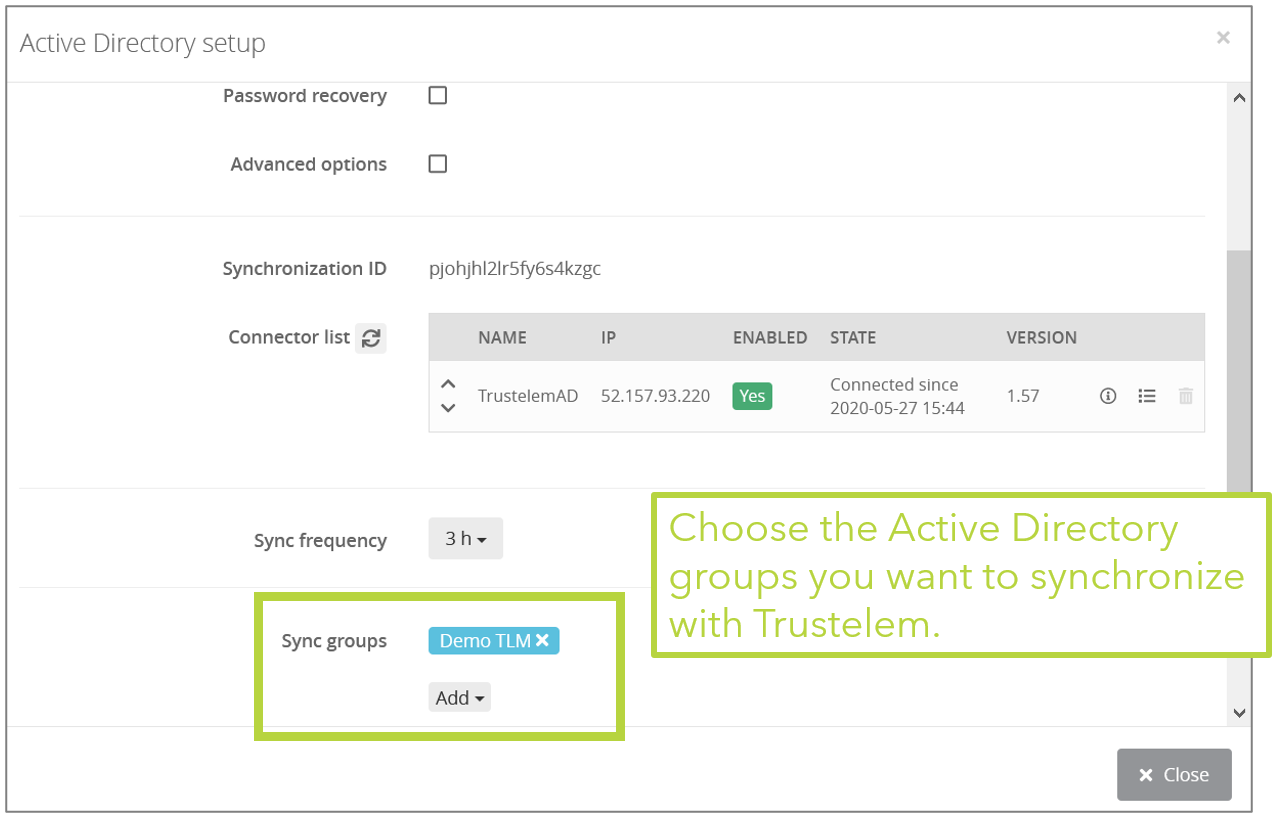
- Setup the appropriate synchronization frequency (nota: a high frequency increases the load of your domain controllers).
- Select the groups to be synchronized.
WARNING: if you synchronize a user who has the same UPN/email as a local Trustelem account, then the 2 accounts will be merged and the password to use will be the one from Active Directory. This often happens when you have a local admin account, and then add new AD accounts.
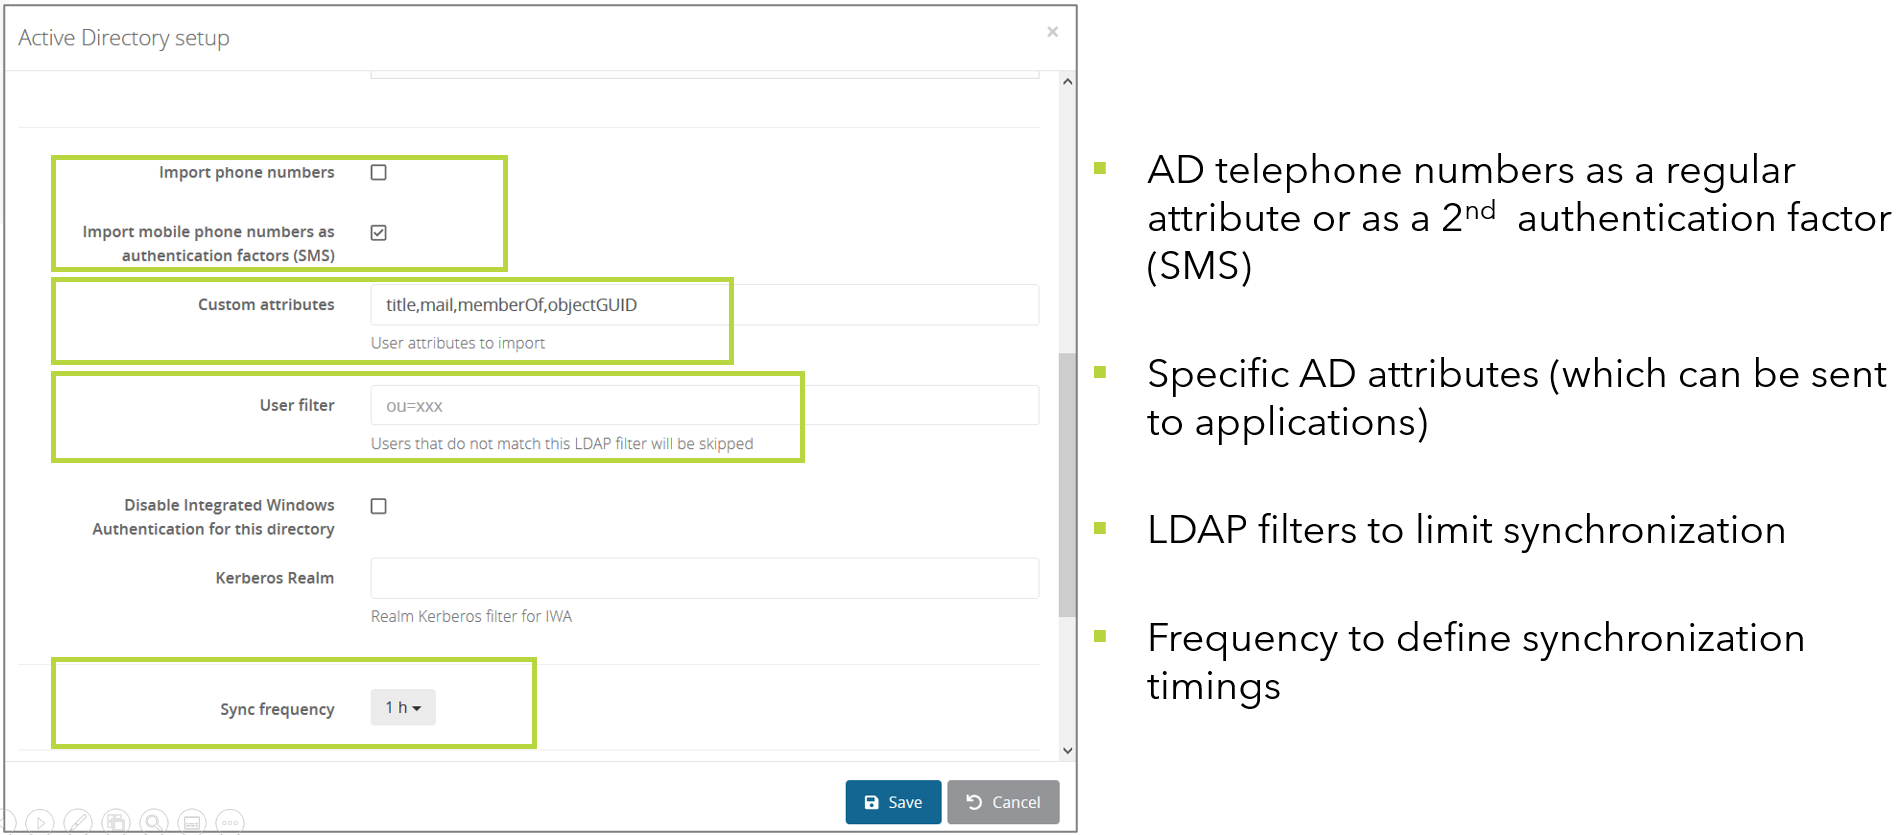
- By checking Advanced options, you can define a list of Custom attributes (title, memberOf,objectGUID,userPrincipalName...) to import with the users.

- Click on Save.


Setup on Linux
-
Click on Create and select Active Directory.
-
Give a name to the new directory, and optionally a description.
-
Ensure Use a connector is checked.
-
Write down the synchronization ID, then click on Save.
-
On your VM, launch the installation software from the .tgz file, using ./setup.sh with root rights
-
To complete the configuration, edit /opt/wallix/trustelem-adconnect/config.ini file containing the synchronization id. A sample minimal config.ini would be:
sync_id = 2jy34wpcohrhdytr6hutym6qfi2l7nnw state_dir = run/ ldap_addr = ldap://ad_fqdn_or_ip ldap_port = 389 # use the UPN ldap_user = connector@ADdomain ldap_password = xxxx # if there is a proxy proxy = https://username:password@proxy_IP:proxy_port -
If you want to use LDAPs:
- change the configuration to:
ldap_addr = ldaps://ad_fqdn_or_ip # or ldap_addr = ldaps://ad_fqdn_or_ip?tls_verify ldap_port = 636- in order to set up the certificate validation correctly, you need to make sure the certificate is signed by a known CA. Check that the certificate is signed by a CA listed in
/etc/ssl/certs.
If you need to add it, you can either symlink it from/etc/ssl/certs(the CA will be installed system wide) :
ln -nsf /path/to/public.crt /etc/ssl/certs/my-ca-name.crtor you can set an environment variable
SSL_CERT_FILE=/path/to/public.crtin thetrustelem-adconnect.servicefile (the CA will be installed only locally, for the trustelem service) :# in file /lib/systemd/system/trustelem-adconnect.service: [Service] Type = simple ExecStart = ... Environment = "SSL_CERT_FILE=/path/to/public.crt" # <- add this line -
After that, you can start the service with: systemctl start trustelem-adconnect.service
-
Get back to the Trustelem admin dashboard, Directory tab
-
Refresh the page: the connector should show up in the table.
-
Once the connector is up, check the IP address, the server name and the service account (to avoid spoofing), then activate the connector by pushing the "No" button.
-
Setup the appropriate synchronization frequency (nota: a high frequency increases the load of your domain controllers).
-
Select the groups to be synchronized.
WARNING: if you synchronize a user who has the same UPN/email as a local Trustelem account, then the 2 accounts will be merged and the password to use will be the one from Active Directory. This often happens when you have a local admin account, and then add new AD accounts. -
By checking Advanced options, you can define a list of Custom attributes (title, memberOf,objectGUID,userPrincipalName...) to import with the users.
-
Click on Save.
Debug
The connector doesn't appear in the setup page on the admin page
- ping admin.trustelem.com on the machine running the connector to verify the outgoing flows
- verify the synchronization ID
- verify the proxy setup
- if the VM is a Windows machine, verify that you clicked on Validate on Trustelem ADConnect program
There is no group when I click on Add on the field Sync groups
- on the field Connector list, click on the i in a circle
- there is an error on the line Server Link
-
YES
- watch the error to understand the issue
- verify the flows from the VM running the connector to the Active Directory
- verify the service account used for Trustelem AD Connect (UserPrincipalName and password)
- verify if you have a replication delay between the DC. For example, if you change the service account password just before the setup, the connector may reach an outdated DC that refuses the password.
-
NO
- verify if the service account has the right to search groups on Active Directory
- try to refresh the page
-
YES
My group doesn't contain all users
- If your group is Domain users, it's normal, it can't be used because it is not a real group
- Verify if the users doesn't have particular profiles which can't be found by the service account
- Verify if there is a replication delay between the DC. If you create users on a DC, it can take some time to replicate on the DC used by the connector.
- Verify if your service account has the right to search users in the selected groups
Updating the connector
The connector Trustelem ADConnect can be updated without any service interruption:
-
Install the latest release of the connector in parallel with your current connector.
-
In the directory tab of the Trustelem administration console, select the relevant directory and ensure the new connector is listed first in order to be used in priority.
-
Ensure that the new connector is working fine by checking its usage statistics, then you can disable the previous connector in the administration console.
-
Finally, you can uninstall the previous connector from your server and then it can be deleted from the Trustelem administration console.
API
APIs are available in the API / scripts tab:
https://admin-mydomain.trustelem.com/app#/api-scripts
Note: if you don't have access to this feature, please contact WALLIX Trustelem support.
Using APIs, you can create your own tools to manage your subscription: synchronize users from local files, build your own form for user creation, create alerts based on the logs...
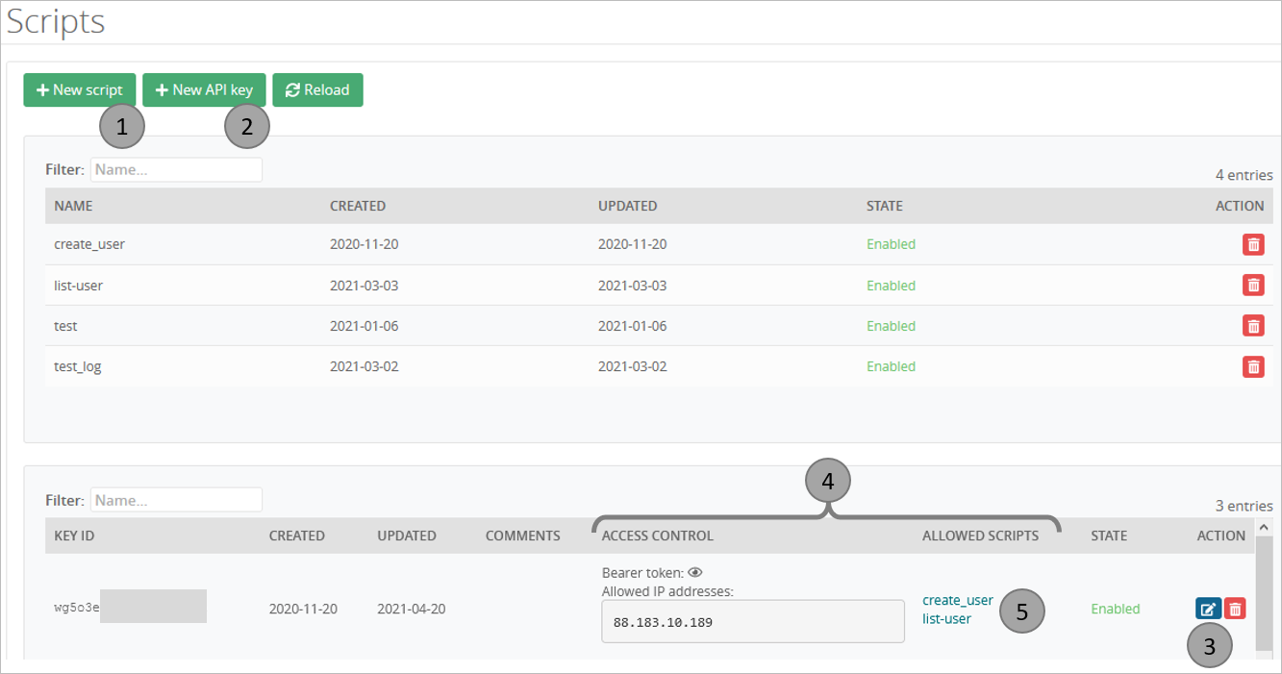
Add a usable script
1-Add a new script
2-Add a new API key if required
3-Edit the API key
4-Provide the allowed IPs and select the new script
5-Click on the script to see a sample command
Example:
Name: create_user
Sample command:
curl -X POST -H 'Authorization: Bearer ZPUAtMc...KYYAej4e' https://admin.trustelem.com/api/script/46e3xi...gtea/create_user
Edit the script
function handler: contains the script in TypeScript language
type Input: contains the parameters required to launch the script
type Output: contains the result which will be provided by the script
Note: you can start from scratch or load examples:
-
Click on Examples and select what you want to import
-
Click on Load
Example with the script simple_create_user
function handler contains:
//Create the input with the provided parameters
const input = req.ReadJSON(true);
//Call the API create user with the previous parameters
const result = api.createUser({
email: input.email,
firstName: input.firstname,
lastName: input.lastname,
passwordInit: { kind: 'temporaryPassword' }
});
//If there is an error, send it as the result
if (isError(result)) {
w.JSON({ error: result.error })
} else {
//Else, provide the temporary password as the result
w.JSON({ password: result.temporaryPassword });
}
type Input contains the provided parameters:
{
email: string;
firstname: string;
lastname: string;
}
type Output contains the result parameters:
{
password: string;
} | {
error: string;
}
API request:
curl -X POST -H 'Content-Type: application/json' -H 'Authorization: Bearer yyhp3yD…lWfxfl8J' -d '{"email":"jdoe@test.com","firstname":"John","lastname":"Doe"}' https://admin.trustelem.com/api/script/wg5…qia/create_user
Response:
{"password":"mkrc2o6mo2ka"}
Datatype
interface User {
id: UserID;
firstName: string;
lastName: string;
UUID?: string;
userPrincipalName?: string;
email: string;
email2?: string;
mobilePhone?: string;
secondaryPhone?: string;
trustelemAdmin?: boolean;
suspended?: boolean;
accountExpiration?: string
primaryDirectory?: DirectoryID;
allDirectories?: DirectoryID[];
attributes?: AttributeManager;
groups?: {
id: GroupID;
name: string;
}[];
}
Note: the attributes can be request using getValue, getValues or list
interface AttributeManager { getValue(name: string): string | null; getValues(name: string): string[]; list: { name: string; value: string }[] };
Create a user
Create a new user, if sendActivationEmail is true, send a mail for setting password, InitPWD will be filled otherwise
createUser(args: {
email: string;
email2?: string;
firstName?: string;
lastName?: string;
accountExpiration?: Date | number | string | null;
isAdmin?: boolean;
groups?: GroupID[];
passwordInit?: { kind: 'temporaryPassword' } | { kind: 'link'; expireMinutes?: number; redirectURL?: string; openSession?: boolean };
}): { id: UserID; temporaryPassword: string; passwordInitURL: string } | { error: string };
Description:
- Create a user with chosen firstName, lastName, email1, email2.
- Only the email1 is mandatory.
- This user access can expire at a given date using the parameter accountExpiration.
- This user can be granted with administrator privileges with the parameter isAdmin.
- This user can be added to groups defined by their GroupID.
- The activation is defined by the passwordInit which can be set to 'temporaryPassword' or 'link'.
- In the second case, a validity (24h if empty) and a redirectURL can complete the link. Also, the session can be directly open or not with the parameter openSession.
- The outputs will be either the new user id and possibly his temporaryPassword / passwordInitURL or the error(s).
Possible errors:
- The email1 already exists
- The email1 has an invalid format
- The email1 is mandatory
- The email2 has an invalid format
- The firstName has an invalid format
- The lastName has an invalid format
- accountExpiration has an invalid format
- isAdmin has an invalid format
- passwordInit has an invalid format
- A group has an invalid format
- A group doesn’t exist
- kind has an invalid format
- expireMinutes has an invalid format
- redirectURL has an invalid format
- openSession has an invalid format
Read a user
Get a specific user by id, email or upn
getUser(args: {
id?: UserID;
email?: string;
userPrincipalName?: string;
}): User | null;
Description:
- If a user defined by a given id, email or userPrincipalName exists, provide his attributes.
Update a user
Update a specific user by id
updateUser(args: {
id: UserID;
firstName?: string;
lastName?: string;
email?: string;
email2?: string;
isAdmin?: boolean;
suspended?: boolean;
accountExpiration?: Date | number | string | null;
groups?: GroupID[];
}): { error?: string; };
Description:
- Update a user defined by his id with the given parameters: firstName, lastName, email, email2.
- This user'access can expire at a given date using the parameter accountExpiration
- This user can be granted with administrator privileges with the parameter isAdmin sets to true.
- This user can be suspended with the parameter suspended sets to true.
- This user can also be affected to groups with the parameter groups.
- The outputs will be either nothing, or the error(s).
Possible errors:
- The user id doesn’t exist
- A group doesn’t exist
- The user id is mandatory
- The user id has an invalid format
- The firstName has an invalid format
- The lastName has an invalid format
- The email has an invalid format
- The email2 has an invalid format
- accountExpiration has an invalid format
- isAdmin has an invalid format
- suspended has an invalid format
- A group has an invalid format
- The email already exists
Delete users
Remove specific users by id
deleteUsers(args: { users: UserID[]; }): {
deleted: {
id: UserID;
email: string;
}[];
errors?: string[];
};
Description:
- Delete a list of users defined by their id.
- The outputs will be either the email and the user id of the deleted users or the error(s).
Possible error:
- A user doesn’t exist
- The list of users has an invalid format
- The list of users is mandatory
Search users
Return the list of users in the organization
listUsers(args: {
withGroups?: boolean;
withAttributes?: boolean;
}): User[];
Description:
- List all users with their attributes.
- If the parameter withGroups is set to true, the fields groups of each user will be filled with the lists of groups (name and id) the user is member of.
- If the parameter withAttributes is set to true, the fields attributes of each user will be filled with the lists of their attributes.
Add or Set Trustelem user attributes
Add a value (or several values) to a Trustelem user attribute.
addUserAttr(args: {
userID: UserID;
name: string;
value: string;
} | {
userID: UserID;
name: string;
values: string[];
}): { error?: string; };
Set the value (or the values) of a Trustelem user attribute.
This function deletes all previously existing values for this Trustelem attribute.
setUserAttr(args: {
userID: UserID;
name: string;
value: string;
} | {
userID: UserID;
name: string;
values: string[];
}): { error?: string; };
Description:
- Create or replace a Trustelem attribute for a user defined by its userID.
- The attribute has a name and can have a value or multiple values.
- The output will be either nothing, or the error(s).
Possible errors:
- The userID doesn’t exist
- The userID has an invalid format
- The name has an invalid format
- The values have ab invalid format
- The userID is mandatory
- The name is mandatory
- The values is mandatory
Delete Trustelem user attributes
Delete one or more Trustelem attribute values from a user:
delUserAttr(args: {
userID: UserID;
name: string;
all: true;
} | {
userID: UserID;
name: string;
value: string;
} | {
userID: UserID;
name: string;
values: string[];
}): { error?: string; };
Description:
- Delete a Trustelem attribute for a user defined by its userID.
- If 'all' is provided, all attributes with the given name are deleted ;
- If 'value' is provided, only the attributes with the given name and this value are deleted ;
- If 'values' is provided, only the attributes with the given name and a value which matches one of the provided values are deleted.
Possible errors:
- The userID doesn’t exist
- The userID has an invalid format
- The name has an invalid format
- The values have ab invalid format
- The userID is mandatory
- The name is mandatory
- The parameters all or values are mandatory
Reset a user password
Generate a code or a link allowing a user to reset its password
resetPassword(args: {
id: UserID;
method?: { kind: 'code'; expireMinutes?: number } | { kind: 'link'; expireMinutes?: number; redirectURL?: string; openSession?: boolean };
}): { resetCode: string; resetLink: string; expirationDate: string } | { error: string };
Description:
- Reset the password of a user defined by his userID.
- The reset is defined by the attribute method, which can be set to 'code' or 'link'.
- Both method have an attribute expireMinutes to define its validity (24h if empty).
- The method link has also a redirectURL and the possibility to open a Trustelem session after the definition of the new password.
- The output will be either nothing or the error.
Possible errors:
- The userID doesn't exist
- The userID has an invalid format
- kind has an invalid format
- expireMinutes has an invalid format
- redirectURL has an invalid format
- openSession has an invalid format
Datatype
interface Group {
id: GroupID;
name: string;
UUID: string;
directoryID?: DirectoryID;
}
Create
Create a new group
createGroup(args: {
name: string;
users?: UserID[];
}): { id: GroupID } | { error: string };
Description:
- Create a group with the given name.
- The group can contain a list of users defined by their UserID.
- The outputs will be either the id of the new group or the error(s).
Possible errors:
- The name already exists
- The name is mandatory
- The name has an invalid format
- A user doesn’t exist
- A user has an invalid format
Read member
List users from groups
getGroupMembers(args: { id: GroupID; }): {
users: {
userID: UserID;
email: string;
}[];
};
Description:
- Provide the userID and the email of users, member of given groups defined by their id(s).
Update
Add user(s)
Add a list of users to a group
addUsersToGroup(args: {
id: GroupID;
users: UserID[];
}): { Added: UserID[] } | { error: string };
Description:
- Add a list of users defined by their UserID to a group defined by its GroupID.
- The outputs will be either the UserID of the added users, or the error(s).
Possible errors:
- The id doesn’t exist
- A user doesn’t exist
- The id has an invalid format
- A user has an invalid format
- The id is mandatory
- The list of users is mandatory
Remove user(s)
Remove a list of users from a group
removeUsersFromGroup(args: {
id: GroupID;
users: UserID[];
}): { Removed: UserID[] } | { error: string };
Description:
- Remove a list of users defined by their UserID from a group defined by its GroupID.
- The outputs will be either the UserID of the removed users, or the error(s).
Possible errors:
- The id doesn’t exist
- A user doesn’t exist
- The id has an invalid format
- A user has an invalid format
- The id is mandatory
- The list of users is mandatory
Delete
Delete a group not synchronized from a directory
deleteGroup(args: { id: GroupID; }): { error?: string; };
Description:
- Delete a group defined by its id.
- The outputs will be either nothing or the error(s).
Possible error:
- The group id doesn’t exist
- A group id has an invalid format
- The group id is mandatory
Search
By id
Get a specific group by id
getGroup(args: {
id?: GroupID;
name?: string;
}): Group | null;
Description:
- If a group defined by a given id or name exists, provide its attributes.
List
Return the list of groups in the organization
listGroups(args: {}): Group[];
Description:
- List all the existing groups with their attributes.
Datatype
interface App {
id: AppID;
name: string;
}
List
Return the list of applications in the organization
listApps(args: {}): App[];
Description:
- List all the existing applications with their attributes.
Search
Get a specific App by id
getApp(args: {
id?: AppID;
name?: string;
}): App | null;
Description:
- If an application defined by a given id or name exists, provide its attributes.
Datatype
interface Perm {
appID: AppID;
groupID: GroupID;
userID: UserID;
internalZone: ZoneSecurityLevel;
externalZone: ZoneSecurityLevel;
ldapZone: ZoneSecurityLevel;
radiusZone: ZoneSecurityLevel;
}
type ZoneSecurityLevel = '' | 'default' | '1_factor' | '2_factors' | 'forbidden';
Description:
- ZoneSecurityLevel represents the permission level for a group or a user to access an app depending of an IP zone or protocols.
- The zone can be either internal (public IP addresses of the internal network), external (any other IP address), LDAP or RADIUS.
- The effective permission for a user is based on the default access-rules, then overload by one or many permissions based on the groups, then overload again by the permissions of the user.
- In case of multiple groups permissions, the more restrictive is applied.
The ZoneSecurityLevel can be one of the 5 following values:
- '' or no rule: does not apply any rule so other permissions can remain active.
- default: apply the default rule
- One Factor: only one authentication factor is needed to access the application
- Two Factor: two authentication factors are needed to access the application
- Forbidden: the user can’t access the application
Examples:
John Doe is in groups “Customer Success” and “Support”
Permissions defined:
- Customer Success for salesforce: internal -> 1 factor, external -> 2 factors
- Support for salesforce: internal -> 2 factors, external -> forbidden
- John Doe for salesforce: internal -> not specified, external -> 2 factors
For internal zone we have 1 factor and 2 factors for groups and not specified for user --> 2 factors For external zone we have 2 factors and forbidden for groups and 2 factors for user --> 2 factors
John needs 2 factors to access salesforce for both internal and external zone.
List
Return the list of permissions for a user, a group or an application
listPerms(args: {
userID?: UserID;
groupID?: GroupID;
appID?: AppID;
}): { perms: Perm[] } | { error: string };
Description:
- List all the permissions available for a user defined by his userID or a group defined by its groupID or an application defined by its appID.
- The research is done on only one id, the priority order is userID, then groupID, then appID.
Possible errors:
- The userID doesn’t exist
- The userID has an invalid format
- The groupID doesn’t exist
- The groupID has an invalid format
- The appID doesn’t exist
- The appID has an invalid format
Set
For group
Create or update a permission for a group
setGroupPerm(args: {
groupID: GroupID;
appID: AppID;
internalZone: ZoneSecurityLevel;
externalZone: ZoneSecurityLevel;
ldapZone?: ZoneSecurityLevel;
radiusZone?: ZoneSecurityLevel;
}): { error?: string; };
Description:
- Create or update a permission for a group defined by its groupID, to an application defined by its appID.
- The permission level must be defined for the internalZone and the externalZone with a ZoneSecurityLevel.
- A specific permission is needed for LDAP and RADIUS protocols
If only ldap/radius are needed, fixe the internal/external zones at ' ' which is no rule - The outputs will be either nothing, or the error(s).
Possible errors:
- The groupID doesn’t exist
- The appID doesn’t exist
- internalZone has an invalid format
- externalZone has an invalid format
- radiusZone has an invalid format
- ldapZone has an invalid format
- The appID has an invalid format
- The groupID has an invalid format
- internalZone is mandatory
- externalZone is mandatory
- The appID is mandatory
- The groupID is mandatory
For User
Create or update a permission on a user
setUserPerm(args: {
userID: UserID;
appID: AppID;
internalZone: ZoneSecurityLevel;
externalZone: ZoneSecurityLevel;
ldapZone?: ZoneSecurityLevel;
radiusZone?: ZoneSecurityLevel;
}): { error?: string; };
Description:
- Create or update a permission for a user defined by his userID, to an application defined by its appID.
- The permission level must be defined for the internalZone and the externalZone with a ZoneSecurityLevel.
- A specific permission is needed for LDAP and RADIUS protocols
If only ldap/radius are needed, fixe the internal/external zones at '' which is no rule - The outputs will be either nothing, or the error(s).
Possible errors:
- The userID doesn’t exist
- The appID doesn’t exist
- internalZone has an invalid format
- externalZone has an invalid format
- radiusZone has an invalid format
- ldapZone has an invalid format
- The appID has an invalid format
- The userID has an invalid format
- internalZone is mandatory
- externalZone is mandatory
- The appID is mandatory
- The userID is mandatory
Delete
Delete a permission for a user, or a group to an application
deletePerm(args: {
userID?: UserID;
groupID?: GroupID;
appID: AppID;
}): { error?: string; };
Description:
- Delete a permission granted to a user or a group to access an application. The three previous parameters are defined by their ID.
- The outputs will be either nothing or the error(s).
Possible errors:
- The groupID doesn’t exist
- The userID doesn’t exist
- The appID doesn’t exist
- The groupID has an invalid format
- The userID has an invalid format
- The appID has an invalid format
- The appID is mandatory
Read
For user
Return consolidated (computed from list of permissions) permissions for a user
getEffectiveAppsPermsForUser(args: { userID: UserID; }): {
appID: AppID;
appName: string;
internalZone: EffectiveZoneSecurityLevel;
externalZone: EffectiveZoneSecurityLevel;
ldapZone: EffectiveZoneSecurityLevel;
radiusZone: EffectiveZoneSecurityLevel;
}[];
Description:
- For a given user defined by his userID, return the list of the application(s) he can access, defined by their appID and appName, with the permissions for internal, external, ldap and radius zones.
Possible errors:
- The userID doesn’t exist
- The userID has an invalid format
- The userID is mandatory
For app
Return consolidated (computed from list of permissions) permissions for an app
getEffectiveUserPermsForApp(args: { appID: AppID; }): {
userID: UserID;
internalZone: EffectiveZoneSecurityLevel;
externalZone: EffectiveZoneSecurityLevel;
ldapZone: EffectiveZoneSecurityLevel;
radiusZone: EffectiveZoneSecurityLevel;
}[];
Description:
- For a given application defined by its appID, return the list of users who can access to it, defined by their userID, with the permissions for internal, external, ldap and radius zones.
Possible errors:
- The appID doesn’t exist
- The appID has an invalid format
- The appID is mandatory
Datatype
interface Log {
id: LogID;
date: string;
level: string;
msg: string;
details?: string;
userID?: UserID;
userEmail: string;
ip: string;
useragent: string;
}
List
Return the list of logs in the organization
listLogs(args: { start?: Date, end?: Date, order?: 'fromEnd' | 'fromStart', pageSize?: number, pageToken?: string }): { logs: Log[]; nextPageToken: string } | { error: string; };
Description:
- List all the logs of the 30 previous days.
- This list can be filtered by date with the parameter start / end to shorten the period.
(Date format: RFC3339 "2006-01-02T15:04:05Z07:00") - By default, a page displays 1000 logs, but it can be reduced with the parameter pageSize.
- The page can be ordered with the parameters ‘fromEnd’ or ‘fromStart’
- If one page is not enough, a nextPageToken is provided. It can be used as a pageToken in the API in order to access to a specific page.
- The outputs will be the logs, possibly the nextPageToken or the error(s).
Possible errors:
- start has an invalid format
- end has an invalid format
- order has an invalid format
- pageSize has an invalid format
- pageToken has an invalid format
- pageToken doesn’t exist
Datatype
interface Alert {
id: AlertID;
date: string;
msg: string;
userID: string;
read: boolean;
}
List
List the alerts
listAlerts(args: {
unreadOnly?: boolean;
since?: string;
}): Alert[];
Description:
- List all the alerts of the 30 previous days.
- This list can be filtered by date with the parameter since to shorten the period.
- This list can provide only the unread alerts with the parameter unreadOnly set to true.
Acknowledge
Update an alert to be marked as read
markAlertAsRead(args: { alertID: AlertID; }): { error?: string; };
Description:
- Change the status of an alert, defined by its alertID, from unread to read.
- The outputs will be either nothing, or the error(s).
Possible errors:
- The alertID doesn’t exist
- The alertID has an invalid format
- The alertID is mandatory
Datatype
interface Session {
id: SessionID;
kind: string;
userID: UserID;
created: string;
modified: string;
expires: string;
deleted: boolean;
ip: string;
userAgent: string;
}
List
List the sessions
listSessions(args: {
showDeleted?: boolean;
since?: string;
limit?: number;
}): Session[];
Description:
- List the active sessions.
- This list can also contain the deleted sessions of the 30 previous days with the parameter showDeleted sets at true.
- This list can be filtered by date with the parameter since to shorten the period.
(Date format: RFC3339 "2006-01-02T15:04:05Z07:00") - By default, a page contains maximum 10000 sessions, but it can be reduced with the parameter limit.
Datatype
interface AuthToken {
id: AuthTokenID;
userID: UserID;
kind: TokenKind;
name: string;
}
List
List the second factors of a user
listAuthTokens(args: { id: UserID; }): { authTokens: AuthToken[] } | { error: string };
Description:
- For a given user defined by his id, list his authTokens available.
- The outputs will be either the authTokens, or the error(s).
Possible errors:
- The id doesn’t exist
- The id has an invalid format
- The id is mandatory
Issue
Send a challenge to a second factor
issueAuthToken(args: {
userID: UserID;
tokenID: AuthTokenID;
message?: string;
}): { challengeID: ChallengeID } | { error: string };
Description:
- Send a challenge to a user defined by his userID on a chosen authToken defined by its tokenID.
- The challenges might be, for instance, a code in a SMS or a notification on a phone and if the factor supports it, can contain a message.
- The outputs will be either the challengeID, or the error(s).
Possible errors:
- The userID doesn’t exist
- The userID has an invalid format
- The userID is mandatory
- The tokenID doesn’t exist
- The tokenID has an invalid format
- The tokenID is mandatory
Verify
Verify the answer to a second factor challenge
verifyAuthToken(args: {
userID: UserID;
challengeID?: ChallengeID;
tokenID?: AuthTokenID;
passCode?: string;
}): { status: 'success' | 'waiting' | 'rejected' | 'timeout' | 'failed' } | { error: string };
Description:
- For a given user defined by his userID, verify the validity of an authToken defined by its challengeID or its tokenID.
- It is validated if the user accepts the authentication for Trustelem Authenticator, or provides the right passCode for the others authTokens.
- The outputs will be either: the status of the verification or the error(s).
Possible errors:
- The userID doesn’t exist
- The userID has an invalid format
- The userID is mandatory
- The challengeID doesn’t exist
- The challengeID has an invalid format
- The tokenID doesn’t exist
- The tokenID has an invalid format
- The passCode has an invalid format
Example
List the available authtokens
Script used:
let res: Output = api.listAuthTokens({
id: "u68446589",
});
Response:
{"authTokens":[
{"id":"at1798391","userID":"u68446589","kind":"GA","name":"default"},
{"id":"at1954553","userID":"u68446589","kind":"TLM_AUTH","name":"samsung"},
{"id":"at1954598","userID":"u68446589","kind":"SMS","name":""}
]}
Use API to verify the factor Google Authenticator
Code provided by Google Authenticator: 123456
Script used:
//{"ID":"at1798391","UserID":"u68446589","Kind":"GA","Name":"default"}
let res: Output = api.verifyAuthToken({
userID: "u68446589",
//challengeID: "",
tokenID: "at1798391",
passCode: "123456"
});
Response:
{"status":"success" }
Use API to verify the factor SMS
Script used:
{"ID":"at1954598","UserID":"u68446589","Kind":"SMS","Name":""}
let res: Output = api.issueAuthToken({
userID: "u68446589",
tokenID: "at1954598",
});
Response:
{"challengeID":"c_6a809214faf216e33cfbc668a346f136"}
Sms received with the code: 123456
Script used:
let res: Output = api.verifyAuthToken({
userID: "u68446589",
challengeID: "c_6a809214faf216e33cfbc668a346f136",
//tokenID: "",
passCode: "123456"
});
Response:
{"status":"success" }
Use API to verify the factor Trustelem Authenticator
Script used:
{"ID":"at1954553","UserID":"u68446589","Kind":"TLM_AUTH","Name":"samsung"}
let res: Output = api.issueAuthToken({
userID: "u68446589",
tokenID: "at1954553",
});
Response:
{"challengeID":"c_6a809214faf216e33cfbc668a346f137"}
Notification received then accepted on Trustelem Authenticator
Script used:
let res: Output = api.verifyAuthToken({
userID: "u68446589",
challengeID: "c_6a809214faf216e33cfbc668a346f137",
//tokenID: "",
//passCode: ""
});
Response:
{"status":"success" }
Application scripts
-
Most of Trustelem applications allow to set up a script in order to change the default behavior.
-
With this script, it is possible to change the SAML or OpenID Connect attributes sent to an application.
-
The language used is TypeScript.
Add a script
-
Edit your app
-
Click on Custom claims for OpenID Connect / Custom scripting for SAML
-
Enter your script
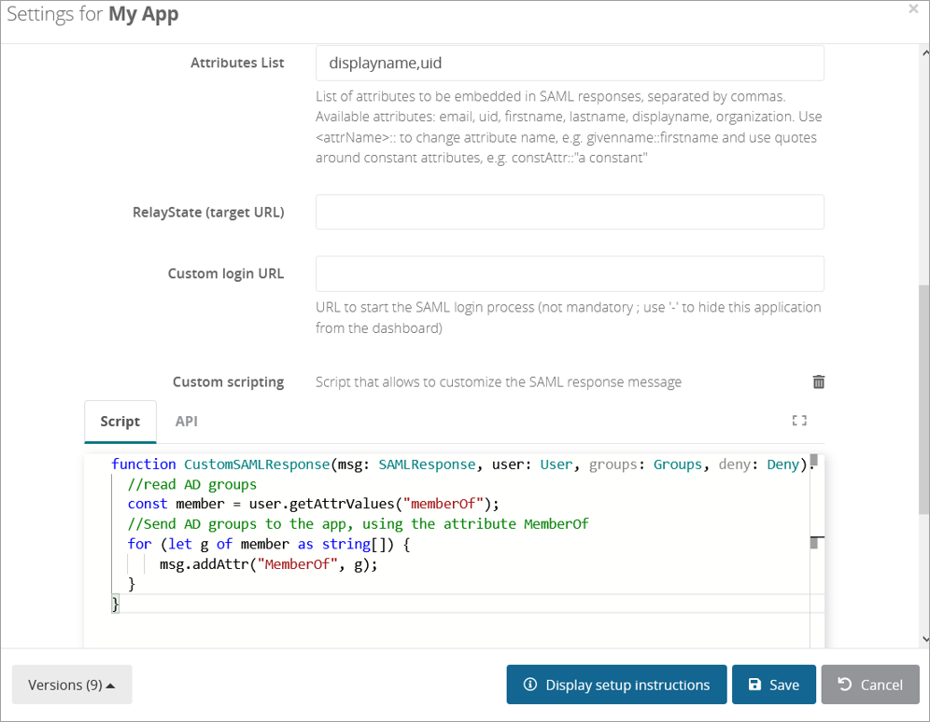
Some examples for SAML applications
Add a constant attribute
msg.setAttr("attribute","value");
Add an attribute containing Trustelem groups
for(let g in groups){
msg.addAttr("Groups",g);
}
Change the user email
if (user.email == 'john.doe@contoso.fr') {
msg.setAttr("email","isabelle.doe@contoso.fr");
}
Some examples for OpenID Connect applications
Add a constant attribute
claims["attribute"] = "value";
Send a user attribute
claims["Profile"] = user.getAttr("profile");
Add an attribute containing Trustelem groups
claims["Groups"] = JSON.stringify(groups);
Associating Google accounts on mobile devices
Warning
- Having setup a network mask in Google SSO configuration prevents associating mobile devices through SSO.
For users having already migrated to Google for Work
-
On the device, remove the Google account firstname.lastname@mycompany.com
- Go to Parameters > Accounts
- Select « Google »
- Select your account firstname.lastname@mycompany.com
- Open the menu (upper right corner) and select « Delete the account »
- Confirm
-
Add the account you just deleted
- Go to Parameters > Accounts > Add an account
- Select « Google »
- Select « Existing account»
- If on Android <= 4 or on some iOS devices, open the menu (upper right corner) and select « Connect through Web browser »
- Accept conditions by clicking on « OK »
- Enter your email, without your password, continue
- You are re-directed to Trustelem. Enter your email, this time with your usual password
-
The account is ready to use.
For users who have not yet migrated to Google for Work
- Go to Parameters > Accounts > Add an account
- Select « Google »
- Select « Existing account»
- If on Android <= 4 or on some iOS devices, open the menu (upper right corner) and select « Connect through Web browser »
- Accept conditions by clicking on « OK »
- Enter your email, without your password, continue
- You are re-directed to Trustelem. Enter your email, this time with your usual password
Authentication with an external IDP
In this page, we will see how to authenticate from an external IDP to a Trustelem subscription.
First, we will setup the authentication from an Azure subscription to a Trustelem subscription, then we will setup the authentication from a Trustelem subscription to another.
From Azure to Trustelem
In this chapter, we'll explain how to authenticate from an Azure subscription to a Trustelem subscription.
For the sake of clarity, we'll use the following terms:
- Azure: the Azure subscription used for authentication.
- Trustelem: the subscription in which we want to be authenticated.
Simple authentication (no Just In Time provisioning)
As there is no Just In Time provisioning yet, the user to authenticate must exist on Trustelem.
-
Go on Trustelem and add an external IDP
Identity Providers > Add
Then copy the Redirect URI
-
Go on Azure, and add an application
App registrations > New registration
Then in the field "Redirect URI", select "Web" and paste the Redirect URI copied before.
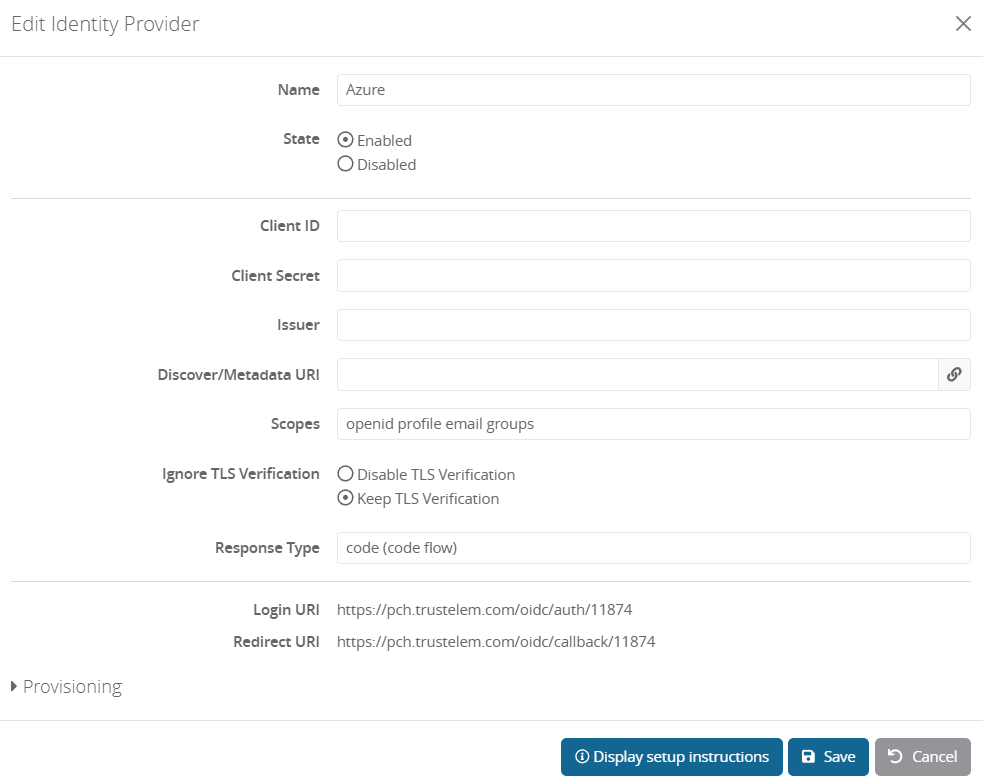

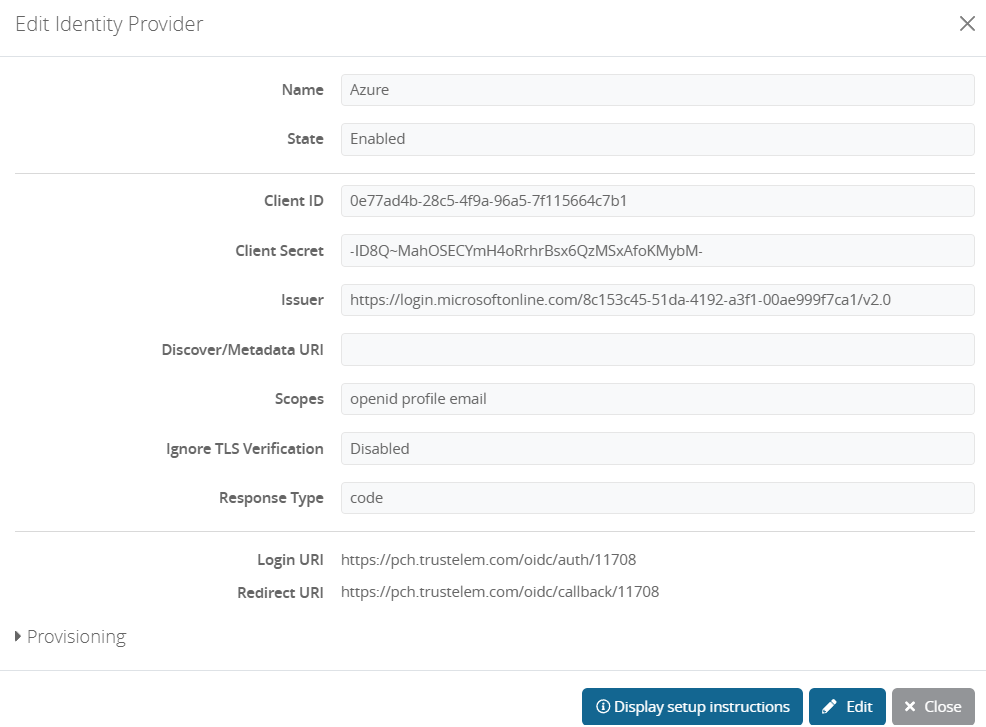
- Add the following values from Azure, to the previous Trustelem external IDP:
-
ClientID:
Copy the Application (client) ID from theOverviewpage -
ClientSecret:
Generate a new client secret fromManage > Certificates & secretsand copy its value -
Metadata URI:
Copy the OpenID Connect metadata document fromOverview > Endpoints
The Issuer will be automatically completed based on this URL. -
Scopes:
Remove "groups", the value should be: "openid profile email"
-
ClientID:
-
Add API rights for the Azure app
- Go to
Manage > API permissions > Add a permission > Microsoft Graph > Delegated permissions - Tick email, openid and profile then save
- Click "Grant admin consent"
- Go to
-
On Trustelem, verify if the user to authenticate exists.
-
Try the authentication, on Trustelem
- Click Azure button, you are redirected to Azure
- Provide the login and password: you are now authenticated to Trustelem
Just-in-time provisioning
When just-in-time provisioning is implemented, step 5 in the previous chapter is no longer necessary.
In fact, when Provisioning is enabled, users will be able to authenticate on Trustelem even if they don't yet exist. In this case, an account will be created on the basis of OpenID Connect attributes.
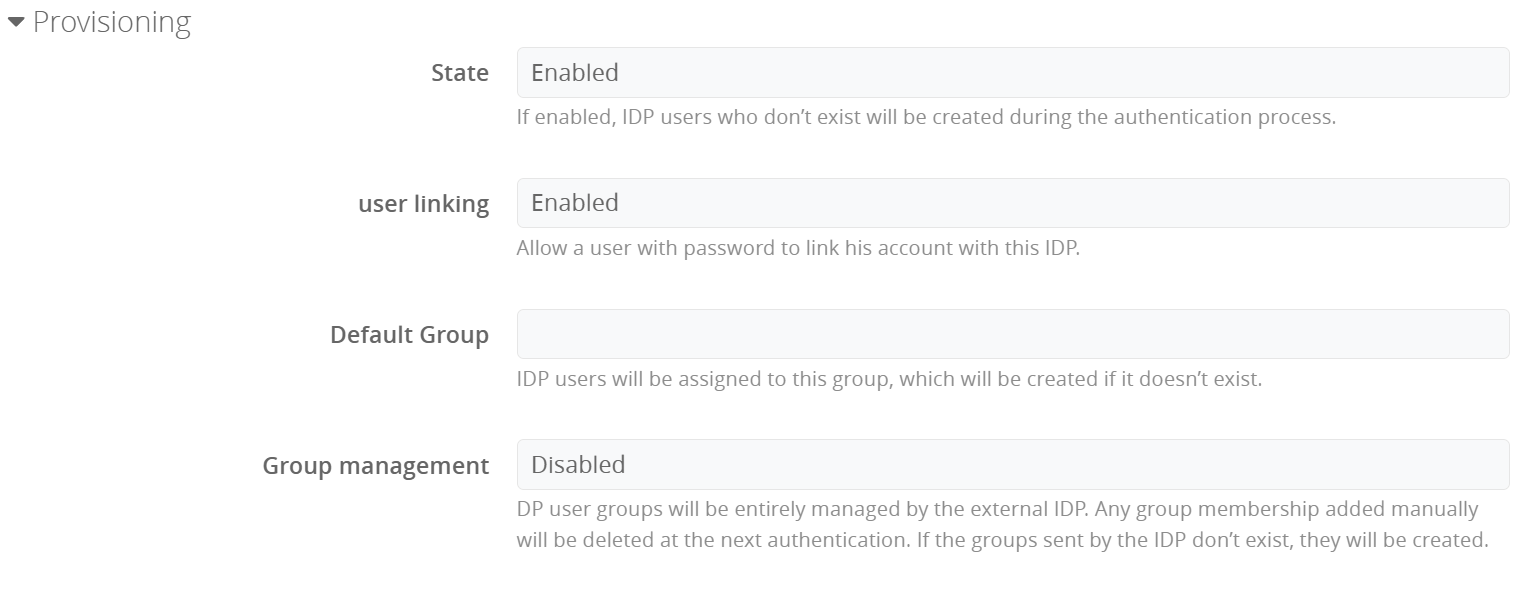
3 additional options are available:
-
User linking
If this option is disabled, users who already exist locally will not be able to authenticate, as the 2 accounts (local + IDP) cannot be merged. -
Default group
Users who authenticate via the external IDP will be added to this group.
If the group does not exist yet, it will be automatically created. -
Group management
Group management for IDP users (and all related local accounts) is based entirely on the OpenID Connect group attribute. The user is automatically added to these groups, which are created if they don't yet exist. In addition, the user is removed from all groups which are not present in the OpenID Connect groups.
On Azure, the scope "groups" is not allowed, as a consequence you need to manually add the group attribute:- On your Azure app, go to
Manage > Token configurationthen add a groups claim - Tick "All groups"
- For the field "Access", if the groups come from Active Directory, you can tick sAMAccountName and the attributes returned to Trustelem will be the group names. If some of the groups don't come from AD, then tick Group ID and the attributes returned to Trustelem will be the group IDs.
You can now save the groups claim. - Add the claim "groups" on your Trustelem External IDP setup
Finally, you can add a prefix to IDP groups, which will be created on Trustelem.
You can also prevent certain groups from being used.
For example,^Internal.*will prevent the use of the OpendID Connect attribute beginning with Internal. - On your Azure app, go to
From an idP supporting OIDC to Trustelem
In this chapter, we'll explain how to authenticate from an idP supporting OIDC to Trustelem (ex one Trustelem subscription to another).
For the sake of clarity, we'll use the following terms:
- Trustelem External: the subscription used for authentication.
- Trustelem Internal: the subscription in which we want to be authenticated.
In other words, we want to authenticate to Trustelem SP with Trustelem IDP.
Simple authentication (no Just In Time provisioning)
As there is no Just In Time provisioning yet, the user to authenticate must exist on Trustelem SP.
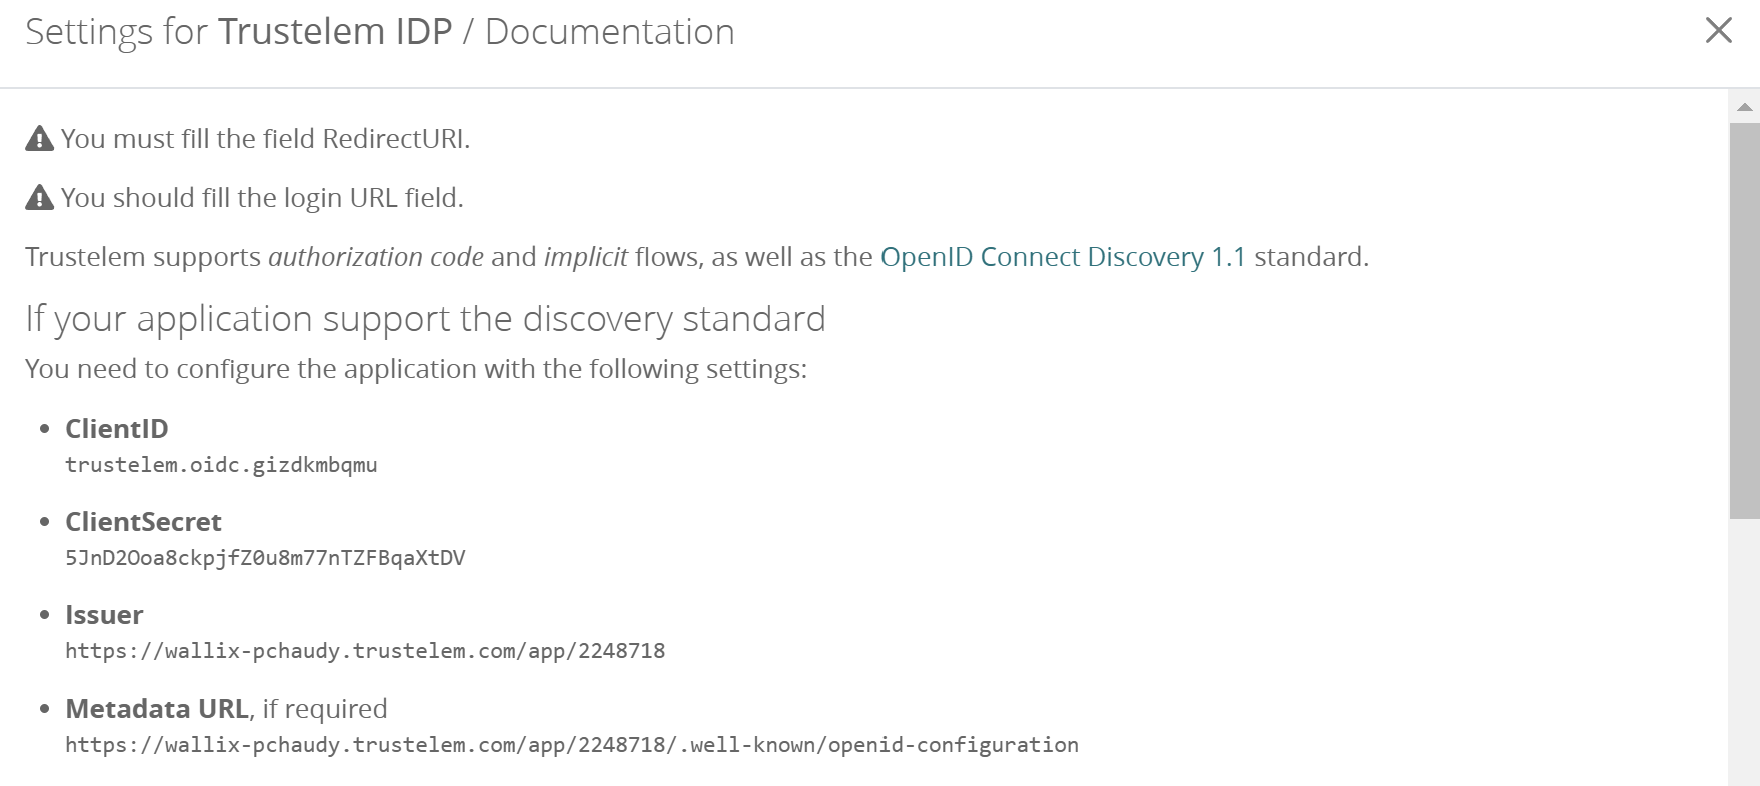
- Go on Trustelem External, and add an application
Apps > Add an application - Choose an OpenID Connect application
- Click on Display setup instructions, then copy:
- ClientID
- ClientSecret
- Issuer
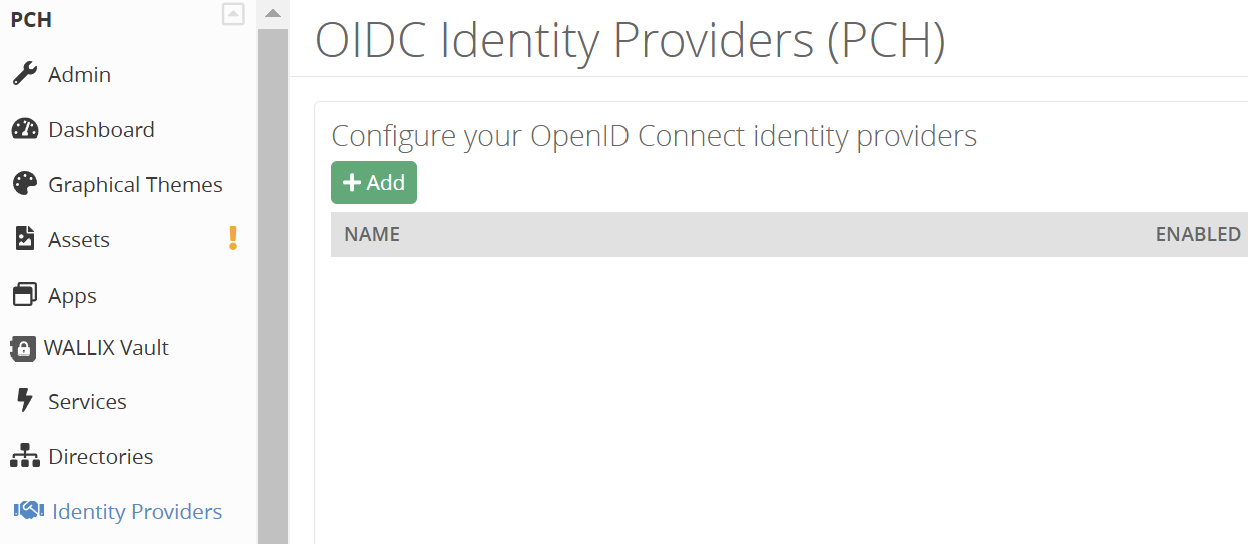
- Go on Trustelem Internal and add an external IDP
Identity Providers > Add
- Paste the previous copied values
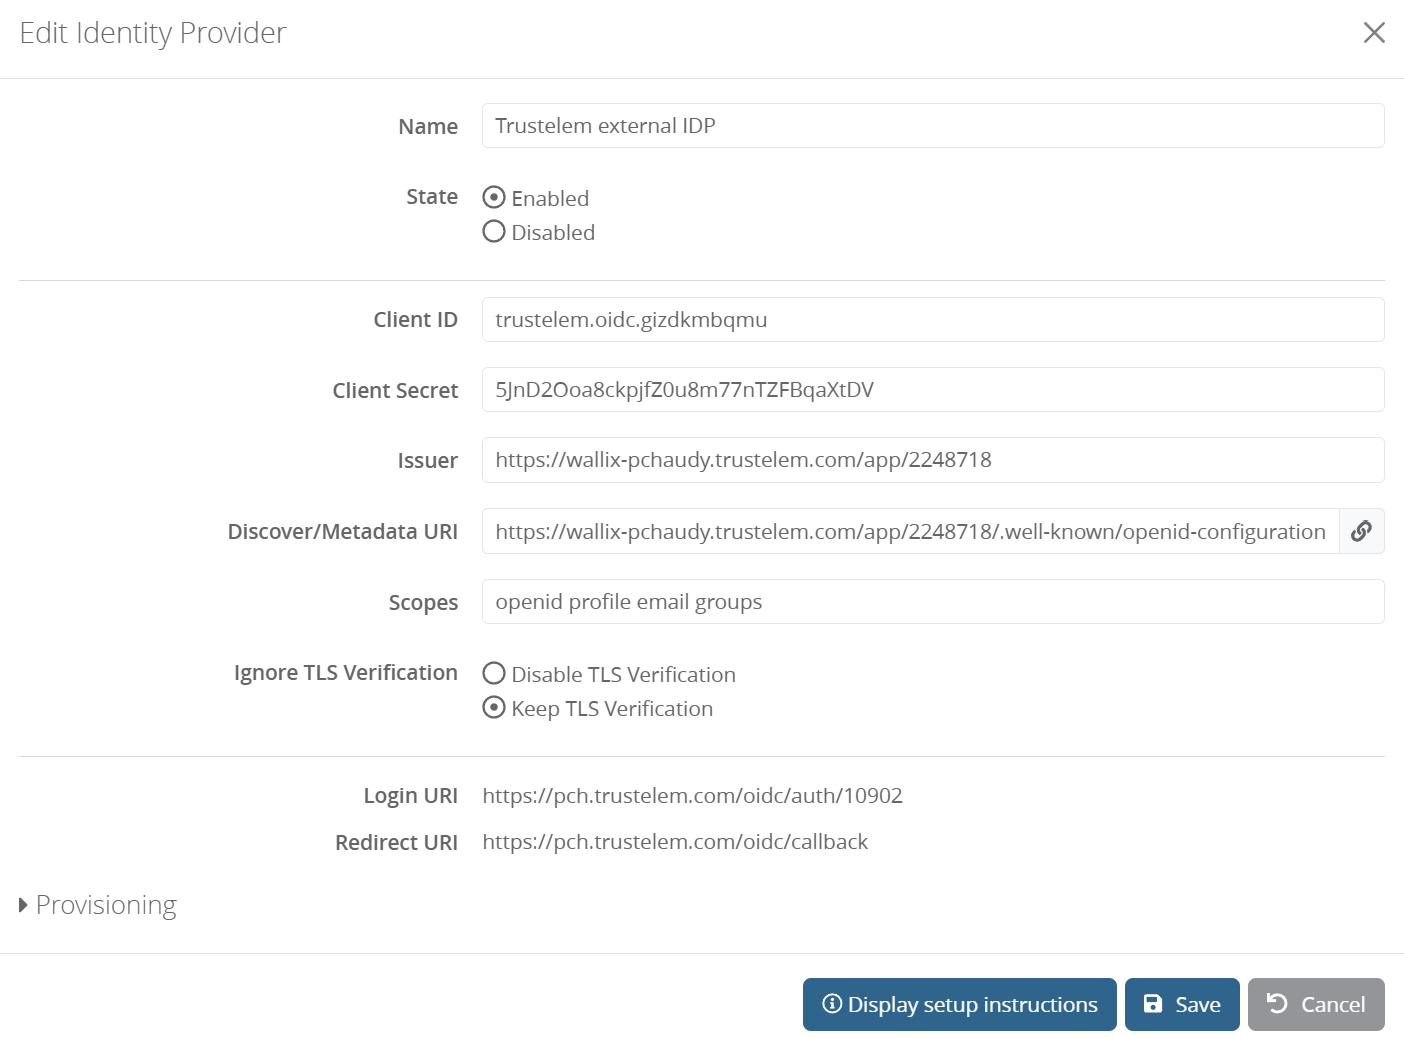
- Copy the Login URI and the Redirect URI then Save the configuration
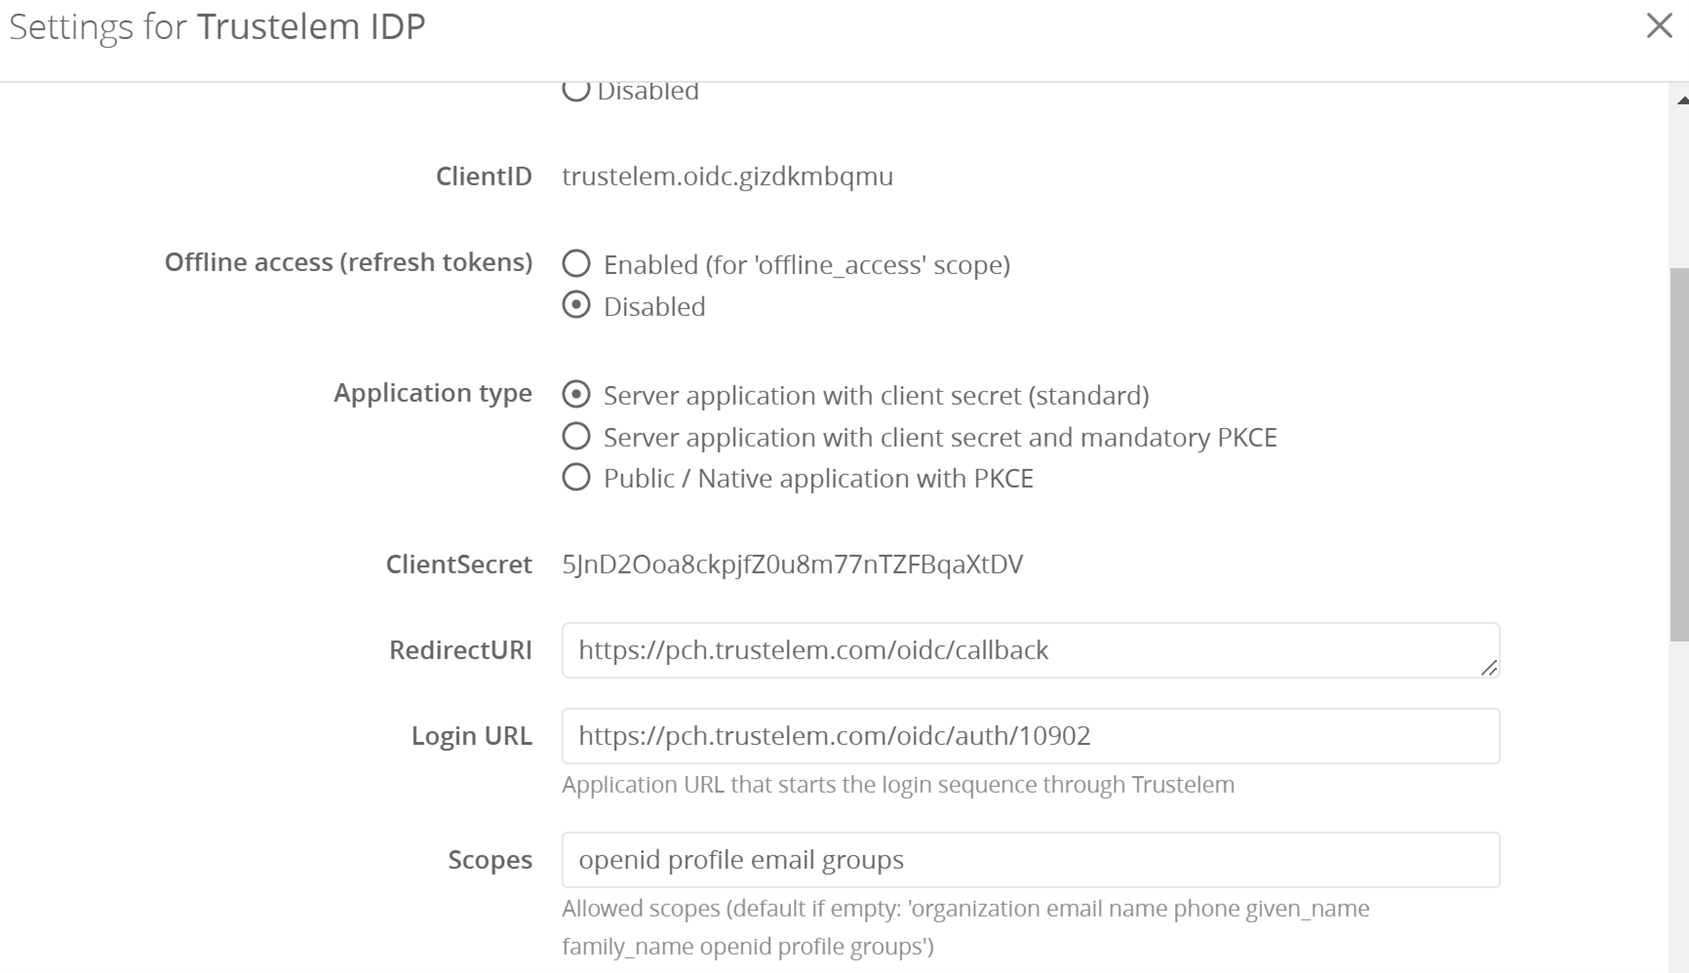
- Return to the OpenID Connect app on Trustelem External, and paste the 2 copied values
Then, save the configuration.
Optionally, you can complete the scopes with “openid profile email groups” but if the field is empty, the same content will be used by default.
- Now on Trustelem External, create a permission for the user you want to authenticate.
In my example, I want to create a 1 factor permission for my app "Trustelem IDP" for the user pchaudy@wallix.com - On Trustelem Internal, verify if the user "pchaudy@wallix.com" exists.
- Try the authentication, on Trustelem Internal

Click Trustelem button, you are redirected to Trustelem External
Then after providing the login and password, you are authenticated to Trustelem Internal
Just-in-time provisioning
Just-in-time provisioning can be implemented after step 8 in the previous chapter. In this case, step 9 is no longer necessary.
In fact, when Provisioning is enabled, users will be able to authenticate on Trustelem, even if they don't yet exist. In this case, an account will be created on the basis of OpenID Connect attributes.
3 additional options are available:
-
User linking
If this option is disabled, users who already exist locally will not be able to authenticate, as the 2 accounts (local + IDP) cannot be merged. -
Default group
Users who authenticate via the external IDP will be added to this group.
If the group does not exist yet, it will be automatically created. -
Group management
Group management for IDP users (and all related local accounts) is based entirely on the OpenID Connect group attribute. The user is automatically added to these groups, which are created if they don't yet exist. In addition, the user is removed from all groups which are not present in the OpenID Connect groups.
To operate, you need to configure the OpendID Connect attribute, or claim, which will contain the groups. For Trustelem "groups" is usually used.
Finally, you can add a prefix to IDP groups, which will be created on Trustelem.
You can also prevent certain groups from being used.
For example,^Internal.*will prevent the use of the OpendID Connect attribute beginning with Internal.
Azure AD users
Contents
How does it work?
The goal is to use Azure Active Directory as an identity provider for Trustelem.
It requires the creation of an "app" in Azure AD admin console for authorizing Trustelem to request Azure AD data using API.
For the synchronization, Trustelem uses the Microsoft API to list the groups and their members.
For the authentication, Trustelem sends an authentication request using Microsoft API and if it is validated, authenticates the user on Trustelem.
Prerequisites
No prerequisite, every steps of the setup are listed in the following chapter.
Note: it is not possible to authenticate users with their AzureAD password if Azure delegates the authentication to an external Identity Provider such as Trustelem.
Setup
-
Create a directory Azure Active Directory on Trustelem
- Go on the tab Directories
https://admin-mydomain.trustelem.com/app#/directories - Click on Create and select Azure Active Directory.
- Go on the tab Directories
-
Define the target Azure subscription
- In the field Tenant ID enter here the tenant ID of your Azure subscription, e.g. contoso.onmicrosoft.com
- In the field Tenant ID enter here the tenant ID of your Azure subscription, e.g. contoso.onmicrosoft.com
-
Authorize Trustelem to connect to Azure
- Connect to https://portal.azure.com with an admin account
- Go to Azure Active Directory then App registration
- Click on button +Add
- Enter a name
- Select Accounts in this organizational directory only
- Select a platform Web in Redirect URI and enter the URL: https://mydomain.trustelem.com
- Click on Register
- In section Expose an API, add a permission and choose Microsoft Graph
- Click on Application permissions
- Select permission Directory.Read.All - Read directory data in section Directory
- Click on button Add permission for applying the selected API.
- Apply these permissions by clicking on Grant admin consent for [Your Company]
- Go to Overview, copy the value given in Application (client) ID and paste it in the field Client ID on Trustelem
- Go to Certificates and secrets, click on New client secret, give it a name and click on Add
- Then copy the field Value and paste it in the field Client Secret on Trustelem
- If needed, in section Owner, add an administrator for this app
-
Use Azure passwords for authenticating users on Trustelem (optional)
- On the Azure admin page of the app previously created, go to Authentication
- In Advanced Settings, in the field Allow public flows, check yes for the option Enable the following mobile and desktop flows
-
On Trustelem, enter the Client ID value again in the field Client ID (needed for compatibility with older Azure versions)
Notes:
-
If you have the application Office 365 in Trustelem, that means you have federated an Azure domain.
-
For a federated domain, Azure AD disable user passwords.
-
If the passwords are disabled, Trustelem can't get them using API and therefore, can't use Azure passwords for authenticating users on Trustelem.
Certificate renewal
If you received and email like the following one, that means the certificate used by some applications will expired soon or has already expired:
You receive this message because you are a Trustelem administrator for -Trustelem subscription-.
The following applications are federated using the certificate -Name of the certificate- that has expired on 2021-12-18 at 14:14.
• MyApp 1
• MyApp 2
It is recommended that you reconfigure those applications as soon as possible to use a more recent certificate to avoid any service outage.
The applications might refuse the authentication if the certificate used has expired, so it is important to fix this situation.
Generate a new certificate
Go to your Trustelem admin page, then Security settings, then Application certificates and click on +Create.
Change the applications certificate
OpenID Connect applications
- On Trustelem, edit the app
- Change the certificate to the new one
- Verify if the authentication works
Note: with OpenID Connect, you shouldn' have to change the certificate in the application directly. But in some rare cases it might happen. So if the authentication isn't working, get back to the old certificate on the Trustelem application, then go to the application and verify if the certificate is provided in the setup.
SAML applications
- On Trustelem, edit the app
- Change the certificate to the new one
- On the application, change the certificate use in the SAML setup to the new one
- it is not necessary if the certificate is recovered using the Trustelem metadata URL
- the application can ask to upload the new Trustelem metadata file instead
- Verify if the authentication works
Note: the applications rarely use the URL for the certificate. So you will probably have to change the certificate or the metadata manually. The consequence will be a short indisponibility between the change on Trustelem and the change on the application.
For O365
Office doesn't have a web interface to change the certificate : you will need Powershell.
- On Trustelem, edit the O365 app
- Change the certificate to the new one
- Open the documentation and copy $cert = ...
- Start Powershell and run the following lines


Custom themes
The aspect of users login pages and users dashboard can be change.
The settings are done in the tab Graphical themes or using the URL:
https://admin-mydomain.trustelem.com/app#/themes
Note: right now, this feature is not activate by default. If you want to customize your login page / dashboard, please email support-trustelem@wallix.com.
What can I do?
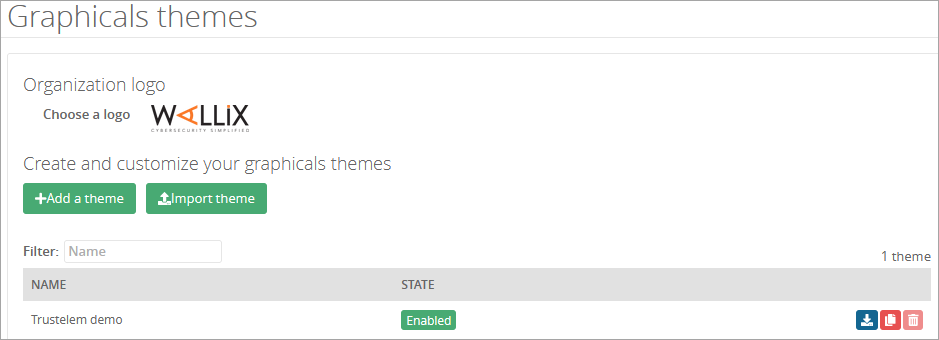
On this page you can:
-
change the logo of your Trustelem subscription
-
create a new theme
-
import an existing theme
-
enable / download / copy / delete an existing theme
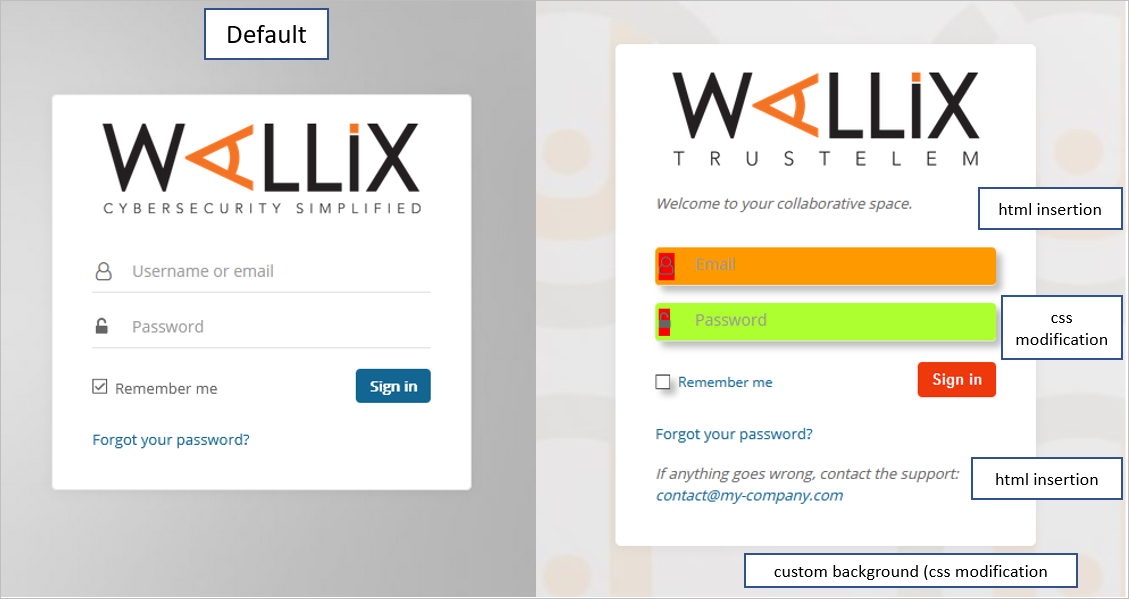
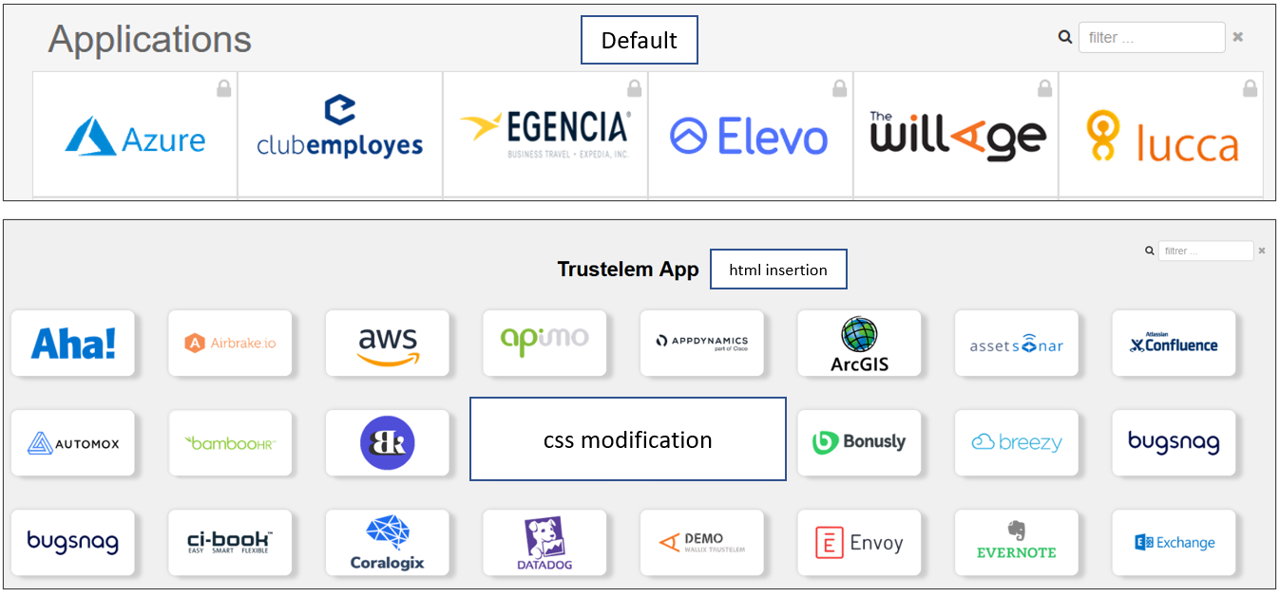
By creating a theme, you can:
-
Add some html in some specific places of the login pages / dashboard
-
Modify the CSS of the login pages / dashboard
-
Add some js script to the login pages / dashboard
How does it work?
The edit page is divided in 3 parts:
-
Login is the place used to add files (html, css, js) which modify the login pages
-
Dashboard is the place used to add files (html, css, js) which modify the dashboard page
-
Common files are all the files used by the other files, like images or fonts
Note: you can also change the favicon of your pages by uploading here an image named favicon.ico
To add a new file, just click on +Add on one of the 3 parts. Then select the file needed or import your own file.
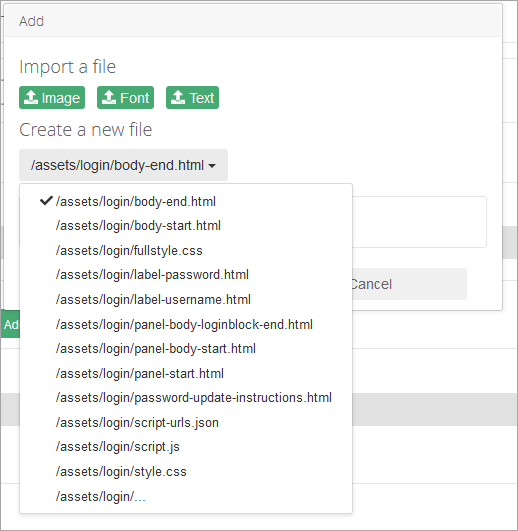
In order to know what does each file, you have some documentation:
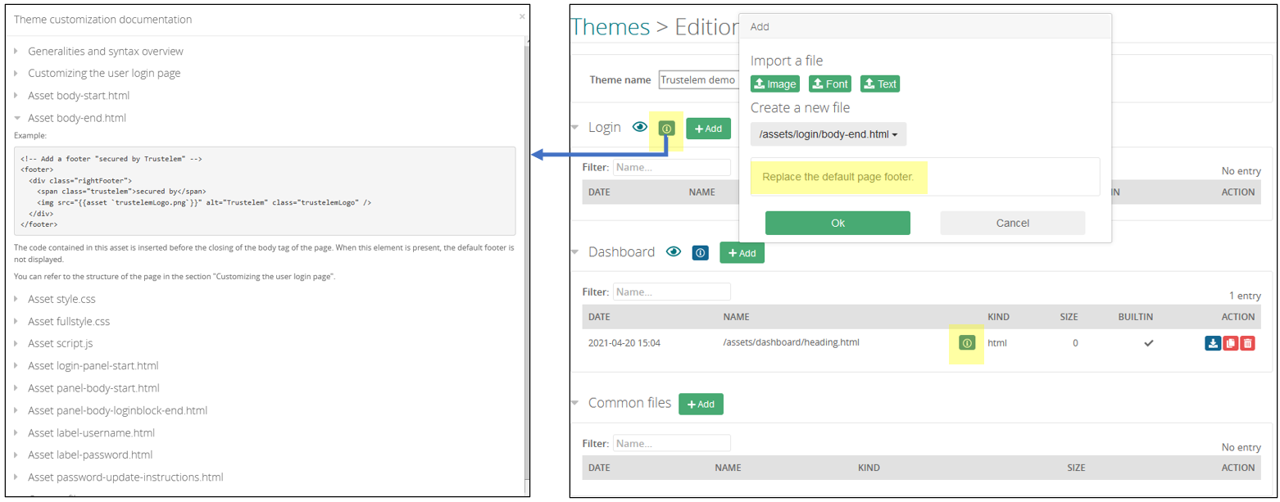
Finally, if you click on the eye buttons, you will have a preview of your pages.
Delegated administration
The delegated administration is a tool which offers the possibility to let non-Trustelem admin users administrate only Trustelem groups.
This new kind of administrator can do the following things on the administered groups:
- Create / Add / Delete / Remove / Edit a user in the administered group
- Reset factors of administered users
- Affect new groups to administered users

To enable this tool, you need to send an email to your WALLIX sales contact.
This tool can be easily customized: change the logo or the background, remove a feature...
How to setup the Delegated administration
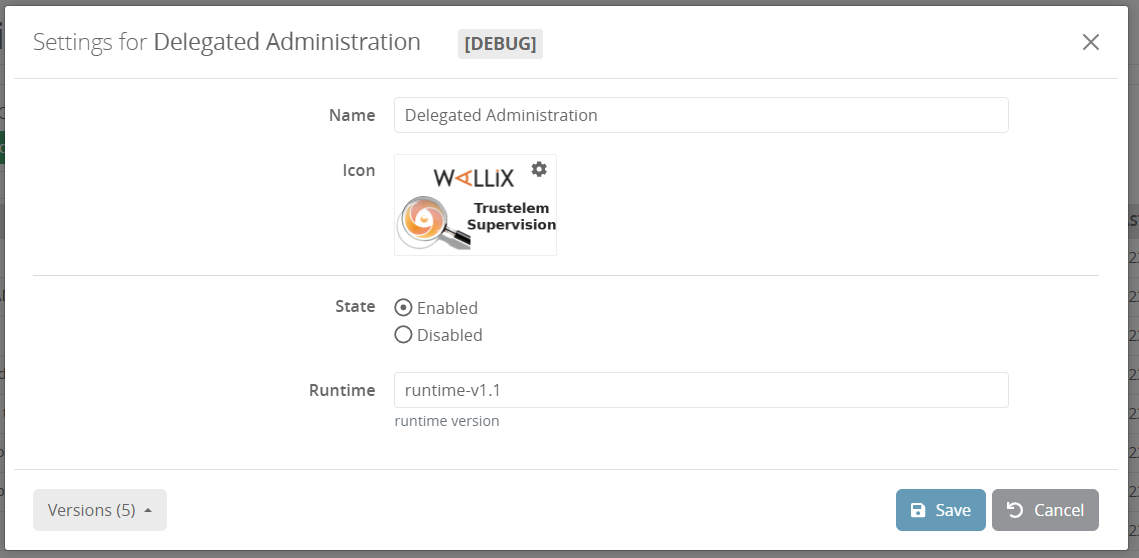
Once the tool enabled, you will have a new app on Trustelem named "Delegated administration". You can change its name and logo.
The first step for the setup is to give access for the selected users to this app using Trustelem tab Access rules

As usual, you can give individual rights for each delegated administrator but it's better to create a group for all of them and add a unique permission.
Then you need to go on the Trustelem profile of your delegated administrators or the groups they belong to, and add one attribute per group :
- name: groupManager
- kind: string
- value: group name
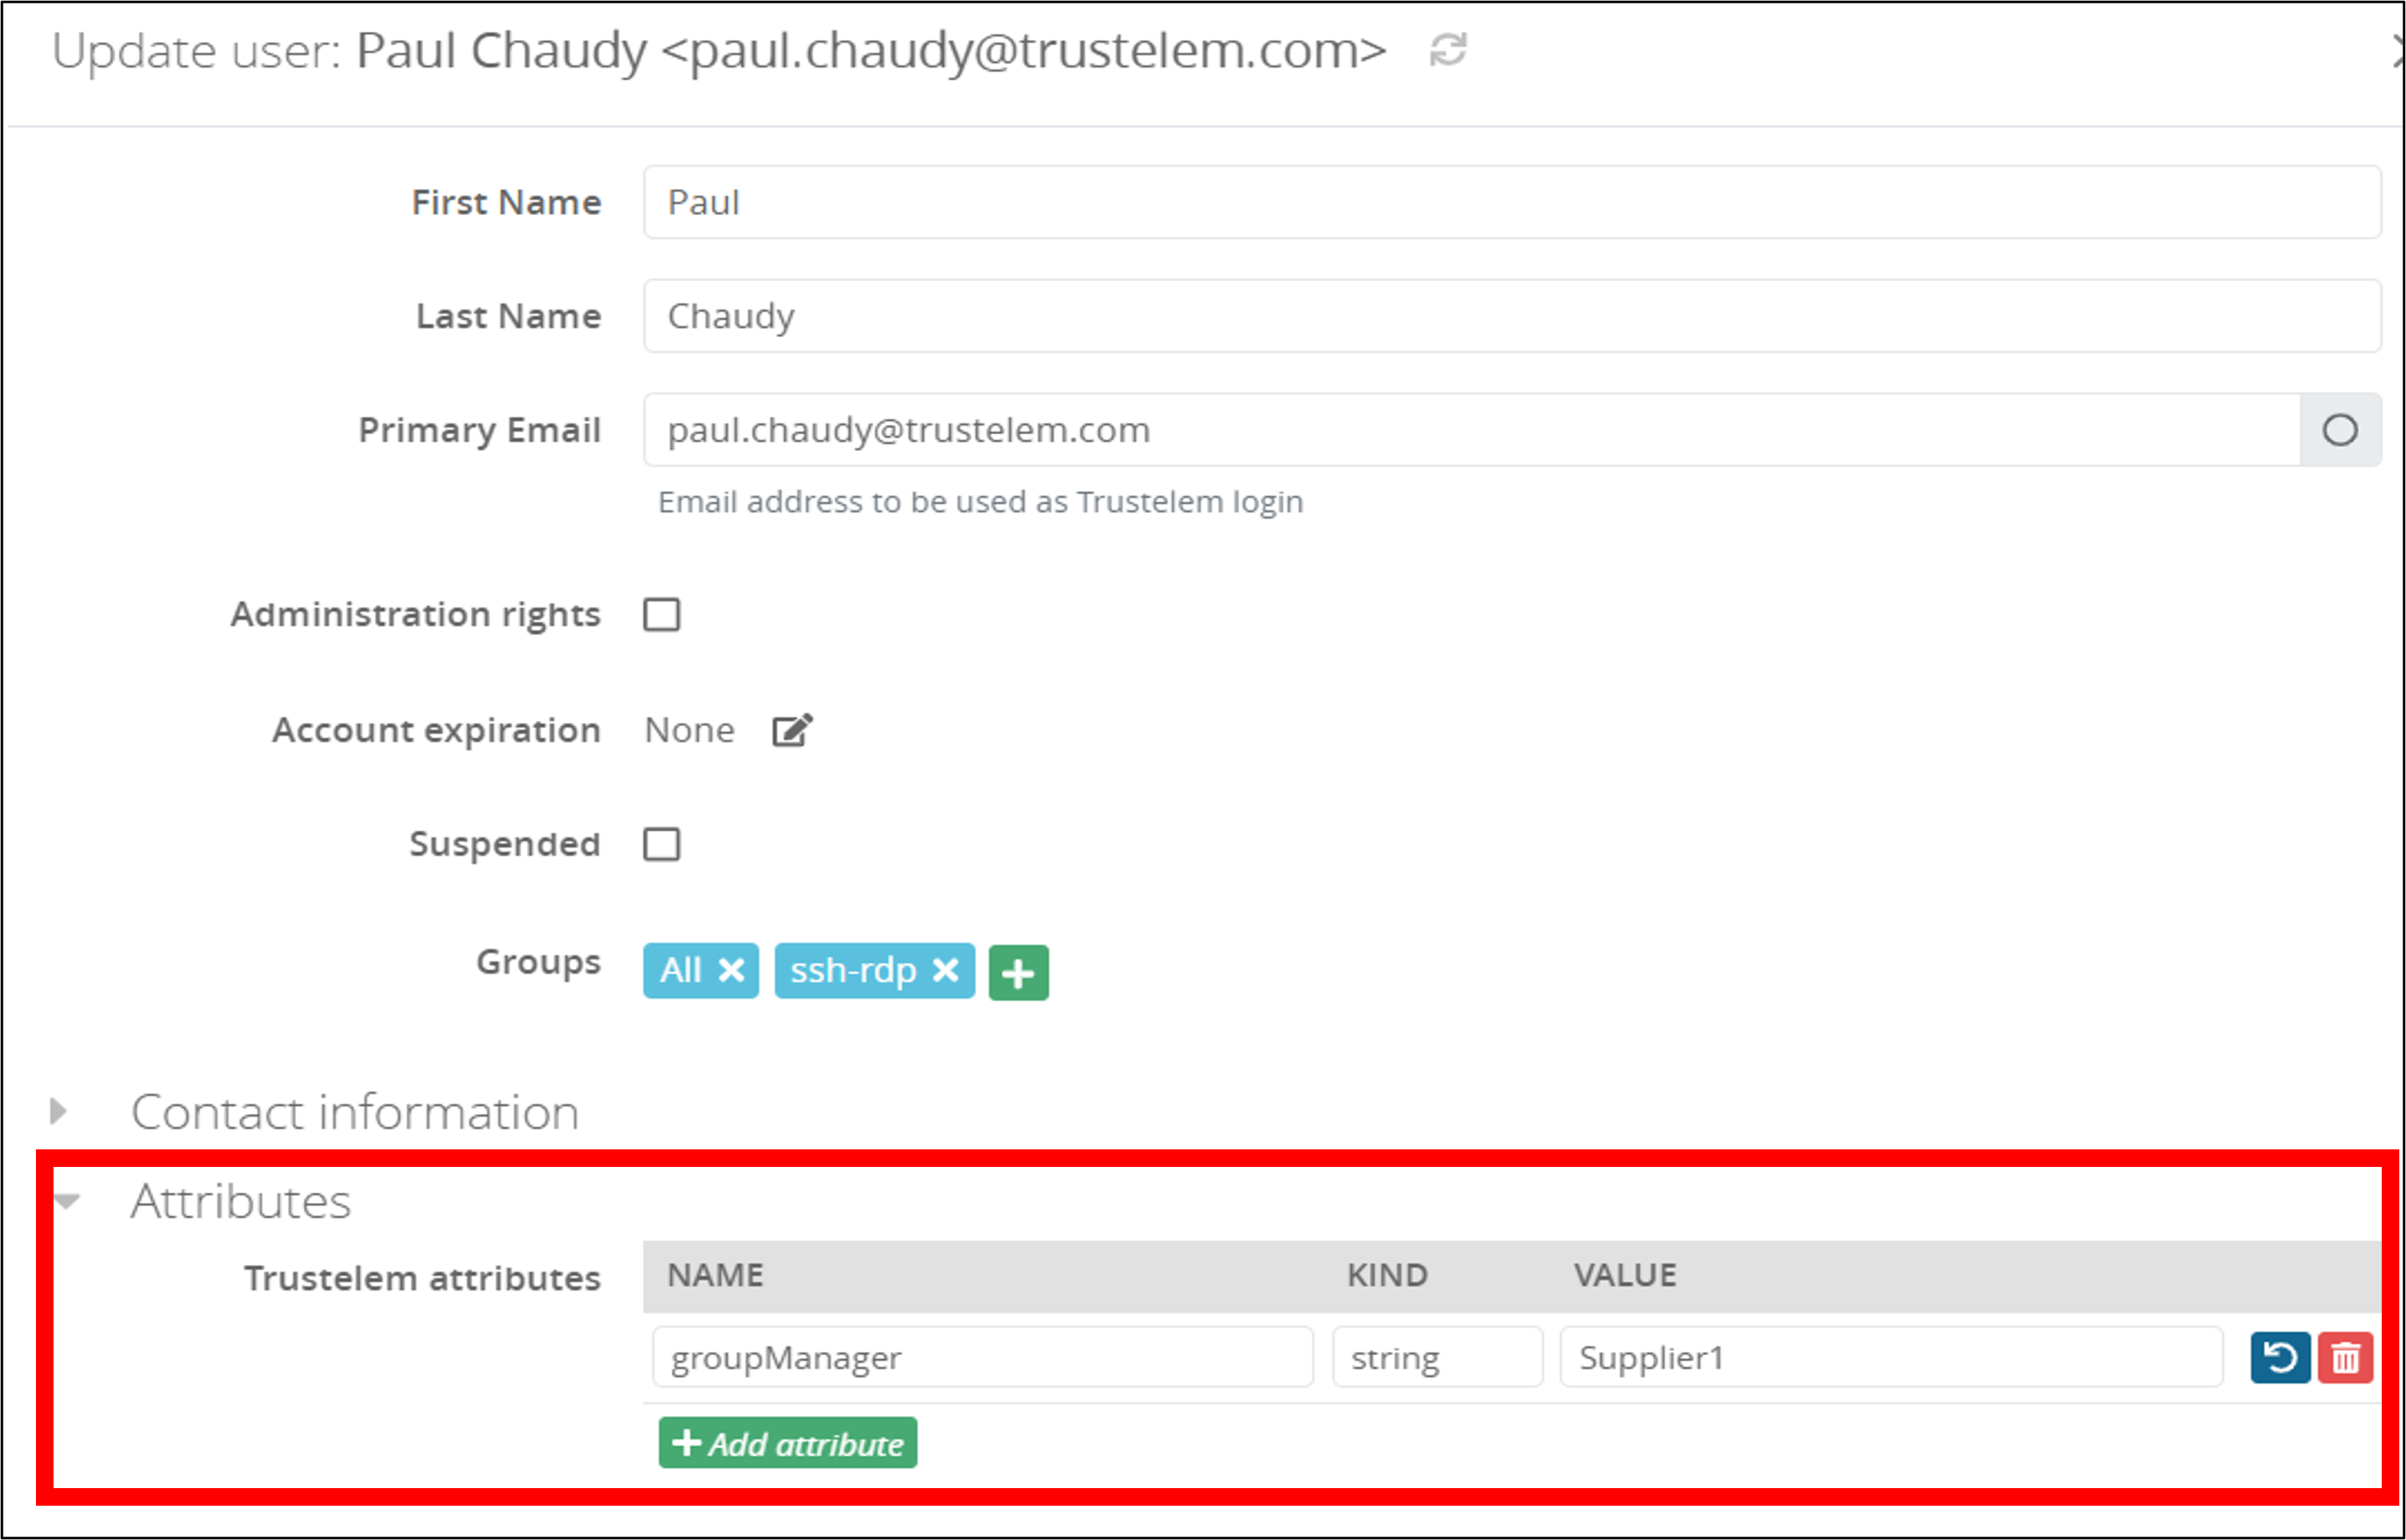
Instead of providing a group name, you can also use regular expressions to select multiple groups.
For instance regexp:.* will select all existing groups.
Still for the value field, you can add ;max:X to limit to X the maximum users number in the group, managed by this delegated administrator.
Finally, still on the same field, you can add assignableGroups:group1,group2,groupN to offer the possibility to add other groups to the users.

The first example let the administrator manage Trustelem group named TMA-Bastion with no additional features.
The second example let the administrator manage all Trustelem groups with a maximum of 3 users inside them.
 In the screenshot, there is "editableGroups" instead of "assignableGroups", because it changed --> this image will be modify. The right value is "assignableGroups".
The third example let the administrator manage Trustelem group named Supplier1 with a maximum of 5 users inside and the possibility to add the groups rdp and ssh to the 5 users.
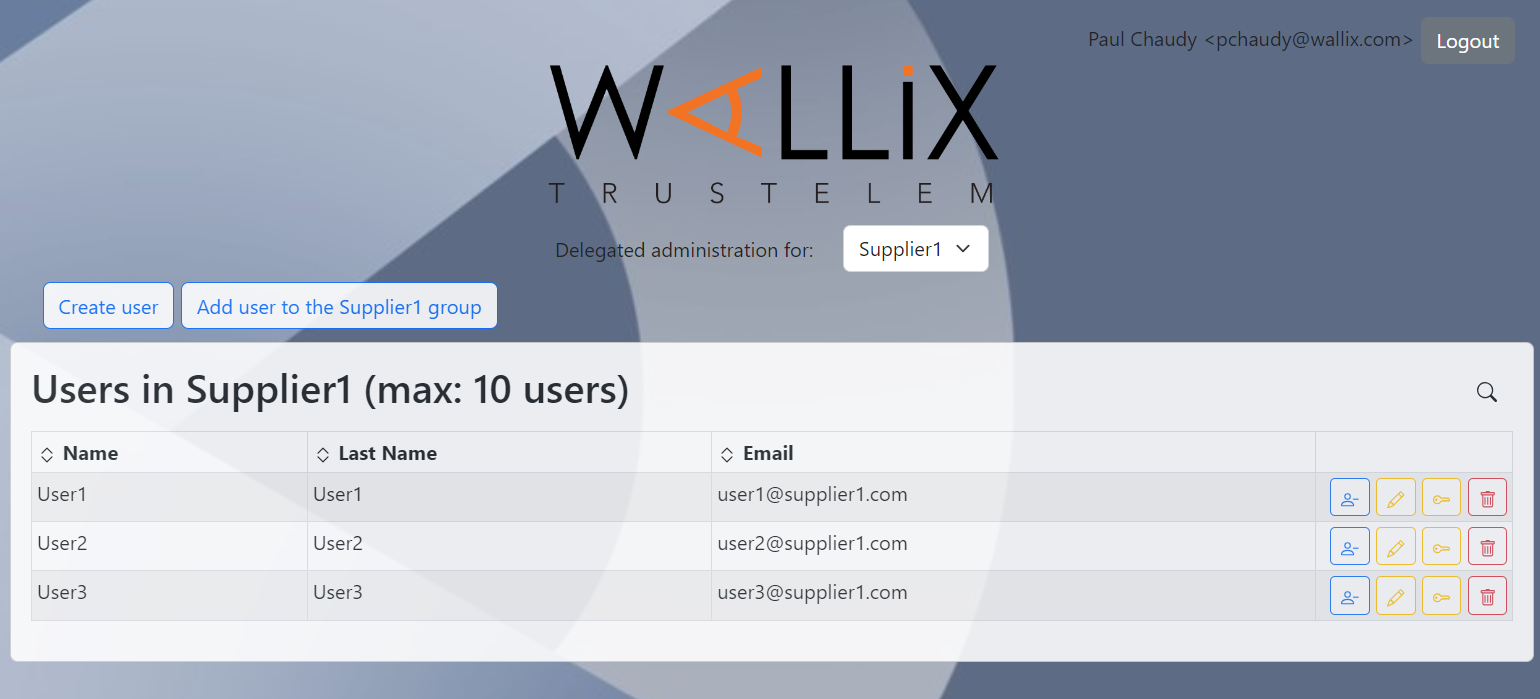
Use case 1
One group on Trustelem is dedicated to one Supplier and gives all the requested access to applications.
This group is named Supplier1.
To handle license abuses, this group is limited to 10 users.
In this case the attribute groupManager should have the value: Supplier1;max:10
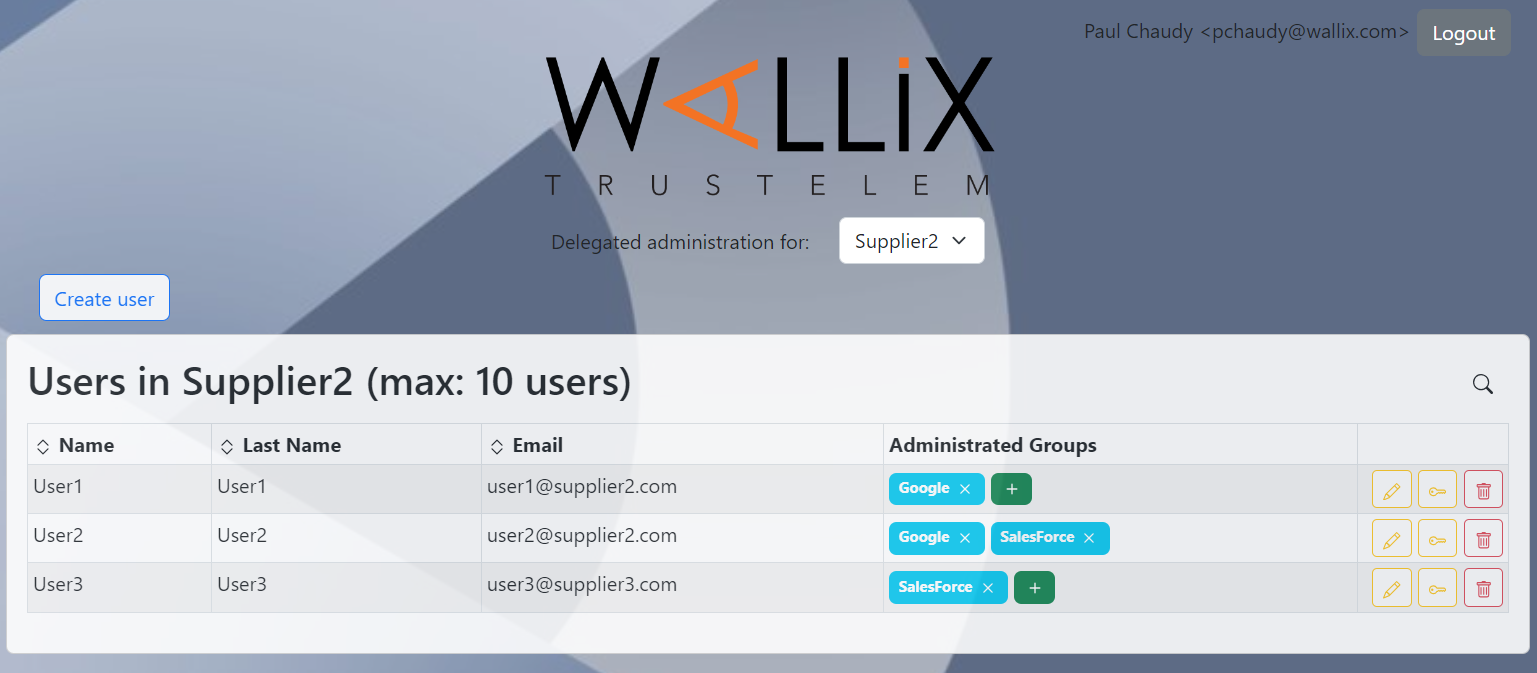
Use case 2
One group on Trustelem gives access to Google for users coming from Supplier2 and Supplier3.
This group is named Google
Another group on Trustelem gives access to SalesForce for users coming from Supplier2 and Supplier3.
This group is named SalesForce
I have 2 other groups: one name Suppliers2 with users coming from Suppliers2 and one name Suppliers3 with users coming from Suppliers3
To handle license abuses, the 2 suppliers are limited to 10 users.
In this case the attribute groupManager should have the value:
- Supplier2;assignableGroups:Google,SalesForce;max:10 for the delegated administrators of Supplier2
- Supplier3;assignableGroups:Google,SalesForce;max:10 for the delegated administrators of Supplier3
 Note: in this example, the buttons add user to the group and remove user from the group have been removed
How to use the Delegated administration
Once the delegated administrator is authenticated to the application, he can create new user using the Create user button.
- If the email address is a real one, then he can click on Send email at the end of the creation
- If the email address is not a real one, then he can copy the text and send manually the content
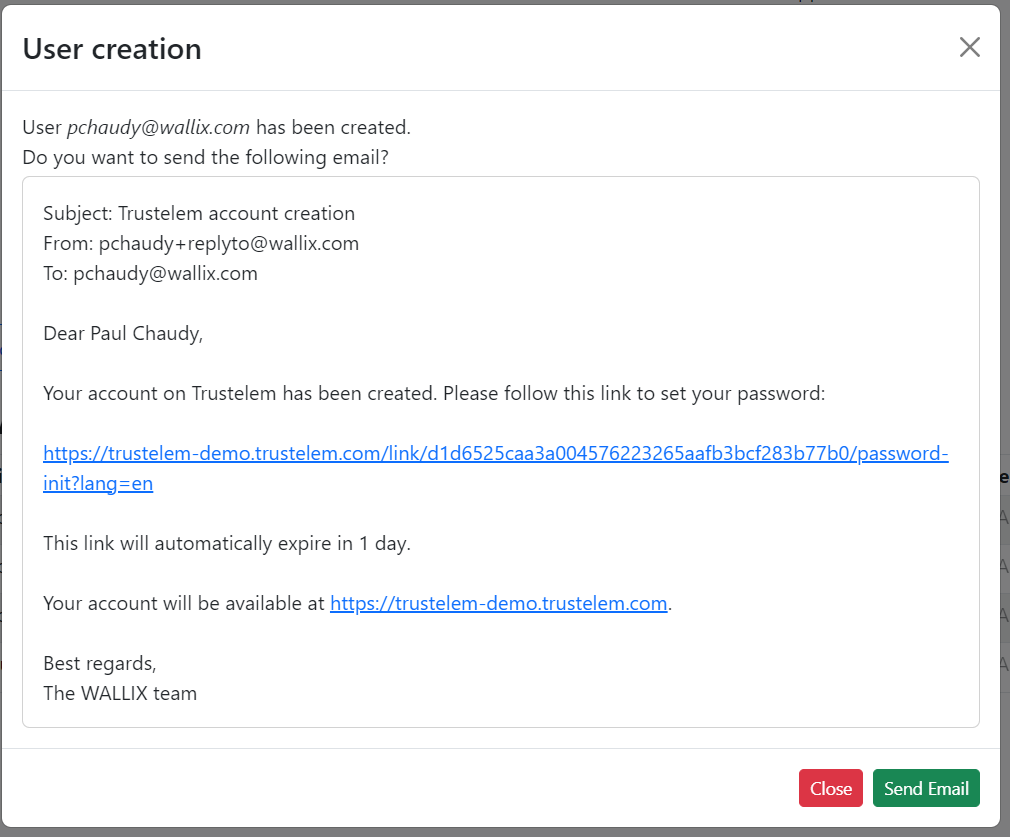
Notes:
- After clicking on the link, the user will have to define a password. Then he will be redirected to his Trustelem login page.
- It is possible to directly redirect the users to one unique application after the password definition.
To do that, you need to create a WALLIX support request with your Trustelem tenant name and the application name. - It is also possible to see the authentication type (1 factor, 2 factors) if your delegated admin tool is dedicated to one app (for Access Manager or SaRA for instance).
To do that, you also need to create a WALLIX support request with your Trustelem tenant name and the application name.
Then the delegated administrator can use the different buttons to:
- Add an existing user in the administrated group
- Remove a user from the group
- Delete a group user
- Edit a group user
- Reset factors of a group user
- Add new groups to a user
Integrated Windows Authentication
Integrated Windows Authentication (IWA) is a Trustelem authentication using the Kerberos token of the user Windows session.
The point is to authenticate on Trustelem to access the apps, not to add MFA on Windows login.
For a user point of view, it's a passwordless authentication:
-
when a user logs in to his computer, he receives a Kerberos token from Active Directory.
-
when the user goes to Trustelem, the browser sends the Kerberos token from the computer to Trustelem.
-
Trustelem sends the Kerberos token to Active Directory in order to validate it.
If everything is ok, the user is logged in, with his identity based on the Kerberos token.
Trustelem admin configuration
The option « Integrated Windows Authentication » under security tab ( https://admin-mydomain.trustelem.com/app#/security) must be enabled.
In addition, you need to check the following points:
-
the IP range of your internal network must be properly set and the user authentication must come from this network (IWA is only enabled on the internal zone).
-
the authentications must be done through
https://mydomain.trustelem.com(Trustelem admin console does not allow IWA). -
a Trustelem ADConnect connector linked to your Active Directory (on a Windows machine) must be active and running.
-
the user whose Windows session is running must have been previously imported from your Active Directory server.
Note: your logs (https://admin-mydomain.trustelem.com/app#/logs) will have a login failure entry with the users identity if a user from your domain is identified by IWA but was not registered with Trustelem.
Server configuration
-
Connect to one of your servers as a domain administrator.
-
Open a command interpreter and enter the following command, after replacing 'trustelem-user' with the name of the user running Trustelem ADConnect connector, and 'mydomain' by the name of your Trustelem subscription domain:
setspn -s HTTP/mydomain.trustelem.com trustelem-user
Client configuration
Enabling IWA on your clients is a browser-specific operation.
-
Connect to a domain controller as a domain administrator
-
Download the file present in this link https://support.google.com/chrome/a/answer/187202
/!\ if the IWA for Chrome stops working, you may need to redownload the file and reinstall the GPO.
For exemple, Chrome version 86 broke compatibility with the previous Chrome GPO. -
Extract the folder
-
Open the Group Policy Management Console (gpmc.msc)
-
Choose an existing GPO or create a new one
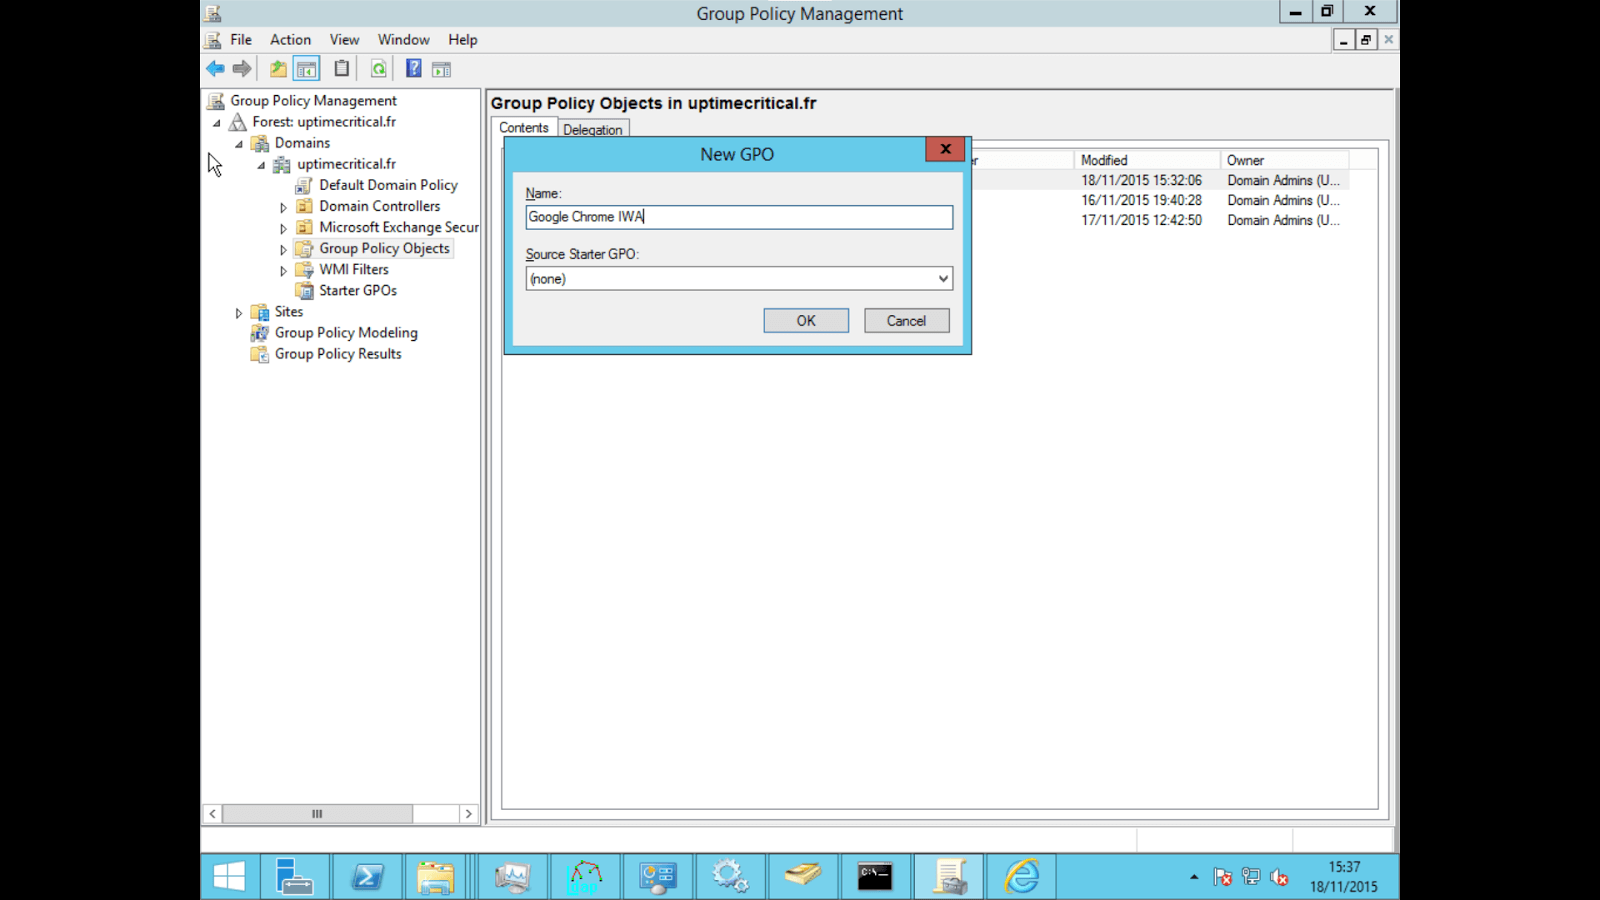
-
Edit the policy (Right click > Edit)
-
Navigate to User Configuration/Policies/Administrative Template, right click > "Add/Remove a template"
-
Click on "Add" and select the file in the previously extracted folder (policy_template/windows/adm/{langue}/chrome.adm)
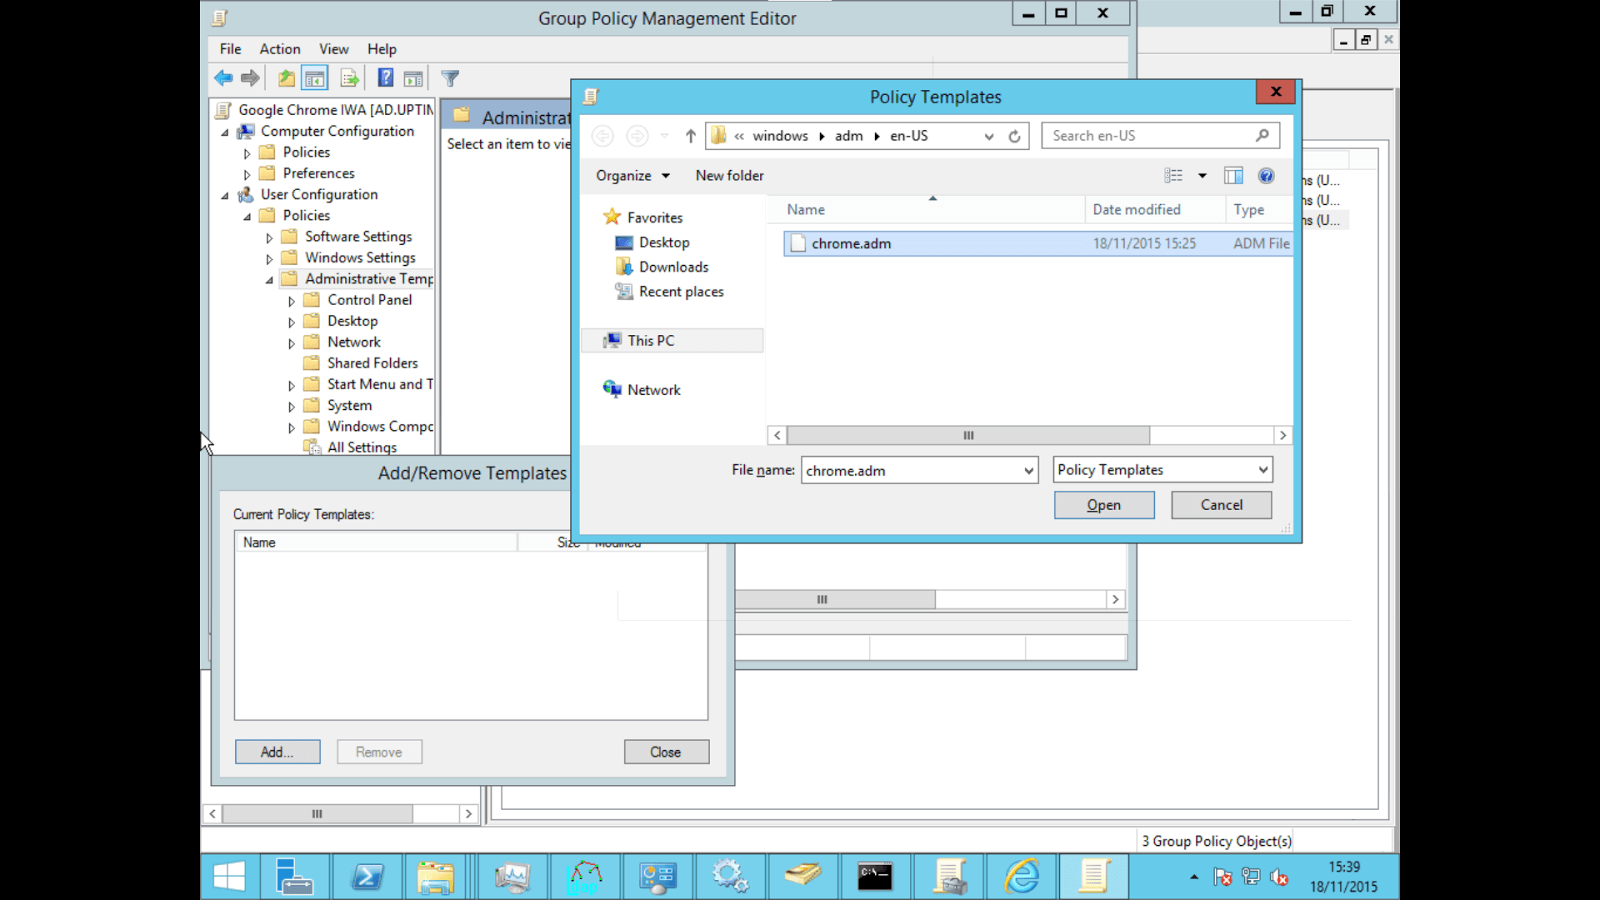
- Navigate to User Configuration/Policies/Administrative Template/Classic Administrative Templates(ADM)/Google/Google Chrome/HTTP Authentication/Authentication server whitelist, right click > "Edit".
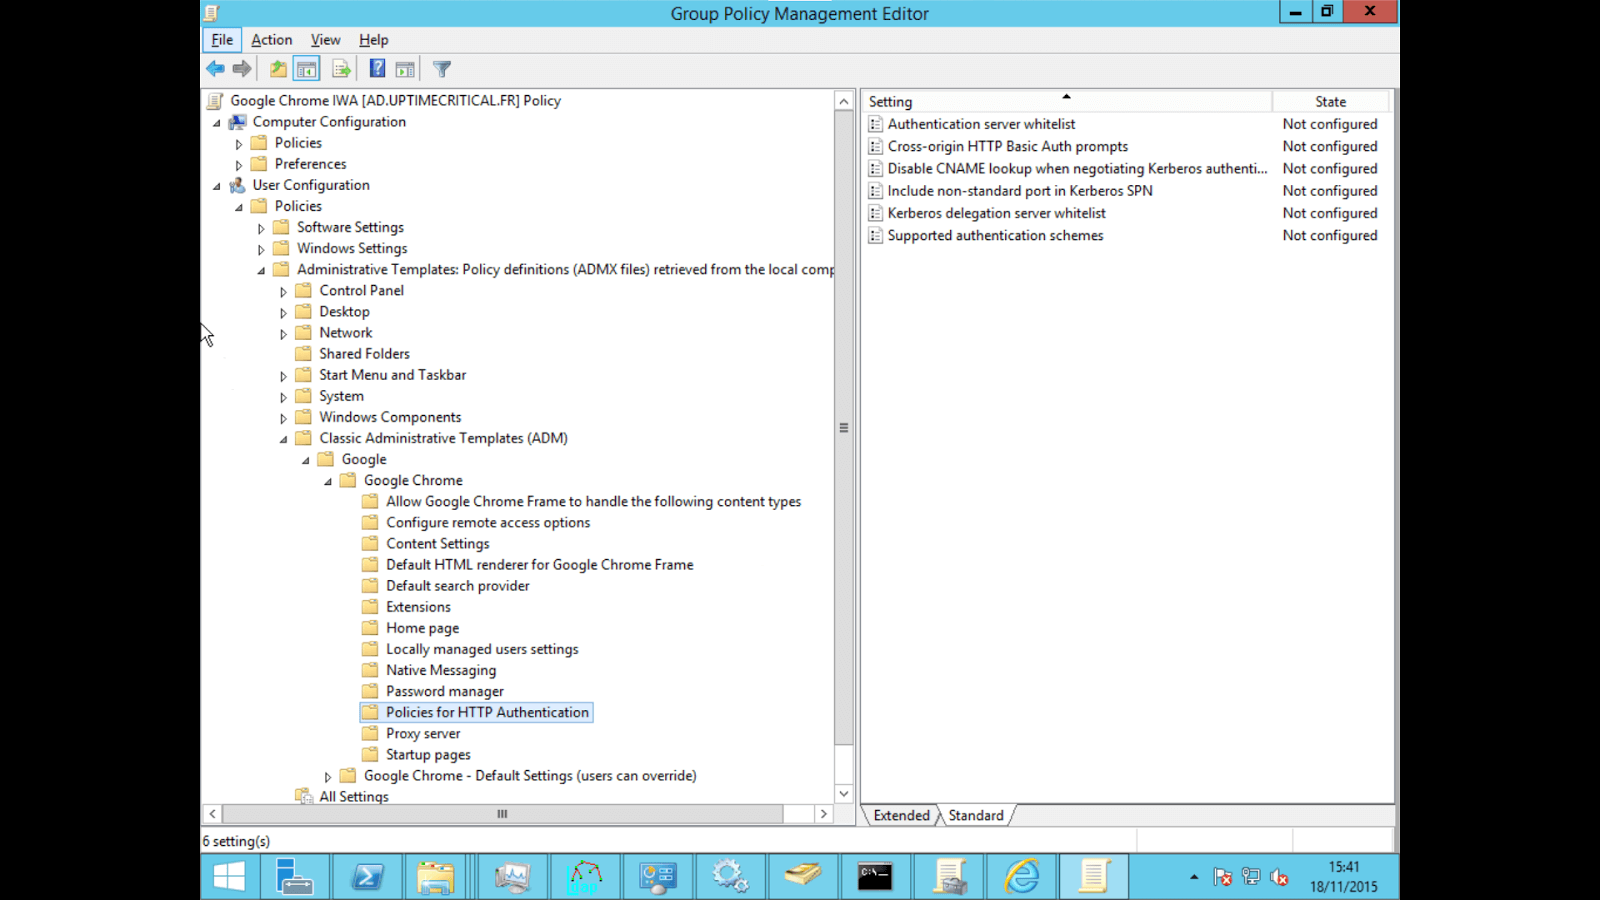
- Click on "Enabled" and enter "*.trustelem.com" in the value field
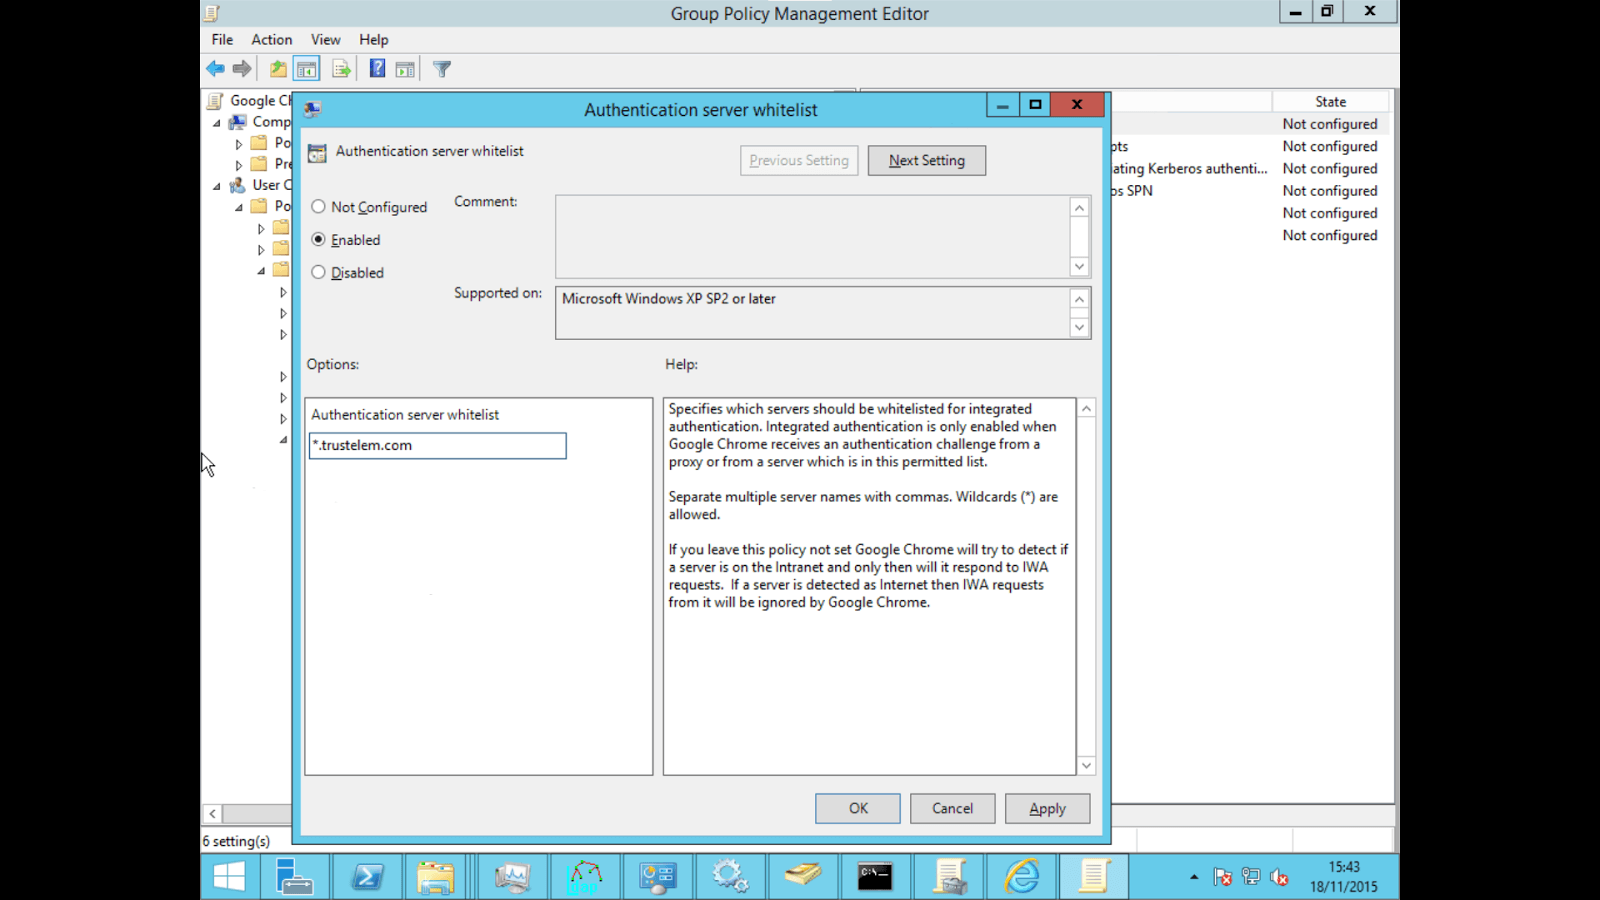
-
Navigate to User Configuration/Policies/Administrative Template/Classic Administrative Templates(ADM)/Google/Google Chrome/HTTP Authentication/Supported authentication schemes, right click > "Edit"
-
Click on "Enabled" and enter "negotiate" in the value field
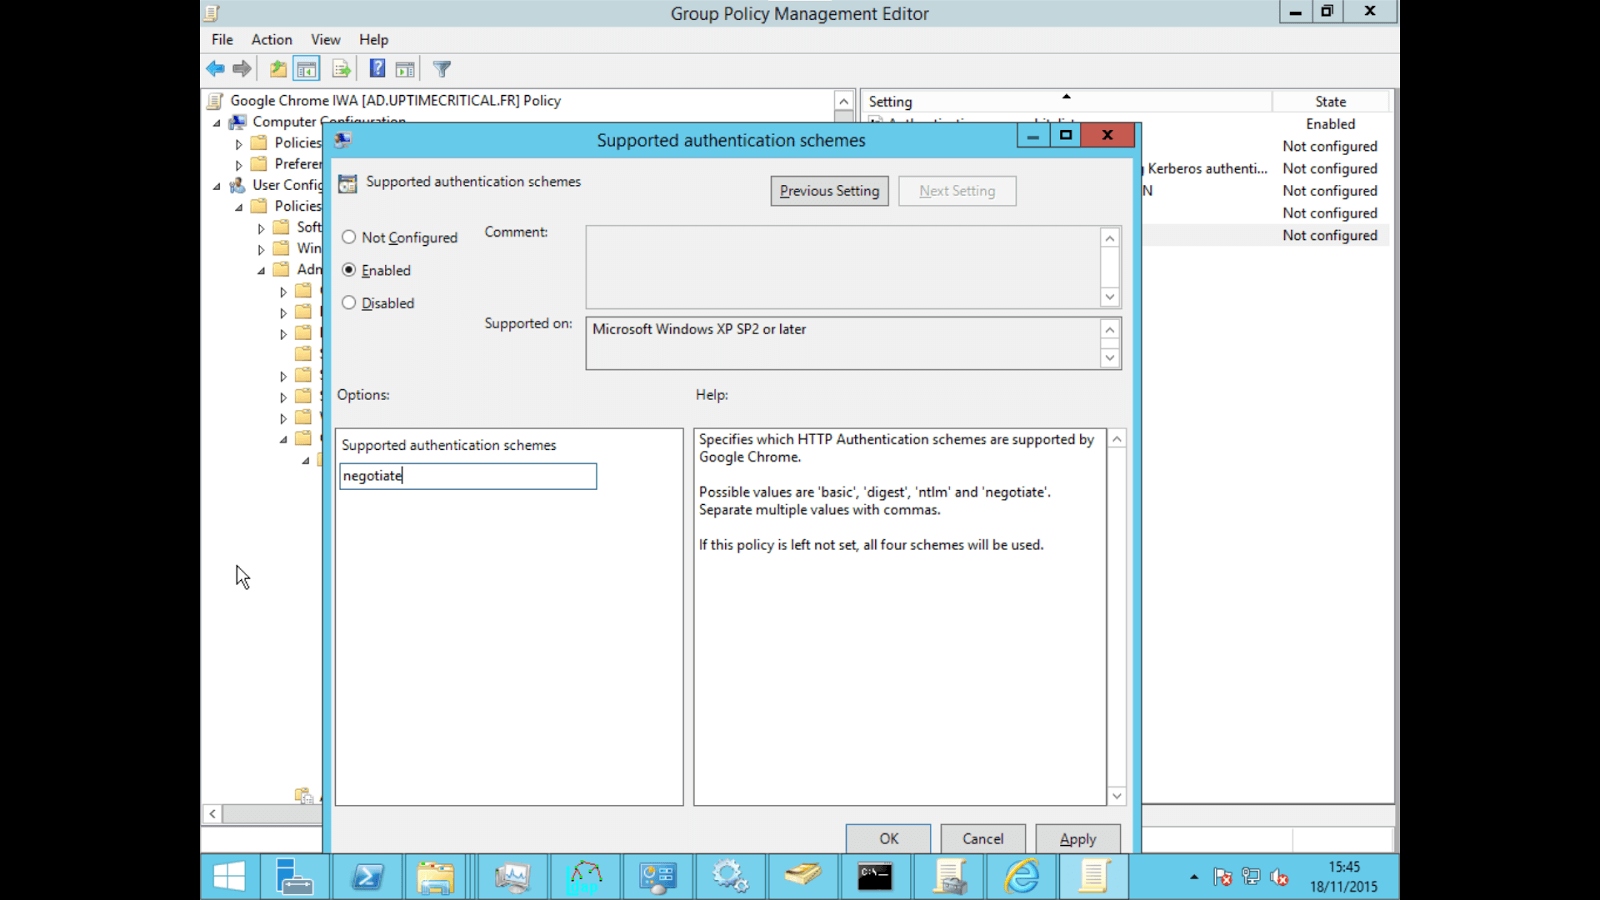
- Verify that the GPO is enabled and linked to your domain
Note: with the new Edge based on Chromium, you have to go here: https://www.microsoft.com/en-us/edge/business/download?form=MA13FJ and click on Download Windows XX-bit policy. Then follow the Google GPO process.
-
Connect to a domain controller as a domain administrator
-
Open the Group Policy Management Console (gpmc.msc)
-
Choose an existing GPO or create a new one
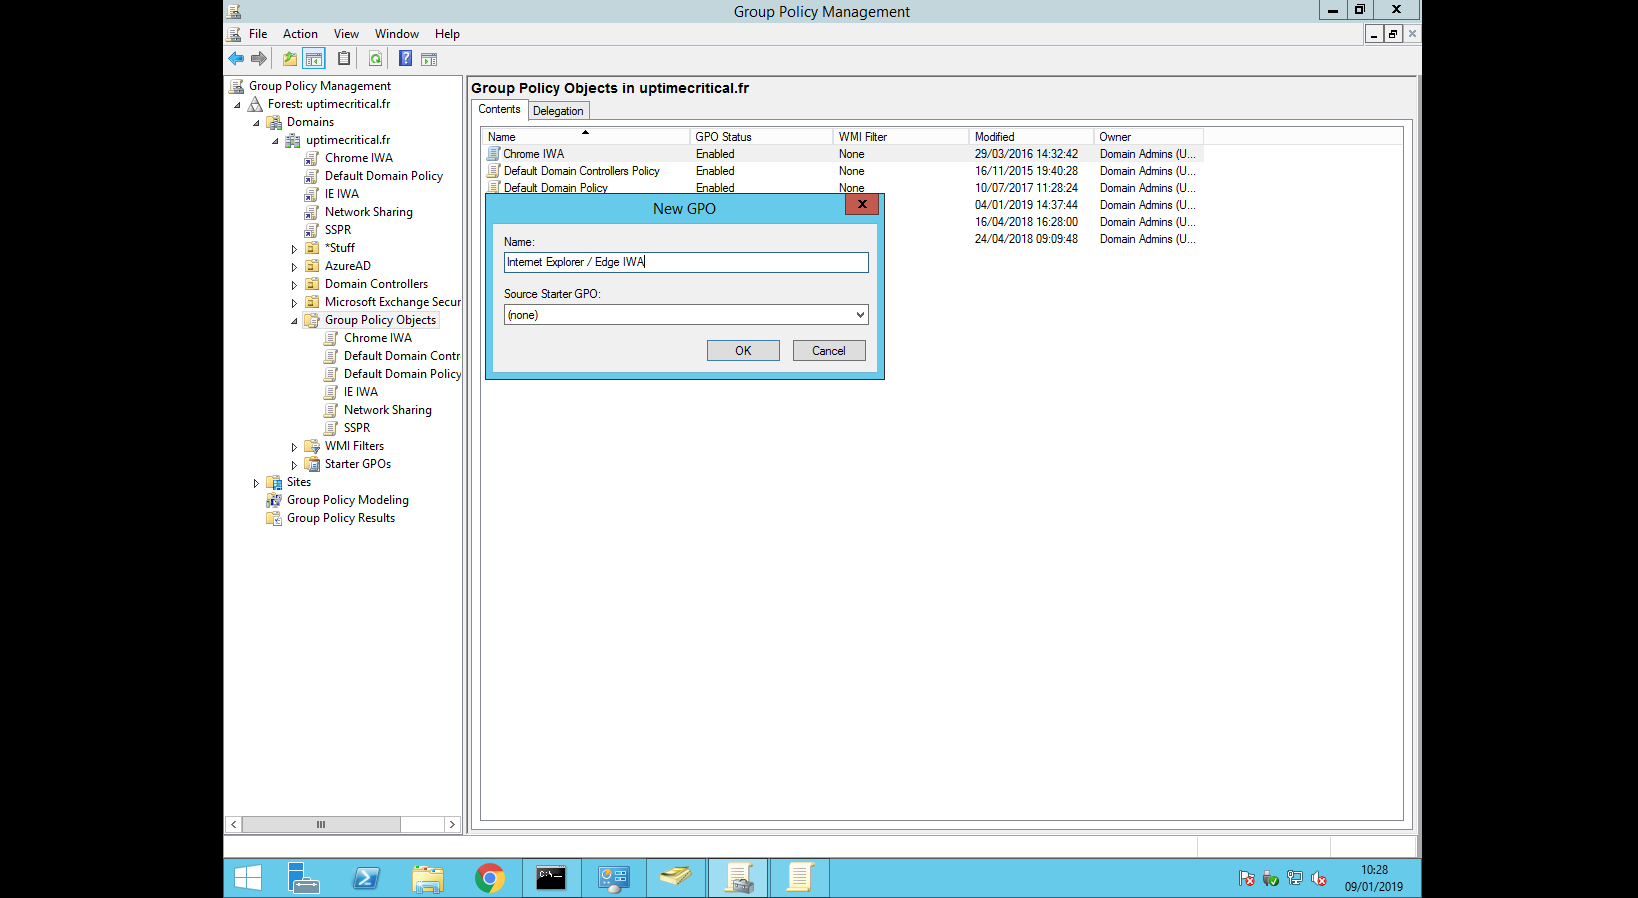
-
Edit the policy (Right click > Edit)
-
Navigate to User Configuration/Policies/Administrative Template/Windows Components/Internet Explorer/Internet Control Panel/Security Page/Site to Zone Assignment List, right click > "Edit"
-
Click on "Enabled" and enter "*.trustelem.com" in the first field and "1" (Intranet zone) in the second field
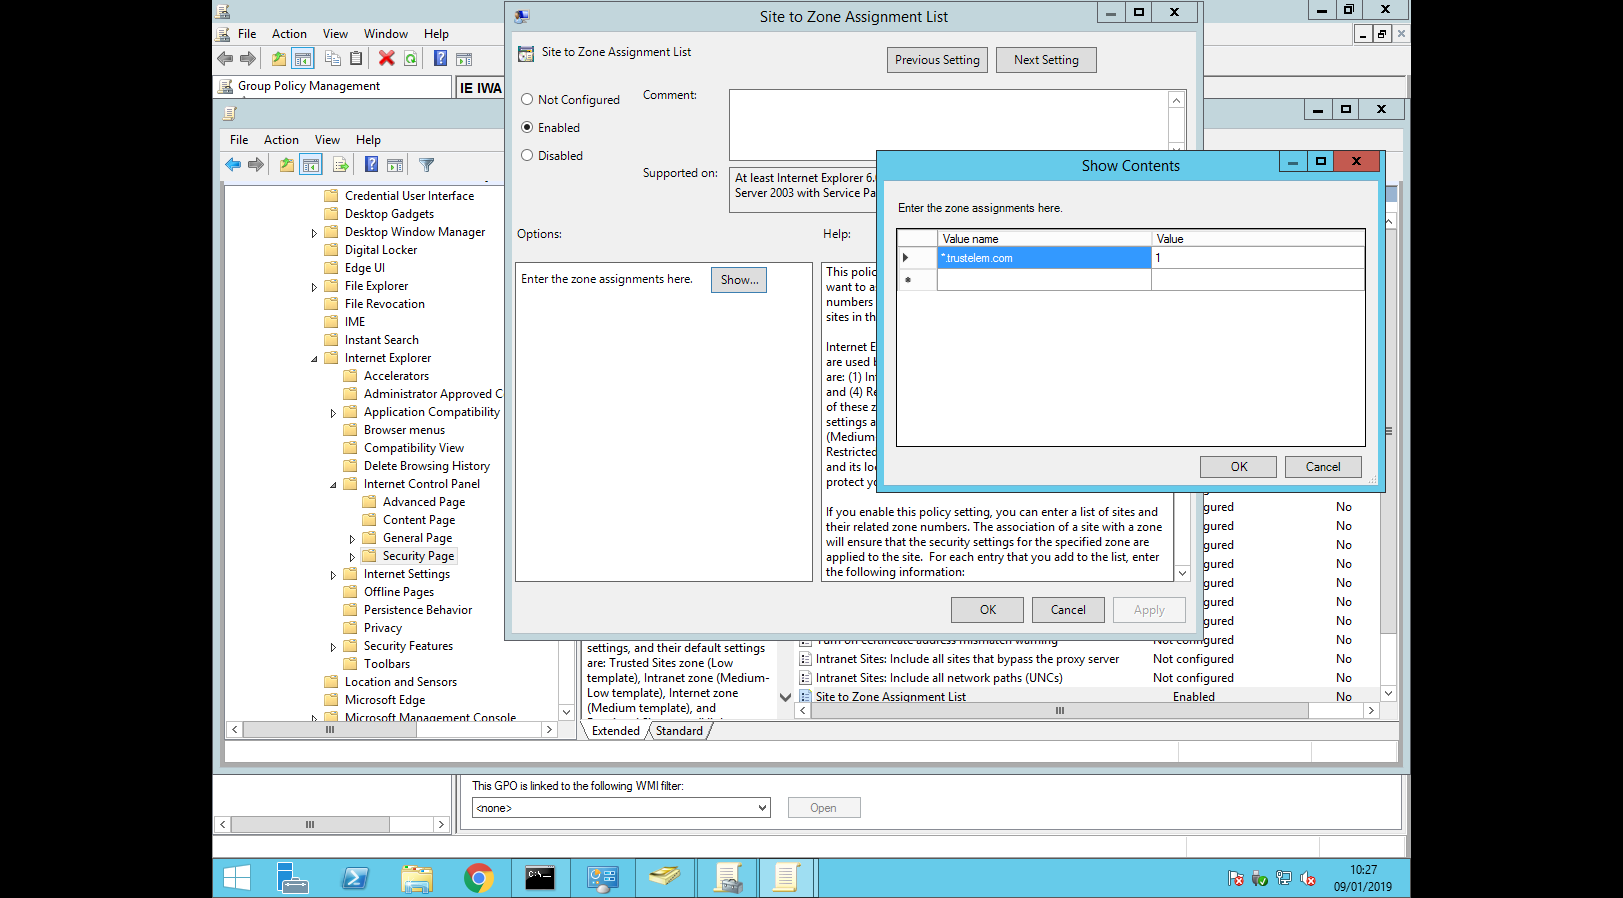
-
Navigate to User Configuration/Policies/Administrative Template/Windows Components/Internet Explorer/Internet Control Panel/Security Page/Intranet Zone/Logon Options, right click > "Edit"
-
Click on "Enabled" and choose "Automatic logon with current username and password"
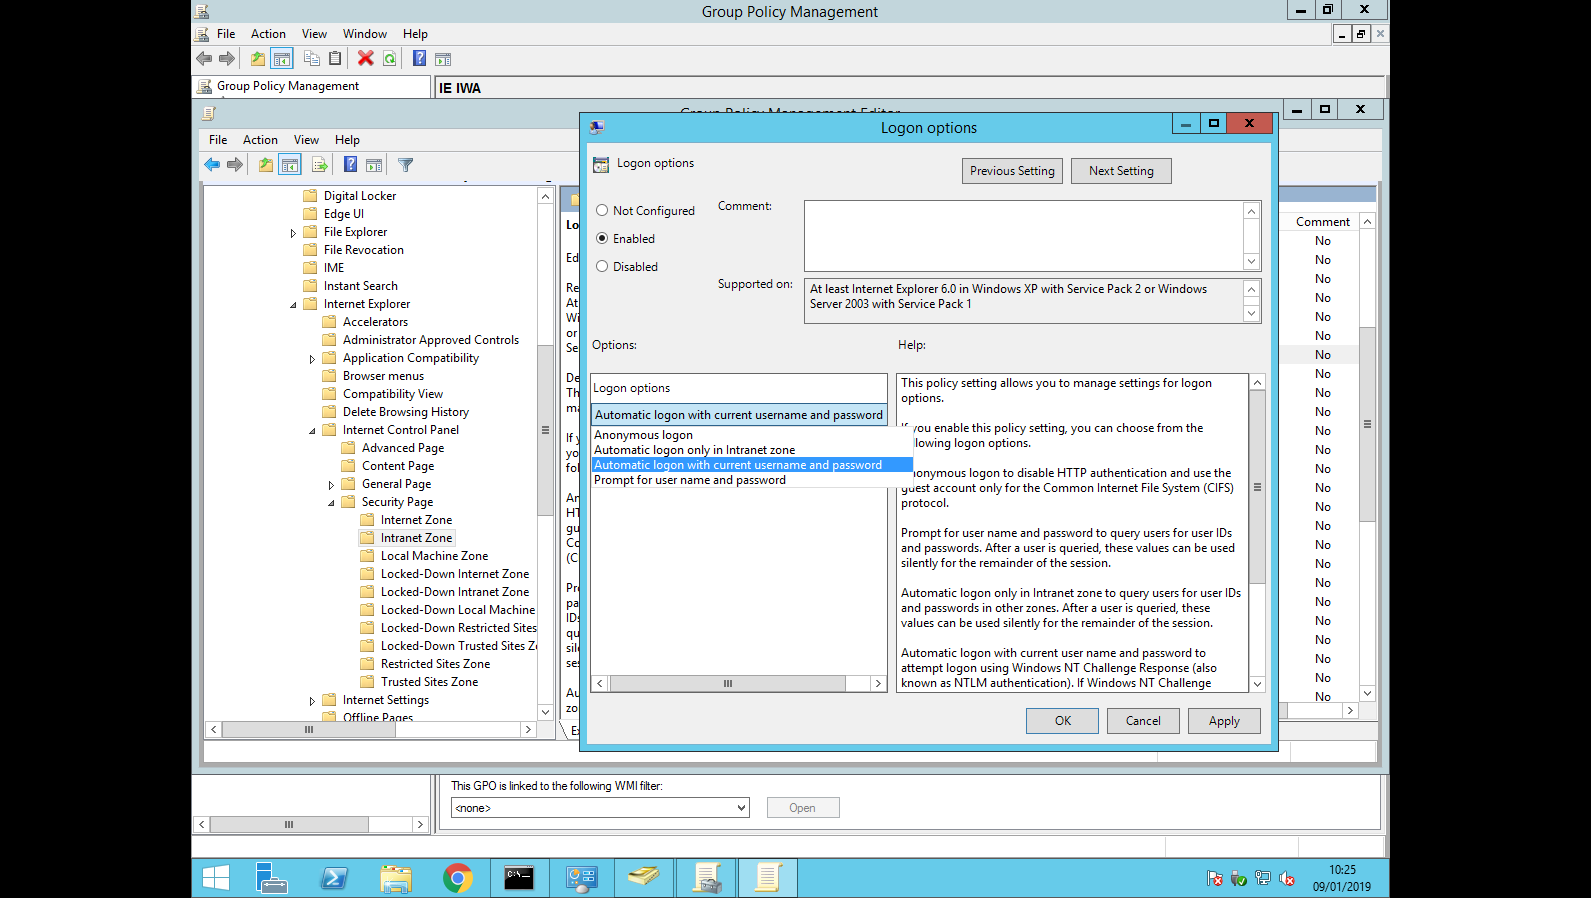
- Check that the GPO is enabled and linked to your domain
-
Connect to a domain controller as a domain administrator
-
Download the GPO: https://github.com/mozilla/policy-templates/releases
-
Extract the folder, copy firefox.admx and firefox.adml for windows to your policy folder (usually C://Windows/PolicyDefinitions).
-
Open the Group Policy Management Console (gpmc.msc)
-
Choose an existing GPO or create a new one
-
Edit the policy (Right click > Edit)
-
Navigate to User Configuration/Policies/Administrative Templates/Firefox/Authenticaton/SPNEGO, right click > "Edit".

- Click on "Enabled" then "Show" and enter "https://mydomain.trustelem.com" in the value field
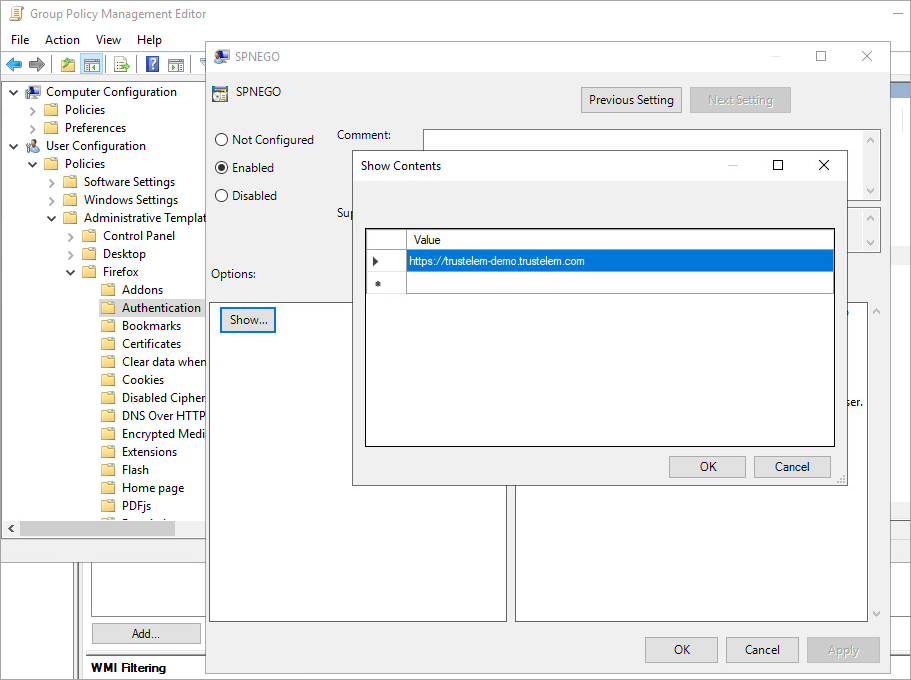
- Verify that the GPO is enabled and linked to your domain
-
In the Windows start menu, search: Internet Options > Security
-
Select Local Intranet, then click on Sites
-
In the Local Intranet window, make sure that Include all local sites (intranet) not mentioned in other zones is checked, the click on Advanced
-
In the Local Intranet window, enter *.trustelem.com to the zone, so as to activate Single Sign-On. Click on OK, the close the Local Intranet window
-
In the Internet Options > Security > Local Intranet window, click on Custom Level... > User Authentication and choose Automatic logon with current username and password
-
Click on OK. Restart Microsoft Internet Explorer / Edge so as to activate this configuration
-
On user desktops, open an Active Directory-authenticated session
-
Launch Firefox
-
In the address bar, enter about:config
-
Select the network.negotiate-auth.trusted-uris parameter
-
Enter your custom Trustelem hostname: mydomain.trustelem.com or add it to the list, separated by commas
-
Click OK
-
Restart Firefox
LDAP-Radius - Trustelem Connect
Contents
- How does it work?
- Prerequisites
- Setup Trustelem Connect on a Windows machine
- Setup Trustelem Connect on a Linux machine
- Setup an application to use Trustelem Connect
- Debug
How does it work?
The goal is to use Trustelem database to provision and or authenticate users on an application using LDAP or Radius.
To do so, a connector, Trustelem Connect, is installed on a local customer server and has the role of LDAP server / Radius server. When it receives a request (LDAP search, LDAP bind, Radius Access request, Radius Challenge request) then it sends the request to Trustelem.
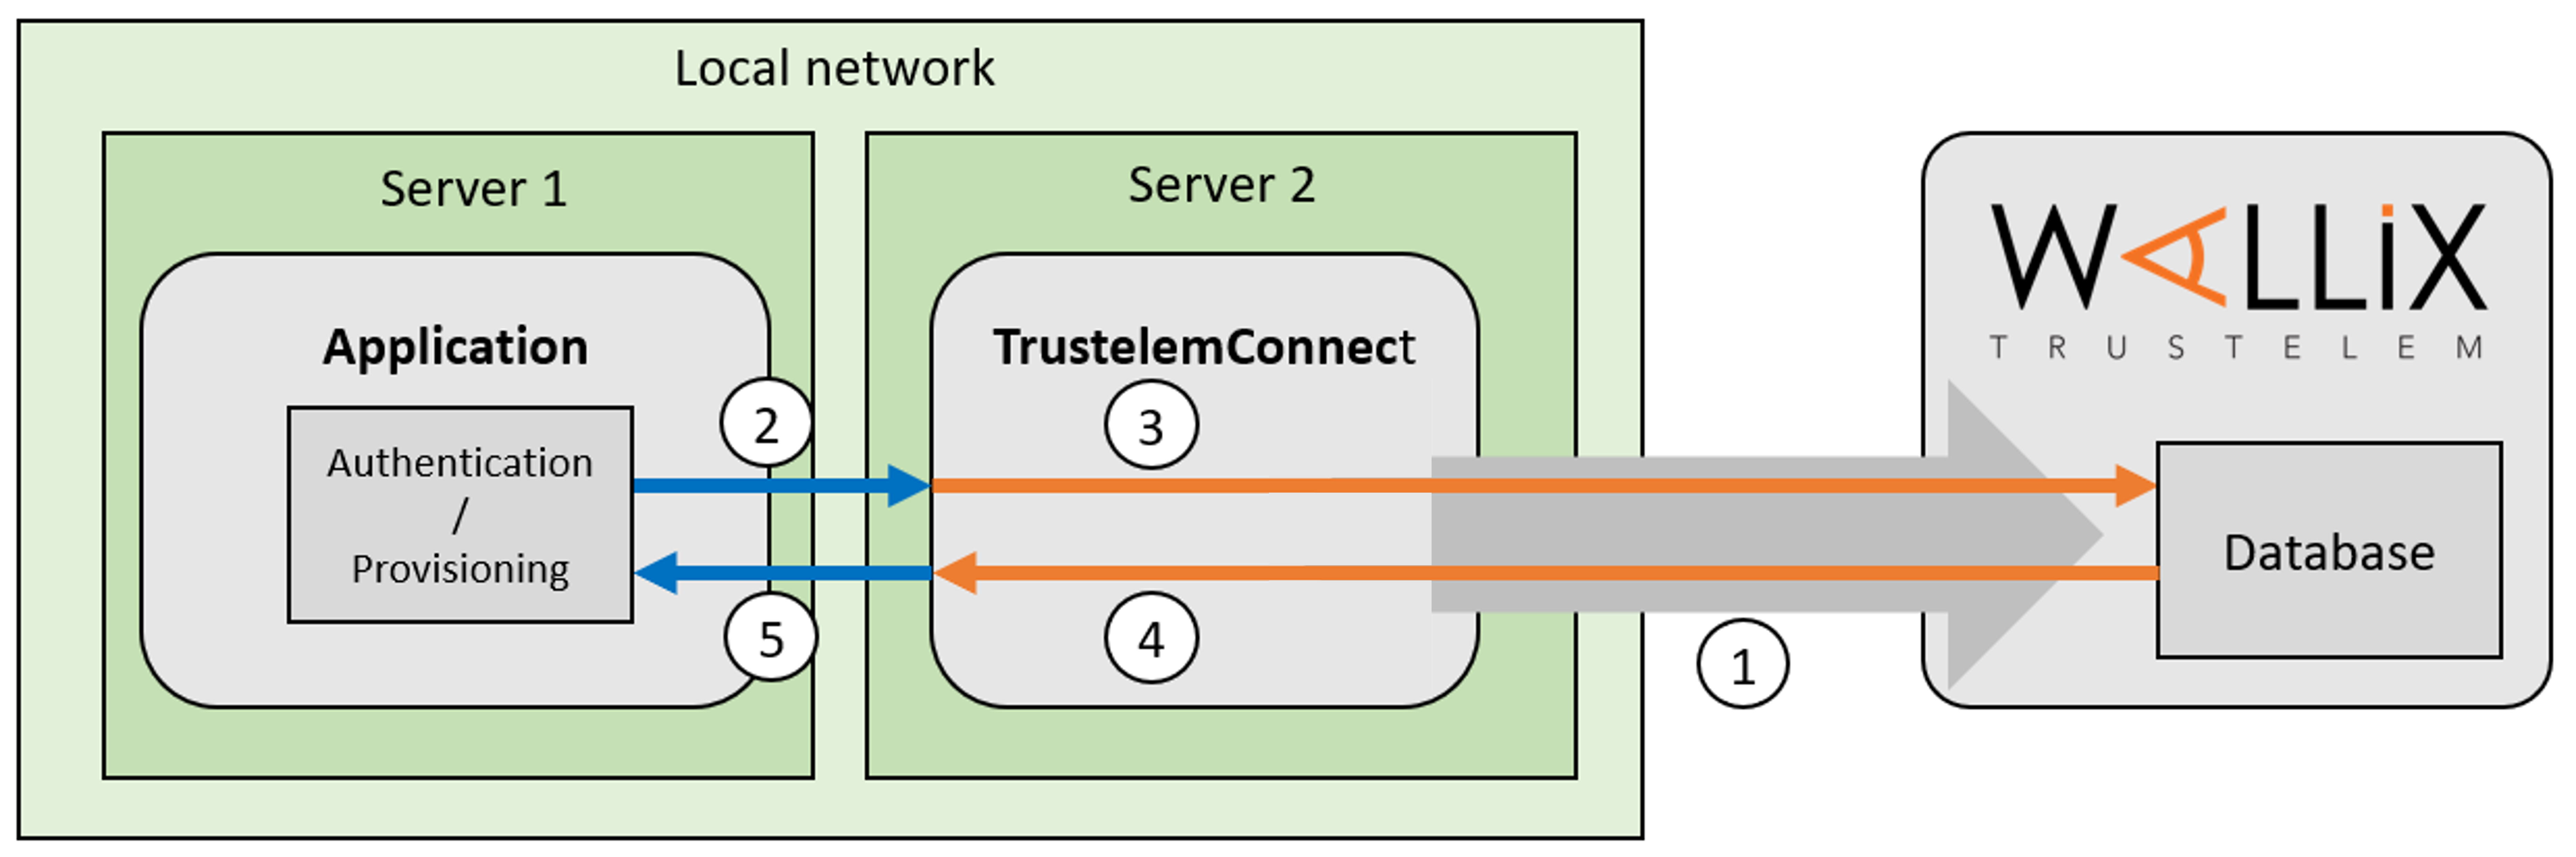
1/ During the setup, Trustelem Connect opens a websocket to Trustelem services using port 443.
Note: with the websocket, information is encrypted by TLS protocol and with an additional symmetric encryption.
Trustelem Connect also opens on the local machine, TCP or UDP ports on a specified local IP, based on the Trustelem setup.
One opened port matches one protocol for one application on Trustelem
For instance, I made the setup of Trustelem Connect, linked a Bastion application, and choose to use the port 5214 on the IP IP-Server2 for the protocol LDAP

2/ The application makes a search/authenticate request and sends it to Trustelem Connect on the defined port using LDAP or Radius.
With the previous example, the protocol is LDAP, the IP of the LDAP server is IP-Server2, the port is 5214
3/ Trustelem Connect uses the websocket to send the request to Trustelem services:
4/ As said before, on Trustelem the port is associated to a specific protocol and application.
Trustelem examines the access rules related to these protocol and application, and returns the answer to Trustelem Connect using the websocket.
With the previous example:
- If Trustelem receives a search request, it returns users who have an LDAP access-rule for the application Bastion.
- If Trustelem receives an authentication request, it returns the validation/invalidation of the credentials based on the Bastion LDAP access rule
5/ Trustelem Connect forwards the answer to the application using LDAP or Radius.
Prerequisites
- Prepare a VM, Windows Server or Linux, with minimal resources for the OS
- If you already have a VM for Trustelem ADConnect, you can use the same
- If you have only one VM which is down, the link to your application is down too..
- The recommendation is 2 VM at least, to have a failover system
- Download Trustelem Connect on the VM (.exe or .tgz depending of the OS)
- The flow from the application to the VM should be opened for the IP/port/protocol defined in the Service setup
- usually tcp port 2001 for LDAP, and udp port 1812 for Radius
- The flow from the VM to https://admin.trustelem.com should be opened (IP: 185.4.44.22)
- tcp port 443
- (optional) A service account with "read only" rights should be created on your Active Directory
Setup TrustelemConnect on a Windows machine
In your Trustelem administration page:
-
Go to the Services tab.
-
Click on the button + Create a service and copy the service ID.
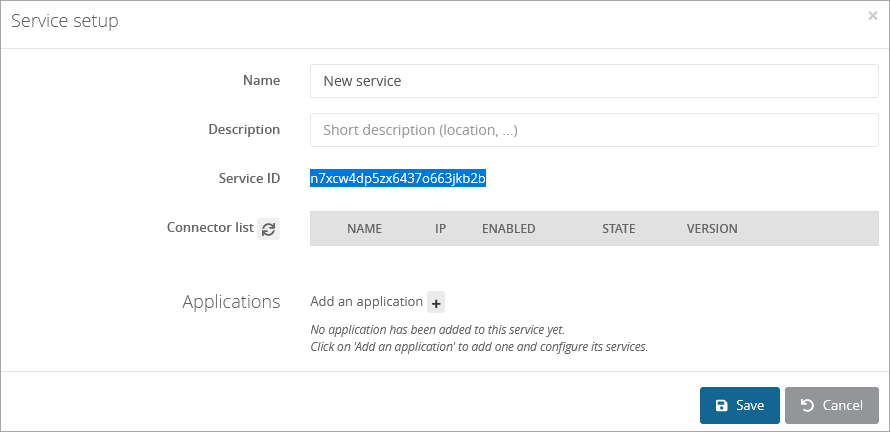
On your server:
- Start the setup (Trustelem Connect.exe), and paste your service ID.
- If you have a proxy, complete the field HTTP Proxy with the value:
https://username:password@proxy_IP:proxy_port - Click on Validate the Configuration
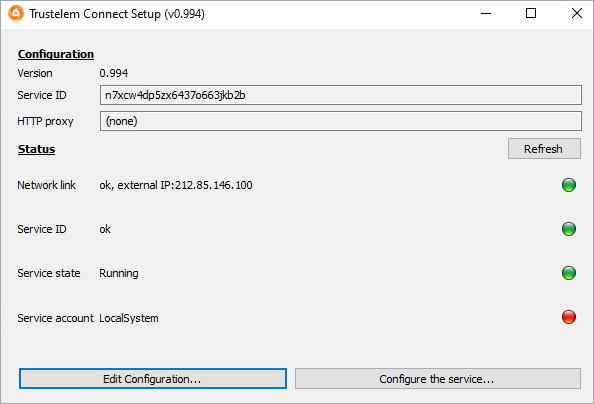
- Then if you want to use LDAPs, on the Trustelem Connect folder, add a config.ini file and provide the following information (adapted to your own repository and your own certifiates) :
tls_cert="C:\Program Files (x86)\Trustelem\cert.pem"
tls_cert_key="C:\Program Files (x86)\Trustelem\key.pem"
- Start the service.
In your Trustelem administration page
-
Refresh your Services page.
-
Turn on the service by clicking on No.
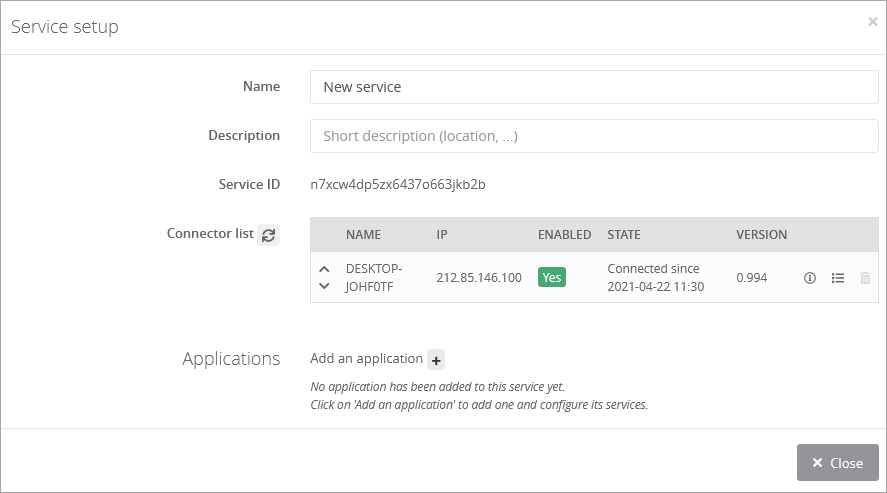
You now have a functional connector.
Setup Trustelem Connect on a Linux machine
In your Trustelem administration page:
-
Go to the Services tab.
-
Click on the button + Create a service and copy the service ID.
On your server:
- Install the connector as a service with the setup.sh script launch with root privilege.
- To complete the configuration, edit /opt/wallix/trustelem-connect/config.ini file containing the synchronization id.
- A sample minimal config.ini would be:
service_id = 2jy34wpcohrhdytr6hutym6qfi2l7nnw
state_dir = run/
# if there is a proxy
proxy = https://username:password@proxy_IP:proxy_port
- The run folder must have read write rights for the trustelem user.
- You can add your own X509 certificate for ldaps and starttls. Accepted format is PEM.
tls_cert = run/connector.crt
tls_cert_key = run/connector.key
- After that, you can start the service with: systemctl start trustelem-connect.service
- The service will run with the user trustelem
In your Trustelem administration page
-
Refresh your Services page.
-
Turn on the service by clicking on No.
You now have a functional connector.
Setup an application to use Trustelem Connect
Note: for WALLIX Bastion and WALLIX Access Manager, you should watch the dedicated documentation instead of this chapter.
On your Trustelem administration page:
-
Go to the Apps tab.
-
Click on + Add an application
-
Choose either a pre-integrated application or a generic model depending on your need.
If you want to use only LDAP / Radius (no additional SAML/OpenID Connect) the generic Basic no SSO model should be used. -
Turn on LDAP and/or Radius.
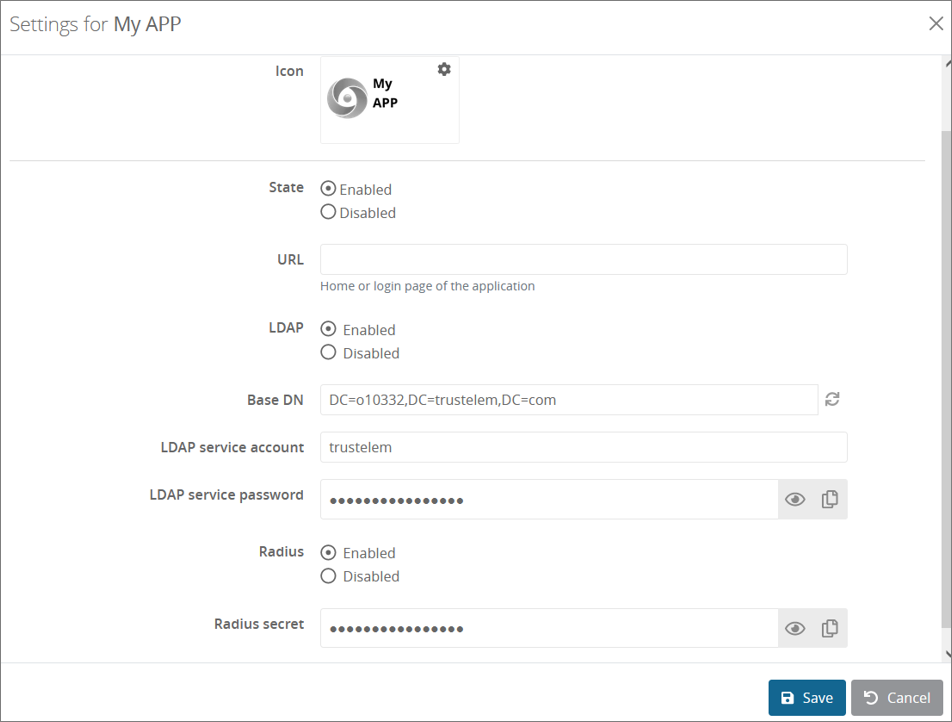
-
Go back to the previously configured service and click on Add an application +
-
Click on LDAP and/or Radius button(s) to enable the protocol, then enter the listen address and port
Notes:- the listen address can be localhost, all existing IP address on the machine = *, or a specific IP = ...
- this will open the defined udp (Radius) or tcp (LDAP) port on the machine running Trustelem Connect on the IP 127.0.0.1 (localhost) OR on all local IPs (*) OR on a specific local IP (...)
- if you have a dedicated VM for the connector, choose *
-
If you have setup Trustelem Connect to use LDAPS, then check LDAPS
-
Click on Save
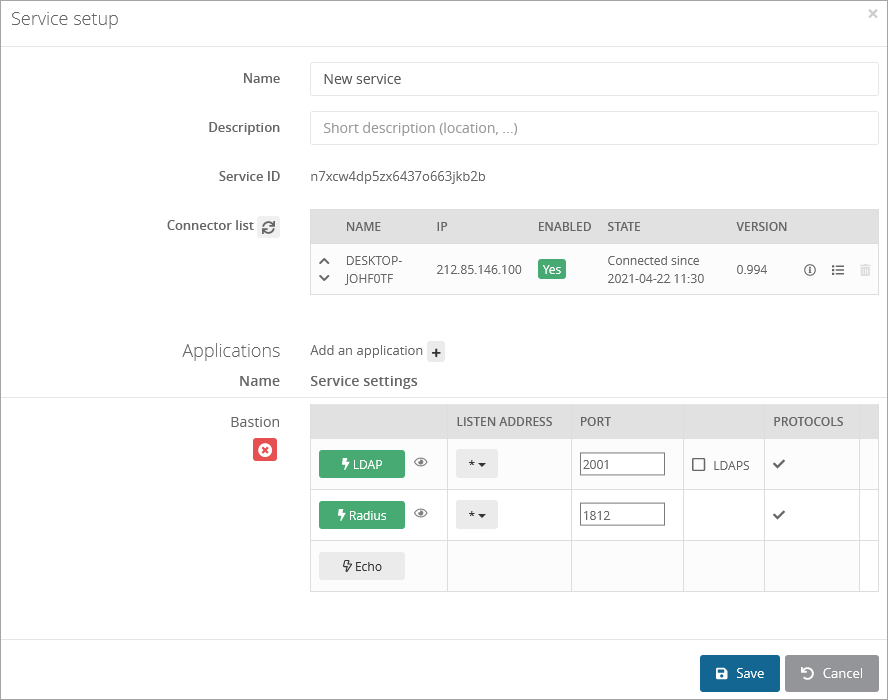
Trustelem is now ready to reply to applications sending requests to TrustelemConnect with the correct port and IP.
Of course, you need to create the access rules to defined which users can use the application
https://trustelem-doc.wallix.com/books/trustelem-administration/page/access-rules
On your your application setup:
Add a LDAP and/or Radius setup, based on the information provided by Trustelem:
- The IP / FQDN of the LDAP or Radius server is the IP / FQDN of the machine running Trustelem Connect
- The port is defined in the Services tab
- For a LDAP server
- The DN / user account / user account password are provided on the setup of the Trustelem application. These values can be modified but except for specific situations, there is no reason to change them.
- If you have to choose between an Active Directory server or a LDAP server, you should choose Active Directory. Trustelem tries to replicate how an Active Directory answers.
- A user CN looks like that:
CN=my_user,DC=my_trustelem_domain,DC=trustelem,DC=com
- A group CN looks like that:
CN=my_group,OU=Groups,DC=my_trustelem_domain,DC=trustelem,DC=com
- A Trustelem local user must have the login sets to mail
- A user synchronized from Active Directory can have the login sets to sAMAccountName, userPrincipalName or mail
- If you want to use MFA with push notification with LDAP had a sufficient timeout to let the time to users to validate the notification
- For a Radius server the secret is provided on the setup of the Trustelem application.
With the example used in the first chapter, the setup is:
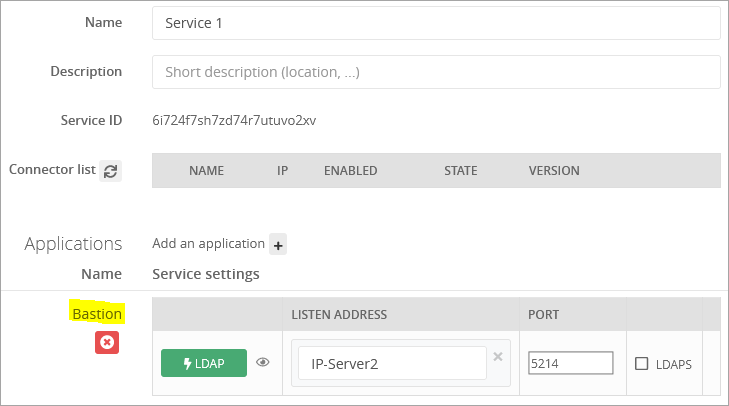
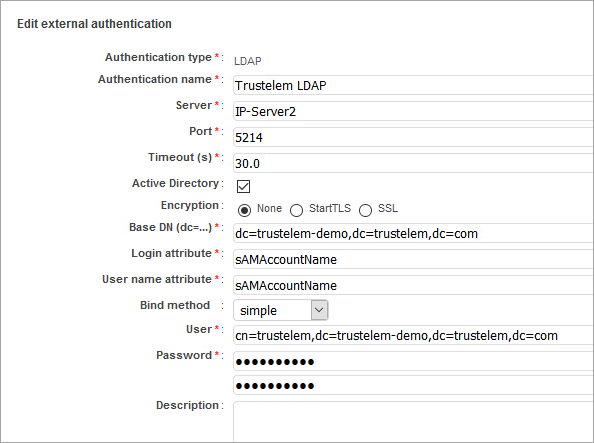
Debug
The connector doesn't appear in the setup page on the admin page
- ping admin.trustelem.com on the machine running the connector to verify the outgoing flows
- verify the synchronization ID
- verify the proxy setup
- if the VM is a Windows machine, verify that you clicked on Validate on Trustelem Connect program
The LDAP or Radius authentication is no working
- Go on your Trustelm Logs page and see if you have LDAP or Radius logs. If yes, the connector is working and you should know why the authentication failed:
- if the user is not found, is the login attribute correct?
- if the user doesn't have the permission for the app, is your access rule correct?
- if the user doesn't have a 2nd factor, is your enrollment process correct?
- If your application tries to do a LDAP search and doesn't have access rule (LDAP 1 or 2 factors), no users will be found but you will not see any logs because it is not a bug
- Go on your Service setup and verify if the listen address is correct (should be * if the VM is dedicated to Trustelem)
- On the same page, see the port defined and the setup information clicking on the eye button
- Verify the setup of the application: server IP, port, DN/account/password for LDAP, secret for Radius
- Verify if the flow from the app to the VM running the connector is opened. If you have a doubt, use Wireshark on Windows or tcpdump on Linux.
/!\ tcpdump displays the flow received, before applying local firewall rules. So if you are on Linux and see the requests, you should verify if there is a local firewall.
Loss of a second factor
The following procedure may be used when a user needs to access a protected application, but doesn't have his second authentication factor available:
-
The user may enter its login/password on
https://mydomain.trustelem.com. -
Instead of activating the usual second factor, he/she selects « Use an alternative method ».
-
The user may then ask a rescue code:
- He has to click on « Ask for a rescue code ».
- All administrators receive an email alerting that a rescue code is requested by a user.
- One of the admins has to click on « Rescue code » in the « Alerts » tab of the Trustelem admin dashboard.
- This code can be transmitted to the user, after having properly checked the user's identity.
- The user has 24h to use this one-time rescue code.
Multi factors authentication
Contents
- What is a Multi factors authentication?
- Existing 2nd factors on Trustelem
- Possible authentications depending on the protocols
- Setup
- Create an access-rules for MFA
What is a Multi factors authentication?
There are 3 kinds of authentication factors:
-
Something you know --> password, pin...
-
Something you possess --> smartphone, security key, certificate...
-
Something you are --> fingerprint, face, eye iris, voice...
A Multi factors authentication is the combination of 2 factors. Example: login + password + email one time password = MFA
BUT a strong authentication is the combination of 2 different kinds of factors.
The previous example is not a strong authentication
Example: login + password + mobile phone application one time password = strong authentication
Existing 2nd factors on Trustelem
Trustelem factors, used in addition to the password, are:
-
SMS: users receive a SMS with a code on their mobile phone - additional cost, not available by default
-
TOTP Authenticator: user can use any kind of Time based One Time Password (TOTP) which is a code provide:
- by an application (Google Authenticator, Microsoft Authenticator...)
- or a device (usually setup with NFC).
-
WALLIX Authenticator: the mobile (IOS/Android) and desktop application made by Trustelem; if the network is up the user receives a push notification, otherwise he can use a TOTP

-
Security key: user has to plug a fido key. The fido key can be for example: https://www.yubico.com/fr/works-with-yubikey/catalog/trustelem/
-
Email: a code is sent using an email address to be used a second factor. This is not a strong authentication, so it is disable by default
Notes:
-
The desktop version of WALLIX Authenticator can be downloaded in the Microsoft store only.
It uses a specific Microsoft protocol for push notification named WNS.
It can be necessary to open some flow for this protocol in the firewall.
The needed URLs can be found here https://learn.microsoft.com/fr-fr/windows/apps/design/shell/tiles-and-notifications/firewall-allowlist-config -
TOTP codes are calculated using a secret and the time of the device. If the time is incorrect, the code will not work.
Possible authentications depending on the protocols
Web logging - Admin page + SAML / OpenID Connect applications
The user provides his Trustelem login + password, then the 2nd factor.
If he has multiple 2nd factors, he can choose to use another one:
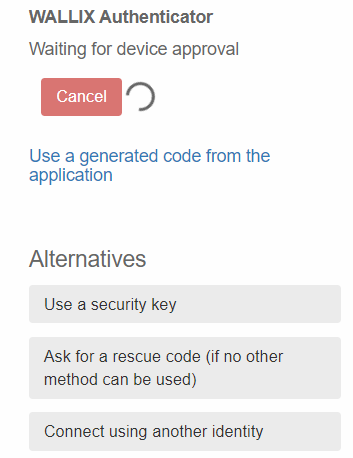
LDAP applications
The LDAP protocol is not designed to do MFA. But with Trustelem, there are 2 ways of doing it:
-
You can use push notifications with LDAP.
The user provides his Trustelem login + password in the application, then Trustelem sends a push notification and answer to the LDAP request after the notification validation.
To make it works, be sure to set a response time / timeout long enough on your application. -
You can use a code with LDAP (TOTP or OTP).
The user provides his Trustelem login, and in the same form the password and the code sticked together. -
You can't use security keys: the protocol can't read USB device.
Radius applications
Radius authentications have lot of possibilities:
- login + password + 2nd factor using Radius
The user provides his Trustelem login + password, then his 2nd factor - login + password using another protocol + 2nd factor using Radius
The user provides a login + password from another source, then Trustelem 2nd factor - login + password then no answer from Trustelem before the validation of a push notification
The user provides his Trustelem login + password then validate a push notification - login + password and the code sticked together
The user provides his Trustelem login + password and code sticked together - You can't use security keys: the protocol can't read USB device.
Setup
To setup the allowed factors, , go on Trustelem admin page, Security settings and Authentication factors
The first part, Manage authentication factors, has 2 parameters: Login, and User can reset token
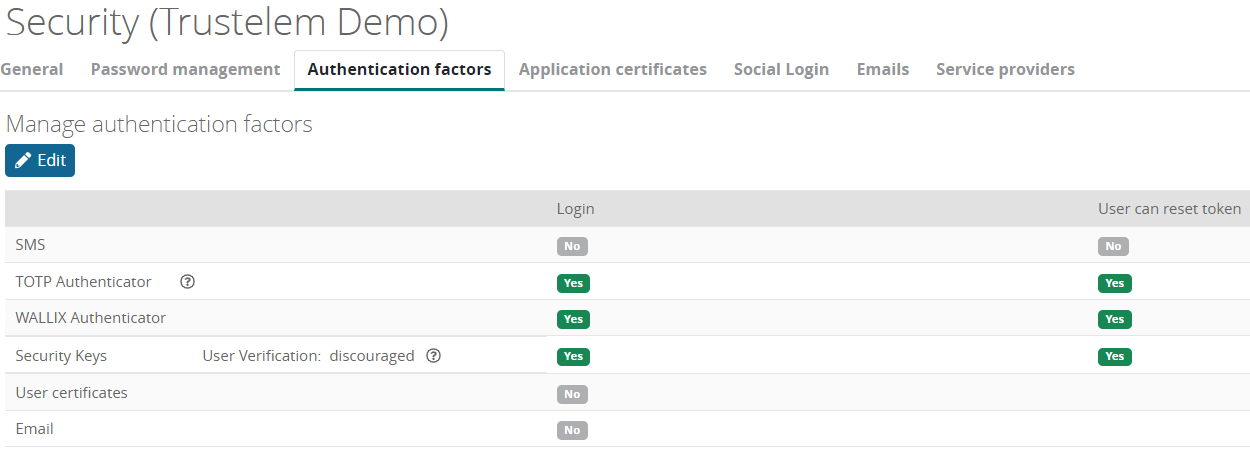
Login parameter
For a chosen factor, you can activate the option login for all users or for specific users.
When it's done:
- Users can use the selected factor for a multi factors authentication.
- An administrator can do a manual enrollment for users.
User can reset token parameter
For a chosen factor, you can activate the option User can reset token for all users or for specific users.
When it's done, the defined users can use their dashboard to reset this factor:
https://mydomain.trustelem.com/#security
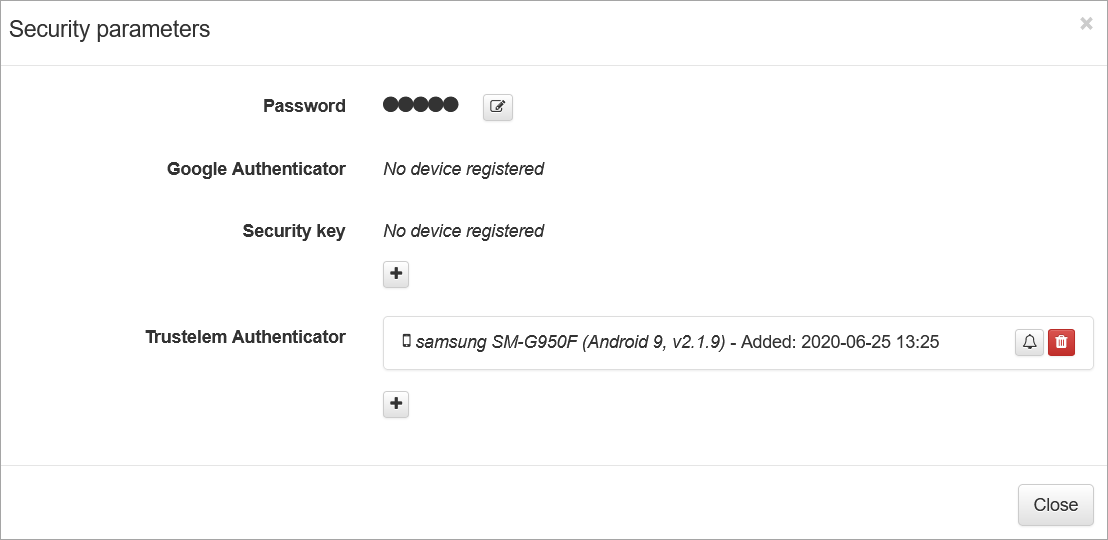
When you have enabled the chosen factors, you can start the enrollment.
Manual enrollment using dashboard
This has to be done by a Trustelem administrator

Manual enrollment using email
This has to be done by a Trustelem administrator. You can send the enrollment link to Trustelem Primary Email or choose another one.
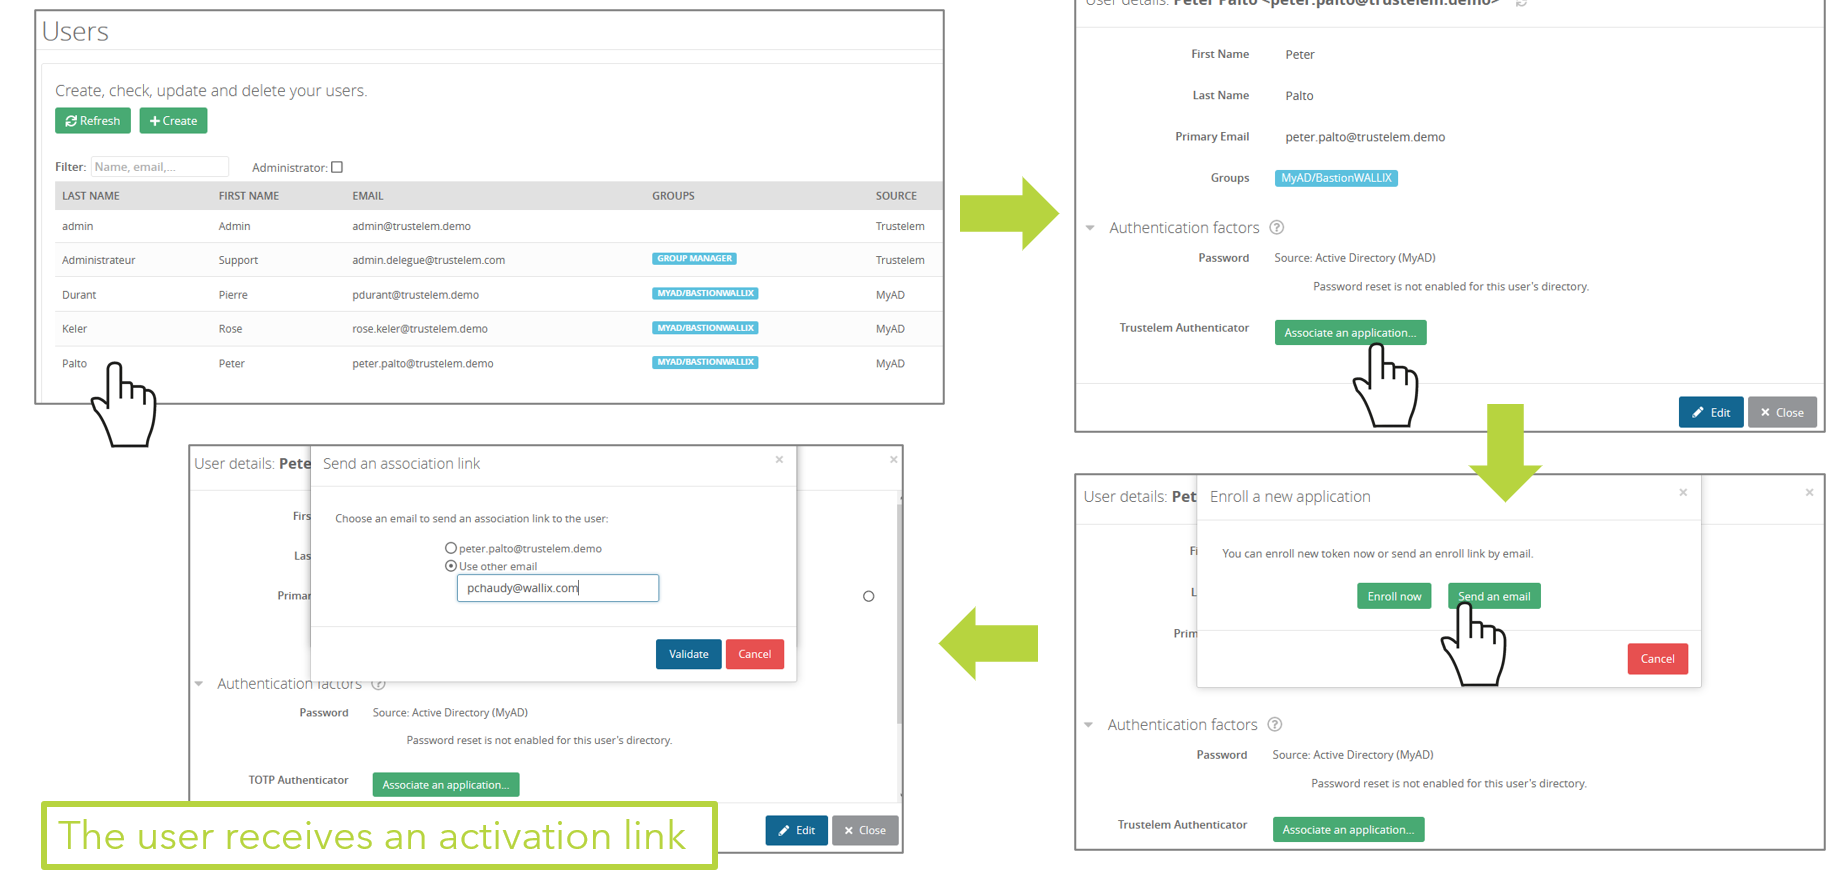
Enrollment campaign
- The enrollment can be using campaigns.
- Users in the selected groups will be involved in the enrollment process only if they don't already have a 2nd factor.
- If you select multiple factors, users will have a selector to enroll only one of them.
- if you enable Automatic enroll by email emails with the enrollment link are sent automatically. If you don't, you have buttons to do it manually.
- If you enable the Automatic enroll during login, every time users authenticate on Trustelem login page, they will have a window asking them to enroll a new factor.
They can skip the enrollment, but the window will continue to appear after the next authentications until they do the enrollment.
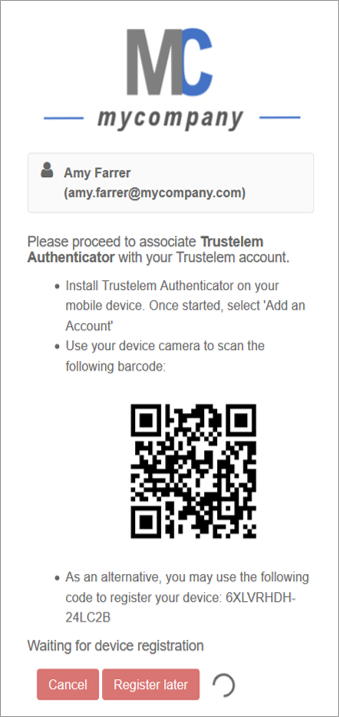
Create an access-rules for MFA
If you already have users and applications, you can now create access-rules in order to force multi factors authentication.
You can find the detail using the URL: access rules
On-premise SIEM
How to send Trustelem logs to an on-premise SIEM?
Here we'll explain how to connect Trustelem to a SIEM or an agent capable of receiving logs and hosted in your infrastructure.
To begin with, it's important to know that Trustelem sends new events every 30s, and has a queuing system if an error is detected during transmission.
Now, how to do the setup?
1/ Install Trustelem Connect.
More information is available here:
LDAP-Radius - Trustelem Connect
For this usecase, you don't need to add any applications to the Trustelem Service, just a connector capable of joining your infra.
You can use an existing Trustelem
2/ Add or edit the config.ini file.
In the folder where Trustelem Connect service is installed, edit or create the config.ini file.
Add the following lines:
outgoing_allowed = "true"
[targert.choose_a_name]
addr = "The IP/FQDN of your SIEM"
port = "The port of your SIEM"
Don't forget to change the name, the IP/FQDN, and the port!
3/ Restart Trustelem AD Connect
4/ On the Trustelem Service enable the logs sending
- Under Send logs, choose the date from which you’ll get the logs.
- Click Add send logs tasks
- Click enabled
- Under Target name, enter the name choose on the config.ini file
- Under format, choose JSON (strongly recommended, as Trustelem logs are not properly designed for syslog)
- Under types of logs to send, choose ALL or a specific type of logs
- Click Save
Debug
Linux
- Use the command
nc -l -k VM_IP available_portto build a server able to receive and display the logs
For instance: nc -l -k 10.10.126.203 6812 - Provide the IP and the Port on the config.ini file and restart Trustelem Connect service
- Verify if Trustelem is sending the logs
Windows
- Download Nmap and install it with ncat checked
- Using Powershell, go on the Nmap folder
cd C:\Program Files (x86)\Nmap\ - Use the command
.\ncat.exe -l -k --allow VM_IP available_portto build a server able to receive and display the logs
For instance: .\ncat.exe -l -k --allow 10.10.126.232 6812 - Provide the IP and the Port on the config.ini file and restart Trustelem Connect service
- Verify if Trustelem is sending the logs
Regular expressions
Some fields on the Trustelem administration pages allow the usage of regular expressions.
-
In redirect_uri, for indicating multiple possible values
For example, the following code allows a URL with an optional port number and trailing:
regexp+http://localhost(:(\d)+)?/ -
In the applications scripts, for modifying the returned attributes
For example, the following code changes the domain name in email addresses:
return user.email.replace(/([^@])@./, '$1@mondomaine.io');
Self-Service-Password-Reset
The feature Self-Service-Password-Reset (or SSPR) allows Trustelem users to reset a lost password, even if they are from Active Directory.
The goal is to reduce the administrative workload by giving users autonomy.
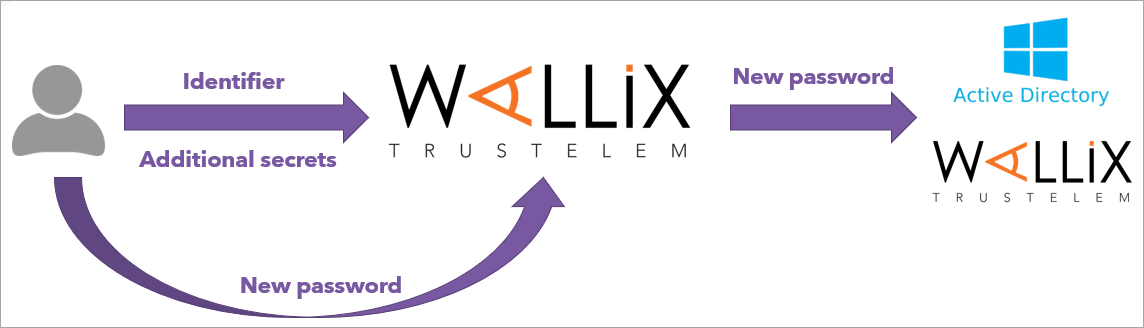
-
A user provides his login and additional secrets on
https://mydomain.trustelem.com/forgot. -
Then he can define a new password.
-
This new password is saved on Trustelem or sent to Active Directory.
The setup is done in the Security settings tab, then Password management:
https://admin-mydomain.trustelem.com/app#/security/passwords/edit --> Self-service password reset for users
When the feature is activated the administrator can select the number of required factors then select which factors will be required.
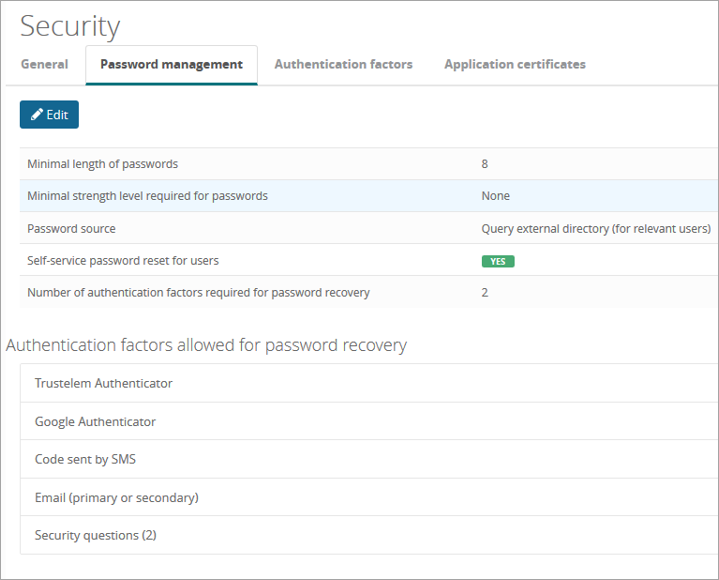
Notes:
-
In order to use a second factor for SSPR, it has to be activated and enrolled first.
See: https://doc-trustelem.wallix.com/administration/mfa/ -
If users have a password stored by Trustelem there is no need for more configuration.
-
When the password used is not stored by Trustelem (users from AD or Azure AD), a special configuration has to be done in order to give Trustelem the needed rights.
Self-Service password Reset for Active Directory
If you want to activate the SSPR service for Active Directory, you should already have a directory setup with an AD Connect installed.
See: Active Directory synchronization
First, you have to go on your Trustelem directory setting page and activate the feature Password recovery.
Then SSPR service requires the Trustelem connector service account to be granted with privilege delegation for user's password reset.
- Open the Active Directory Users and Groups panel and right-click on target domain. Then select item Delegate Control...

- In the delegation wizard, click on Next, then click on Add.... Click on Next

- Choose the service account executing Trustelem AD Connect. Click on Next
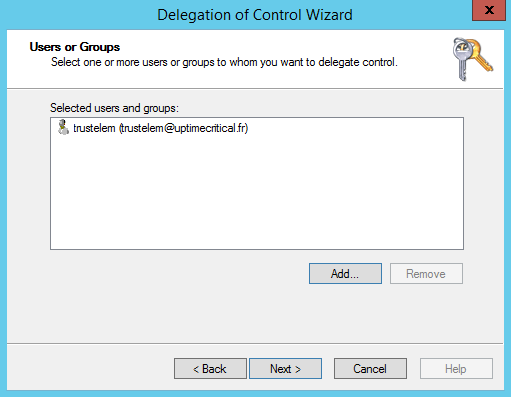
- Select the following permission to delegate: Reset user password and force password change at next logon. Click on Next
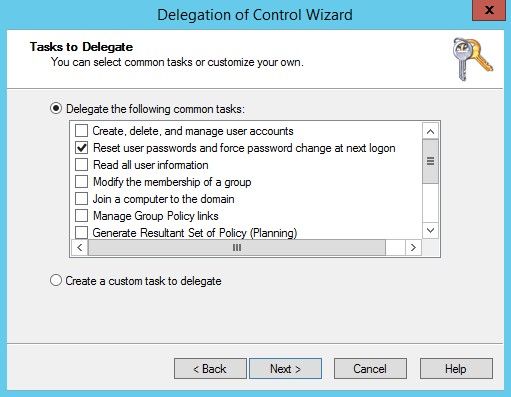
- Check summary and click on Finish
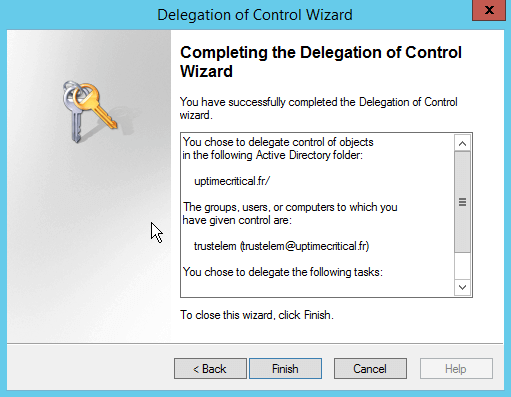
Self-Service password Reset for Azure Active Directory
If you want to activate the SSPR service for Azure Active Directory, you should already have a directory setup with Trustelem.
Note: Azure Active Directory passwords can only be used and reset by Trustelem if Office 365 is not federated.
First, you have to go on your Trustelem directory setting page and activate the feature Password recovery.
Then start PowerShell and execute the following script, with the correct value for the CLIENT ID of your Trustelem app on Azure AD:
Install-Module AzureAD
Connect-AzureAD
$app = Get-AzureADServicePrincipal -filter "AppId eq 'CLIENT ID'"
$role = Get-AzureADDirectoryRole | Where-Object { $_.DisplayName -eq "Helpdesk Administrator" }
Add-AzureADDirectoryRoleMember -ObjectId $role.ObjectId -RefObjectId $app.ObjectId
$role = Get-AzureADDirectoryRole | Where-Object { $_.DisplayName -eq "Directory Writers" }
Add-AzureADDirectoryRoleMember -ObjectId $role.ObjectId -RefObjectId $app.ObjectId
Trustelem local users
Contents
What Trustelem local users are?
- Trustelem local users should be used when the accounts are not stored in corporate directories
- They should also be used for administration purposes, to have at least one backup admin account.
- They can be managed with Trustelem administration console, with the Delegated administration tool, or with API
- Their attributes are fully editable
- Their passwords are stored by Trustelem
- The email address (Primary Email) is unique: 2 accounts can't have the same.
- As it is not possible to have 2 identical email address (Primary Email). If later you synchronize a directory user with the same Primary Email the 2 accounts will be merged and the local account will disappear.
-
The email address (Primary Email) will be the login of this account.
--> This account doesn't have a sAMAccountName.
Creation
- Go on the tabs Users
- Click on + Create
- Provide the First Name, Last Name, and Primary Email
- If the account will be a Trustelem admin, check Administration rights
- Optionally, select an Expiration date for the account
- Optionally, affect the wanted Groups to the user
- Optionally, provide the Contact information : it will not be use by the service. This information is only for you.
- Optionally, define some Attributes for the user. Those attributes can be sent to applications, or used by the Delegated administration tool.
- Select the Account Activation method:
- Temporary password: you will have a temporary password in the tab Alerts and it has to be communicated to the user manually.
- Link by e-mail: an activation link will be sent to the Primary Email
Management
By clicking on the user, you can:
- Generate a reset code for the password if a user lost it
- Send an email to the Primary Email to reset the password
- Send an email to another email address to reset the password
- Register 2nd factor with the user
- Send an enrolment link for the 2nd factor to the Primary Email
- Send an enrolment link for the 2nd factor to another email address
- Delete a 2nd factor
- Change information and attributes
Temporary users
As said before, an administrator can define an expiration date for a user account:
- using the administration page

- using the API (create or update user - accountExpiration)
updateUser(args: {
id: UserID;
firstName?: string;
lastName?: string;
email?: string;
email2?: string;
isAdmin?: boolean;
suspended?: boolean;
accountExpiration?: Date | number | string | null //Expiration parameter
groups?: GroupID[];
}): { error?: string; };
When the date is reached, the account has a status Expired and the user can't authenticate on Trustelem anymore.
Trustelem password levels
Trustelem password levels
Trustelem passwords have 3 security levels : None - Medium - High
Trustelem uses a security framework, zxcvbn (https://github.com/dropbox/zxcvbn) developed by Dropbox, which evaluates password strength according to current best practices and dictionaries.
Basically, zxcvbn looks for patterns in the password, and searches for these patterns in current pattern/password dictionaries. We also add our own dictionary, which contains account information (login, domain, orga...). Based on this, it will define a security score.
Our Medium level = zxcvbn score of 3 (safely unguessable: moderate protection from offline slow-hash scenario.)
Our High level = zxcvbn score of 4 (very unguessable: strong protection from offline slow-hash scenario)
To this framework, we add the length defined on Trustelem.
Why is it secure ?
There are no explicit criteria such as "X capitals, Y special characters...", but rather a live calculation of password strength based on a constantly updated dictionary. This is much more secure.
Password creation requirements are generally the same on most websites. Hackers therefore know what patterns to look for, such as replacing letters with symbols (@ for a, for example). Traditional password security requirements would accept "P@ssw0rdSecure" as a password, even if it is not secure at all.
On Trustelem, administrators can easily enforce password requirements, as the feature enables employees to create secure passwords with ease. Companies can therefore ensure that their employees adopt better password habits, without disrupting their working day or the company.
SCIM Client
Contents
- How does it work?
- Prerequisites
- Setup Trustelem Connect on a Windows machine
- Setup Trustelem Connect on a Linux machine
- Declare the SCIM server as a connector target
- Setup an application to provision through SCIM
- Force a synchronization
- Debug
How does it work?
The goal is to use the Trustelem to provision users and groups into an application that exposes a SCIM 2.0 API. The connector is what lets Trustelem reach a SCIM server that is only accessible from the customer's private network, but it can just as well forward to a SCIM server reachable from outside the network.
To do so, a connector, Trustelem Connect, is installed on a local customer server. Unlike the LDAP / Radius use case where Trustelem Connect receives requests, here Trustelem is the SCIM client: it builds the provisioning requests and Trustelem Connect forwards them to the SCIM server (typically one that lives on the private network, but any reachable SCIM server works).
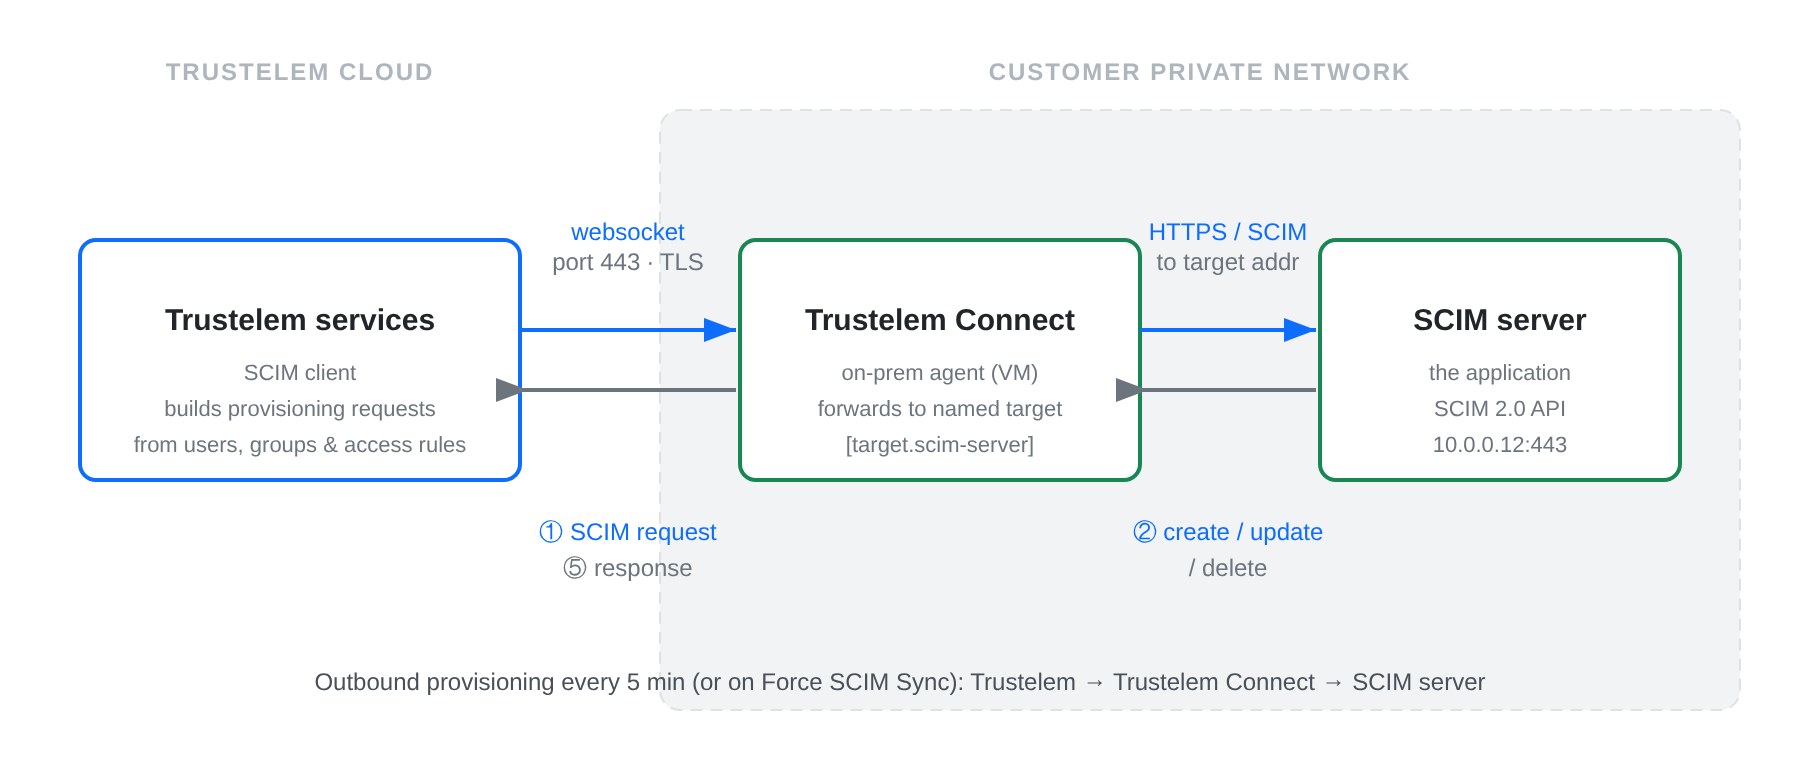
1/ During the setup, Trustelem Connect opens a websocket to Trustelem services using port 443.
Note: with the websocket, information is encrypted by TLS protocol and with an additional symmetric encryption.
On the local machine, Trustelem Connect is also configured with one or more targets. A target is a named destination (a host:port) that the agent is allowed to dial — here, your SCIM server.
For instance, I made the setup of Trustelem Connect and declared a target named scim-server pointing at 10.0.0.12:443
2/ On a regular schedule (every 5 minutes), or when an administrator clicks Force SCIM Sync, Trustelem computes the users and groups that should exist on the application, based on its access rules, and prepares the corresponding SCIM requests (create / update / delete).
3/ Trustelem sends each SCIM request to Trustelem Connect through the websocket, naming the target to use.
4/ Trustelem Connect opens the connection to the SCIM server (in TLS if the base URL is https://) and forwards the request to the address configured for that target.
Note: the generic agent only dials targets it has been explicitly configured with, so a request to an undeclared target is refused — it will never dial an arbitrary address.
5/ Trustelem Connect forwards the SCIM server's answer back to Trustelem through the websocket, and Trustelem records the result of the synchronization.
With the previous example:
- If a user gains a SCIM access-rule for the application, Trustelem creates (or updates) the user on the SCIM server.
- If a user loses the access-rule, Trustelem deletes (or deactivates) the user on the SCIM server.
Prerequisites
- Prepare a VM, Windows Server or Linux, with minimal resources for the OS
- If you already have a VM for Trustelem ADConnect or for a LDAP / Radius connector, you can use the same
- If you have only one VM which is down, the provisioning is down too..
- The recommendation is 2 VM at least, to have a failover system
- Download Trustelem Connect on the VM (.exe or .tgz depending of the OS)
- https://dl.trustelem.com/connect/
- the download buttons (Windows / Linux) are also available directly on the service page in your administration interface
- The flow from the VM to the SCIM server should be opened for the IP / port the SCIM API listens on
- usually tcp port 443 (https) or 8080
- The flow from the VM to the Trustelem production servers and relay (https://admin.trustelem.com) should be opened, on tcp port 443, towards the following IPs:
- Current production servers: 185.4.44.22, 185.4.46.20, 185.4.46.21, 185.4.46.22
- New production servers (replacement): 185.4.44.114, 185.4.44.117
- Relay endpoints: 98.66.169.89 (relay-fr-01.wallix.com), 20.39.241.157 (relay-fr-02.wallix.com)
- The SCIM credentials of the application (a bearer token, or a username / password for Basic authentication) and the base URL of its SCIM API
Setup TrustelemConnect on a Windows machine
In your Trustelem administration page:
-
Go to the Services tab.
-
Click on the button + Create a service and copy the service ID.
On your server:
- Start the setup (Trustelem Connect.exe), and paste your service ID.
- If you have a proxy, complete the field HTTP Proxy with the value:
https://username:password@proxy_IP:proxy_port - Click on Validate the Configuration
- Start the service.
In your Trustelem administration page
-
Refresh your Services page.
-
Turn on the service by clicking on No.
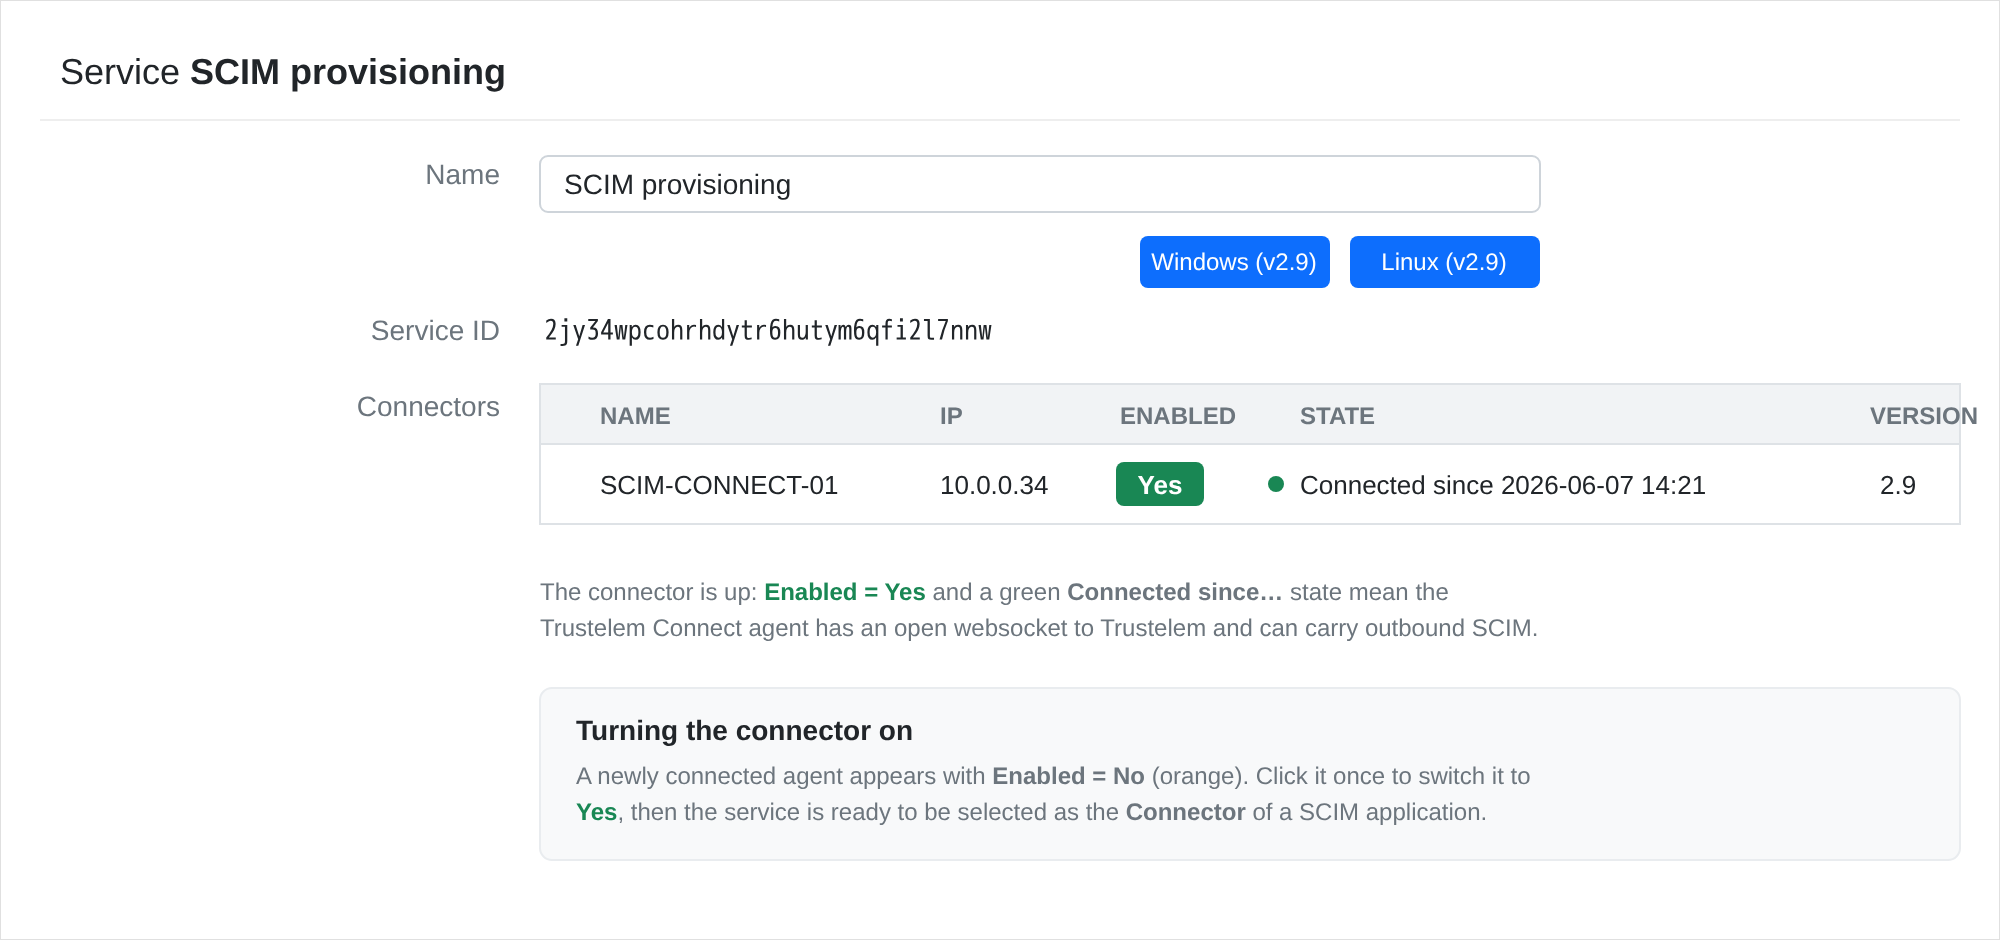
You now have a functional connector.
Setup Trustelem Connect on a Linux machine
In your Trustelem administration page:
-
Go to the Services tab.
-
Click on the button + Create a service and copy the service ID.
On your server:
- Install the connector as a service with the setup.sh script launch with root privilege.
- To complete the configuration, edit /opt/wallix/trustelem-connect/config.ini file containing the synchronization id.
- A sample minimal config.ini would be:
service_id = 2jy34wpcohrhdytr6hutym6qfi2l7nnw
state_dir = run/
# if there is a proxy
proxy = https://username:password@proxy_IP:proxy_port
- The run folder must have read write rights for the trustelem user.
- After that, you can start the service with: systemctl start trustelem-connect.service
- The service will run with the user trustelem
In your Trustelem administration page
-
Refresh your Services page.
-
Turn on the service by clicking on No.

You now have a functional connector.
Declare the SCIM server as a connector target
Outbound SCIM never dials the remote directly: Trustelem Connect forwards the request to a named target. You declare that target on the machine running the connector with the set-target command, then you reference it by name in the application setup.
On your server, from the Trustelem Connect folder:
connect set-target <name> <host:port>
With the previous example:
connect set-target scim-server 10.0.0.12:443
- <name> is a free label — you will type the exact same value in the application setup (field Connector target name).
- <host:port> is the address of the SCIM server as seen from the connector machine.
- The command writes a
[target.<name>]section in config.ini and enables outgoing connections; on Linux you can also edit config.ini directly:
outgoing_allowed = "true"
[target.scim-server]
addr = 10.0.0.12:443
- Useful options:
-
-always-tls/-no-tlsto force or disable TLS regardless of the base URL scheme -
-insecure-allow-skip-tls-checkto accept a self-signed certificate (must be combined with Skip TLS certificate check in the application setup) -
-overrideto clear an existing target before re-applying it
-
- Restart the service so the new target is advertised to Trustelem.
Setup an application to provision through SCIM
On your Trustelem administration page:
-
Go to the Apps tab.
-
Either open an existing application to add SCIM provisioning to it, or click on + Add an application to create a new one.
-
If you create a new application, choose either a pre-integrated application or a generic model depending on your need.
-
Turn on SCIM, then fill the SCIM section:
- Base Url for SCIM provisioning: the base URL of the application's SCIM 2.0 API (e.g.
https://scim.myapp.local/v2
). Its scheme decides whether the connector opens the connection in TLS. - Authentication Mode: Bearer Token or Basic
- For Bearer Token: paste the token in the Bearer Token field (the
Bearerprefix is added automatically if you omit it). - For Basic: fill Username and Password.
- Connector: select the service you created and turned on above. The outbound SCIM traffic is tunnelled through this connector.
- Connector target name: type the exact <name> you used with
connect set-target(e.g. scim-server). - Skip TLS certificate check: leave disabled unless the SCIM server uses a self-signed certificate. It only takes effect if the connector target was also declared with
-insecure-allow-skip-tls-check.
- Click on Save.
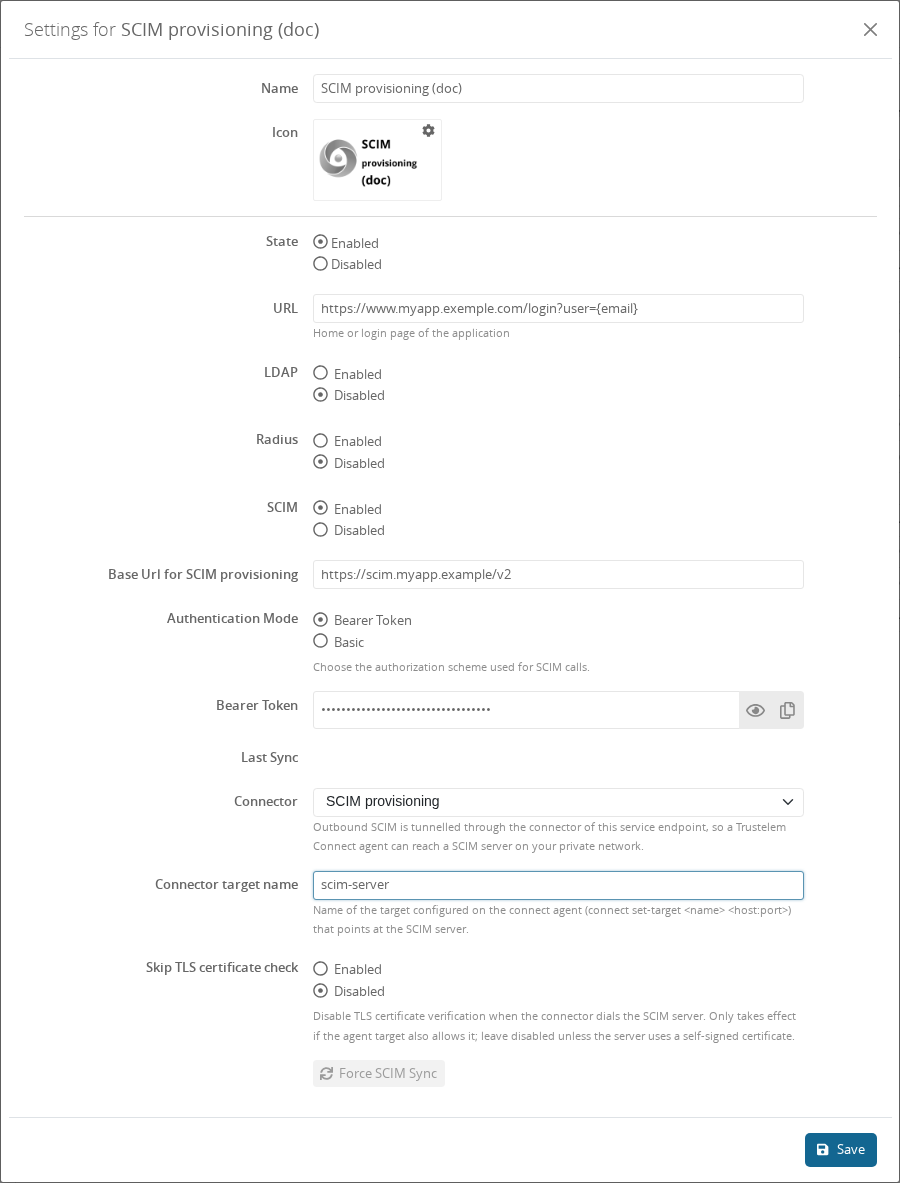
Of course, you need to create the access rules to define which users will be provisioned to the application
https://trustelem-doc.wallix.com/books/trustelem-administration/page/access-rules
Trustelem is now ready to provision users and groups to the application through Trustelem Connect.
Force a synchronization
By default, Trustelem pushes the SCIM updates every 5 minutes. To apply your configuration immediately:
- Open the application, in the SCIM section click on Force SCIM Sync.
- A full synchronization runs: Trustelem lists the resources already present on the SCIM server, reconciles them with the users and groups granted by the access rules, and applies the create / update / delete operations.
- The result is reported in the Last Sync field and, in case of error, as a message describing the most actionable cause (authentication failure, endpoint not found, no connector available, network error…).
Debug
The connector doesn't appear in the setup page on the admin page
- ping admin.trustelem.com on the machine running the connector to verify the outgoing flows
- verify the synchronization ID (service ID)
- verify the proxy setup
- if the VM is a Windows machine, verify that you clicked on Validate on Trustelem Connect program
The SCIM synchronization is not working
- Read the Last Sync message and your Trustelem Logs page:
-
no connector available → the service is not turned on, no agent is connected, or the connector does not advertise the configured target. Verify the service is On, that an agent is Connected, and that the Connector target name matches a
connect set-targetdeclared on the agent. - authentication failed (401) / forbidden (403) → check the Authentication Mode and the bearer token or username / password.
-
endpoint not found (404) → check the Base Url for SCIM provisioning (path and version, e.g.
/v2). -
network error → the connector cannot reach the SCIM server: check the target
host:port, the flow from the connector VM to the SCIM server, and the TLS settings.
-
no connector available → the service is not turned on, no agent is connected, or the connector does not advertise the configured target. Verify the service is On, that an agent is Connected, and that the Connector target name matches a
- If the SCIM server uses a self-signed certificate, declare the target with
-insecure-allow-skip-tls-checkand enable Skip TLS certificate check in the application; otherwise the TLS handshake fails. - Verify if the flow from the connector VM to the SCIM server is opened. If you have a doubt, use Wireshark on Windows or tcpdump on Linux on the connector machine.
/!\ tcpdump displays the flow received, before applying local firewall rules. So if you are on Linux and see the requests, you should verify if there is a local firewall.